Build a secure web application with Platformatic, Auth0 and Next.js
Introduction
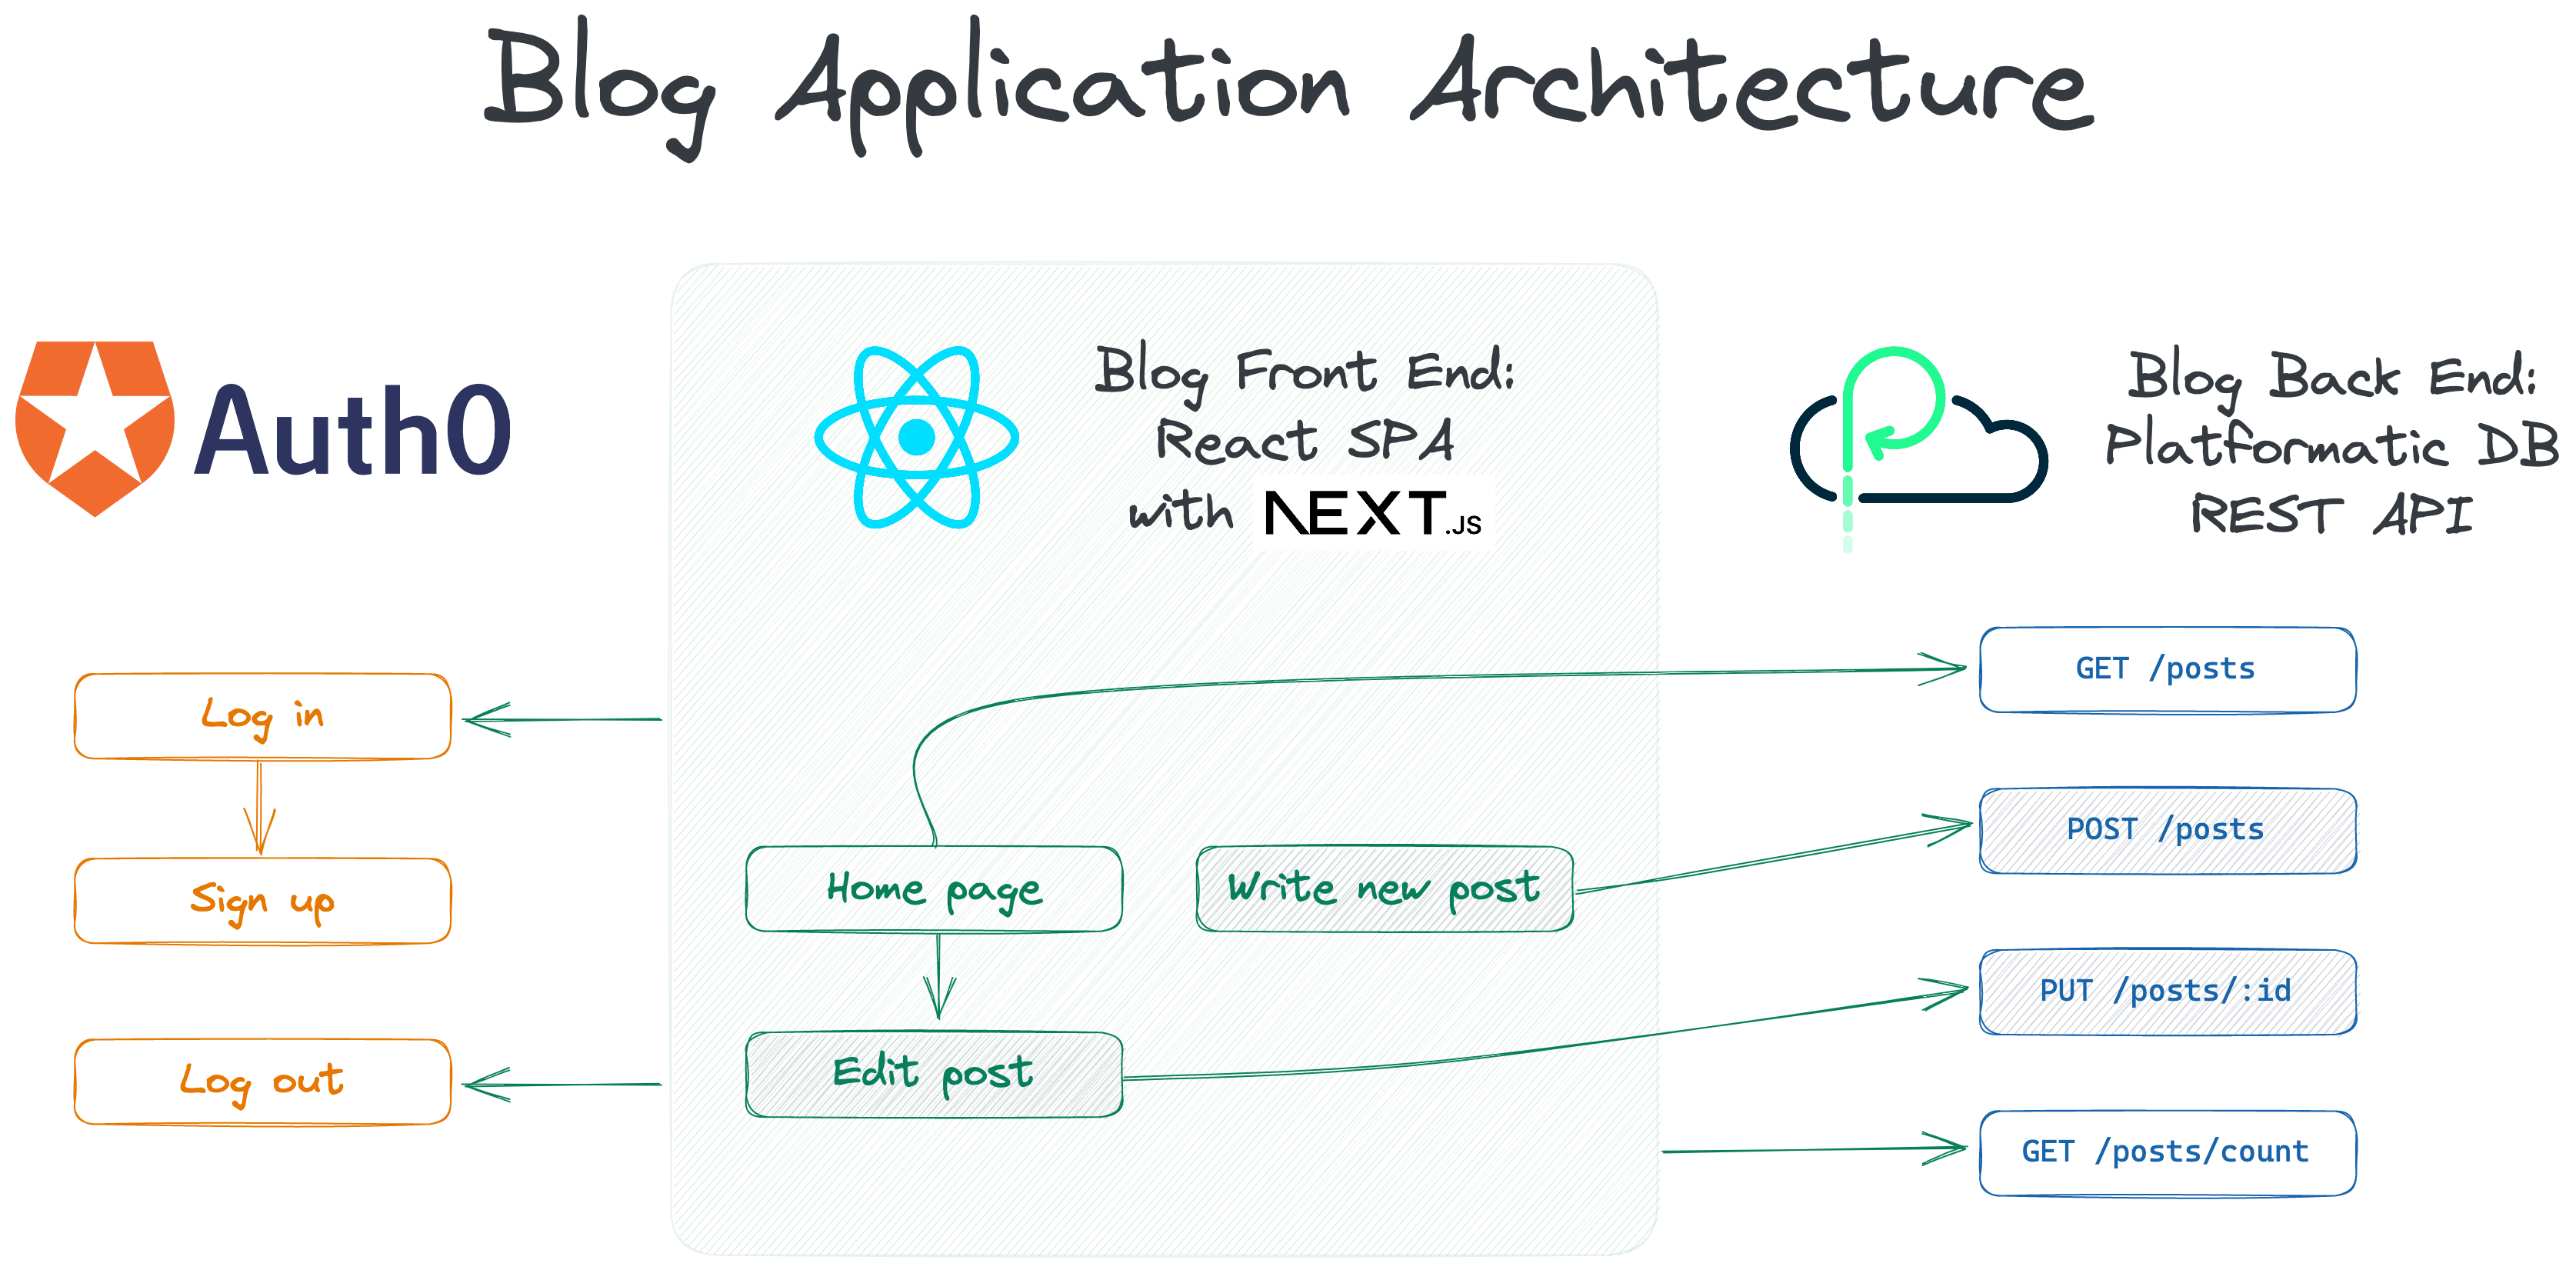
Platformatic DB provides role-based support for authorization. This allows us to restrict access to specific parts of the automatic APIs that Platformatic DB generates for us. We can then integrate an external service like Auth0 to provide authentication functionality, giving us a complete solution for user management and access control.
This tutorial can be followed step-by-step to create a full stack blog application with Platformatic, Auth0 and Next.js, or you can dive in and grab what you need to help you integrate Auth0 and Platformatic DB.
In this tutorial we'll learn how to:
- Set up an application on Auth0
- Add user metadata to JSON Web Tokens (JWTs) on Auth0
- Create a Platformatic DB app and configure authorization
- Create a Next.js app that integrates with Auth0 and our Platformatic app's REST API
To follow along, you'll need:
- Some experience building basic APIs with Node.js.
- To sign up for an Auth0 account — they have a generous free plan.
- Node.js >= v18.8.0
- A code editor, for example Visual Studio Code.
The complete code for this tutorial is available on GitHub.
You can learn about how JSON Web Tokens work in the guide Introduction to JSON Web Tokens. There's also a JWT debugger available at jwt.io where you can paste in a JWT — it will decode it for you so you can see the data that it contains.
Set up on Auth0
Once we've created an account on Auth0, there are three things we need to do:
- Create an application
- Create an API
- Add user metadata to access tokens
But first, let's learn a little about authentication methods on Auth0.
Authentication methods

If we head to the Authentication section of our account we can see that the following authentication methods have been automatically set up for us:
- Database: Username-Password-Authentication
- Social: Google / Gmail (using Auth0 Dev Keys)
If we want to allow our users to log in with their accounts for other services, for example GitHub or Twitter, we can head over to the Social page and click the Create Connection button to add a new connection. For this tutorial though, we can stick with the default authentication methods.
Create an application

To create a new Auth0 application, we need to head to Applications > Applications in the sidebar of our Auth0 account, then click on the Create Application button.

Let's set our application's Name to Blog app and select Single Page Web Applications as the application type, then we can go ahead and click the Create button.
Now that our Auth0 application's been created, there are a few things that we need to configure under the Settings tab.

Under the Application URIs section we need to add the following URLs:
- Allowed Callback URLs:
http://localhost:3000 - Allowed Logout URLs:
http://localhost:3000 - Allowed Web Origins:
http://localhost:3000
Then we can scroll down and click the Save Changes button.
Finally, let's scroll up to the Basic Information section at the top of the page and note down the Domain and Client ID values, as we'll need to use them later when building our blog API and front end.
Create an API
Later in this tutorial we'll be building a blog API with Platformatic DB. We'll want to make requests to that API that include JSON Web Tokens (JWTs) that have been generated by Auth0. We can define an API in Auth0 that will allow us to do this.
Let's head to Applications > APIs in the sidebar of our Auth0 account and then click on the Create API button.

Then we can enter the following settings for our API:
- Name:
Blog API - Identifier:
https://blog-api.dev(this URL doesn't need to exist)
And click on the Create button to create the API.
Add user metadata to access tokens
We want to add user metadata — such as the user's role and username — to the access token that is issued by Auth0 after a user has logged in. This access token is a JWT that we'll then be able to read the user metadata from in our Platformatic app. We'll add the user metadata to the access token as custom claims.
To add custom claims to our JWTs, let's head over to Actions > Library in the sidebar. Then we can click on the Build Custom button.

Let's enter the following settings for our new action:
- Name: Add custom claims to access tokens
- Trigger: Select 'Login / Post Login'
- Runtime: Select the 'Recommended' version
Then we can click the Create button.
Once the action has been created, we can replace the code in the editor with the following code:
/**
* Handler that will be called during the execution of a PostLogin flow.
*
* @param {Event} event - Details about the user and the context in which they are logging in.
* @param {PostLoginAPI} api - Interface whose methods can be used to change the behavior of the login.
*/
exports.onExecutePostLogin = async (event, api) => {
  const namespace = 'https://blog-api.dev';

  api.accessToken.setCustomClaim(`${namespace}/X-PLATFORMATIC-ROLE`, 'author');
  api.accessToken.setCustomClaim(`${namespace}/X-PLATFORMATIC-USER-ID`, event.user.user_id);
  api.accessToken.setCustomClaim(`${namespace}/X-PLATFORMATIC-USER-NAME`, event.user.nickname);
};
In the code above, the namespace in the custom claims is required by Auth0. As with the Identifier for our Auth0 API, the URL we're using for the custom claims namespace doesn't need to exist.
You can learn more about creating custom claims in the Auth0 documentation.

We can test the action by clicking the "play" button on the left hand side of the code editor, and then clicking the Run button. The Test Results will show us an example of the custom claims that will be added to our access tokens.
Once we're happy that our action is working as expected, we can click on the Deploy button.
To use our new action, we need to configure the Login Flow. Let's head to Actions > Flows in the sidebar and then click on the Login flow.

Under Add Action on the right-hand side let's click on the Custom tab, and we'll then see our Add custom claims to access tokens action. Let's click on it and drag it into the middle of the flow between Start and Complete. Now we can click the Apply button to save our changes.
We've now configured everything in Auth0, so it's time to go ahead and create our blog API and front end applications.
Create a project directory
We'll be creating two applications, so let's create a directory to store them in:
mkdir blog-app
And then change into that directory:
cd blog-app
Create a Platformatic DB app
Now we're going to create a Platformatic DB app. Let's run the Platformatic creator wizard in our terminal:
npm create platformatic@latest
And then we can give these responses to set up our new project:
? Which kind of project do you want to create? DB
? Where would you like to create your project? blog-api
? Do you want to create default migrations? yes
? Do you want to create a plugin? yes
? Do you want to use TypeScript? no
? Do you want to run npm install? yes
? Do you want to apply migrations? no
? Do you want to generate types? yes
? Do you want to create the github action to deploy this application to Platformatic Cloud dynamic workspace? no
? Do you want to create the github action to deploy this application to Platformatic Cloud static workspace? no
Once the creator wizard has created our project, let's change directory in our terminal:
cd blog-api
Create the database schema
We're going to create a database migration. It will define the schema for our posts database table, which we can then use to store our blog posts.
First let's remove the default migrations that were generated for us:
rm migrations/*.sql
Then let's create a new migration by running this command:
npx platformatic db migrations create
This has created two new empty files for us:
migrations/001.do.sql— Where we'll define the schema for ourpoststable.migrations/001.undo.sql— Where we'll put SQL to remove thepoststable, in case we ever want to roll back the migration after it's been applied.
Now let's open up migrations/001.do.sql in our code editor and add the following SQL:
# migrations/001.do.sql

CREATE TABLE posts (
  id INTEGER PRIMARY KEY,
  title VARCHAR(255) NOT NULL,
  body TEXT NOT NULL,
  author_user_id VARCHAR(255),
  author_name VARCHAR(255),
  created_at DATETIME DEFAULT CURRENT_TIMESTAMP,
  updated_at DATETIME DEFAULT CURRENT_TIMESTAMP
);
Then let's open migrations/001.undo.sql and add SQL for removing the posts table:
# migrations/001.undo.sql

DROP TABLE posts;
Now we can apply the migration with this command:
npx platformatic db migrations apply
Once the migration has been applied, let's start up our Platformatic app server:
npm start
We can leave this command running while we build our app and the server will automatically be restarted whenever we make changes.
View the REST API documentation
Now that our server is up and running, we can take a look at the REST API that Platformatic DB has automatically generated for us.
If we open up http://127.0.0.1:3042/documentation/ in our browser, we'll see the built-in Swagger UI:

The Swagger UI provides interactive documentation for our Platformatic app's REST API. It shows all of the available REST API endpoints, along with the parameters they accept and example responses. We can even use it to make requests to our API.
We'll be calling some of these REST API endpoints when we build the front end application for our blog.
Configure CORS
The origin for our blog API is http://127.0.0.1:3042 and when we build our front end, its origin will be http://localhost:3000. To allow our front end to read the responses from our API, we need to enable Cross-Origin Resource Sharing (CORS) in our Platformatic app.
If you're not familiar with CORS, you can learn more about it in this MDN guide.
To configure CORS for our API, let's start by adding a CORS origin setting at the end of our .env file:
# .env

PLT_SERVER_CORS_ORIGIN=http://localhost:3000
Then let's add a cors configuration object under the server object in platformatic.db.json:
// platformatic.db.json

{
  ...
  "server": {
    ...
    "cors": {
      "origin": "{PLT_SERVER_CORS_ORIGIN}"
    }
  },
  ...
}
Configure authorization with JWT
Now we're going to configure authorization for our Platformatic DB app. When we add authorization settings, they'll be applied to the automatic REST and GraphQL APIs that are generated by Platformatic DB.
First, let's add a new configuration setting at the end of our .env file:
# .env

PLT_AUTHORIZATION_JWT_NAMESPACE=https://blog-api.dev/
PLT_AUTHORIZATION_JWT_JWKS_ALLOWED_DOMAINS=https://<AUTH0_APP_DOMAIN>/
In the code block above, we need to replace <AUTH0_APP_DOMAIN> with our Auth0 app's domain.
It's important to ensure that we include the trailing slash for the Auth0 app domain or the authorization checks will fail.
Now let's add an authorization object at the end of our our app's configuration file, platformatic.db.json:
// platformatic.db.json

{
  ...
  "authorization": {
    "jwt": {
      "namespace": "{PLT_AUTHORIZATION_JWT_NAMESPACE}",
      "jwks": {
        "allowedDomains": ["{PLT_AUTHORIZATION_JWT_JWKS_ALLOWED_DOMAINS}"]
      }
    }
  }
}
Let's take a look at what these settings do:
jwt.namespace— The namespace that we used to prefix the names of the custom claims in our Auth0 access tokens.jwt.jwks.allowedDomains— This is an important setting as it restricts our app to only accept JWTs that have been issued from one of the configured domains (in our case the single Auth0 app domain).
Add authorization rules
The default role in a Platformatic DB app is anonymous. If a request to our API doesn't contain a valid JWT, we only want to allow read operations (find) for the post entity. If the request has a valid JWT that specifies the author role, we want to allow all operations for the post entity.
Let's add some authorization rules that configure this to the authorization object in platformatic.db.json:
// platformatic.db.json

{
  ...
  "authorization": {
    ...
    "rules": [
      {
        "role": "anonymous",
        "entity": "post",
        "find": true,
        "save": false,
        "delete": false
      },
      {
        "role": "author",
        "entity": "post",
        "find": true,
        "save": {
          "checks": {
            "authorUserId": {
              "eq": "X-PLATFORMATIC-USER-ID"
            }
          }
        },
        "delete": {
          "checks": {
            "authorUserId": {
              "eq": "X-PLATFORMATIC-USER-ID"
            }
          }
        },
        "defaults": {
          "authorUserId": "X-PLATFORMATIC-USER-ID",
          "authorName": "X-PLATFORMATIC-USER-NAME"
        }
      }
    ]
  }
}
In the authorization rules above, you'll notice that we've configured checks for save and delete operations on the post entity. These checks restrict the updating and deletion of a post to the user who created it. We've also set some defaults, which specifies entity fields that will be automatically set using values from user metadata in the JWT. These defaults will be applied when an entity is created.
You can read more about authorization User Roles & Metadata and Rules in the Platformatic OSS documentation.
We now have everything set up with our Platformatic app and we're ready to start building our the front end for our blog.
Create a React front end
Create a Next.js application
Let's use the create-next-app command-line tool to generate a new Next.js application:
npx create-next-app@latest \
  --javascript --tailwind --eslint \
  --src-dir --no-experimental-app --import-alias "@/*" \
  blog-frontend
Once create-next-app has finished running, we should have a Next.js application generated in the blog-frontend directory. Let's change to that directory in our terminal:
cd blog-frontend
Configure static HTML export
Now let's configure our Next.js app to be built as a static HTML website that can be deployed anywhere. We can do this by adding output: 'export' to our next.config.js:
 /** @type {import('next').NextConfig} */
 const nextConfig = {
   reactStrictMode: true,
+  output: 'export',
 }

 module.exports = nextConfig
You can read more about generating static HTML websites with Next.js in their documentation.
Configure environment variables
Now let's create a new file, .env.local, and add the following configuration settings:
# .env.local

NEXT_PUBLIC_BLOG_API_ORIGIN=http://127.0.0.1:3042
NEXT_PUBLIC_AUTH0_DOMAIN=<AUTH0_APP_DOMAIN>
NEXT_PUBLIC_AUTH0_CLIENT_ID=<AUTH0_APP_CLIENT_ID>
NEXT_PUBLIC_AUTH0_AUDIENCE=https://blog-api.dev
NEXT_PUBLIC_AUTH0_SCOPE="openid profile email"
In the code block above, we need to replace <AUTH0_APP_DOMAIN> and <AUTH0_APP_CLIENT_ID> with our Auth0 app's domain and client ID values that we noted down earlier.
You'll also notice in the settings that the value for NEXT_PUBLIC_AUTH0_AUDIENCE is the identifier for the API we created in Auth0, https://blog-api.dev.
We'll be using all of these configuration settings as we integrate our front end application with Auth0 and our Platformatic app's REST API.
Configure Tailwind CSS
We'll be using Tailwind CSS to add some basic styling to our React application.
Let's go ahead and install a couple of Tailwind plugins that will provide some preset styles for us:
npm install @tailwindcss/typography @tailwindcss/forms
Now we need to update our Tailwind configuration to use the typography and forms plugins that we just installed. Let's do that by replacing the contents of tailwind.config.js with this block of code:
// tailwind.config.js

/** @type {import('tailwindcss').Config} */
module.exports = {
  content: [
    './src/pages/**/*.{js,ts,jsx,tsx}',
    './src/components/**/*.{js,ts,jsx,tsx}',
    './src/app/**/*.{js,ts,jsx,tsx}',
  ],
  theme: {
    extend: {},
  },
  plugins: [
    require('@tailwindcss/typography'),
    require('@tailwindcss/forms')
  ]
}
Then we can edit src/styles/global.css and reduce it down to:
/* src/styles/global.css */

@tailwind base;
@tailwind components;
@tailwind utilities;
And now we have everything that we need configured with Tailwind CSS.
Integrate the Auth0 React SDK
We're building a Single Page App (SPA) with Next.js and React. It won't have any API routes, so we're going to use the Auth0 React SDK, as recommended by Auth0.
Let's go ahead and install the Auth0 React SDK as a dependency:
npm install @auth0/auth0-react
Then let's open up src/pages/_app.js and add these two lines at the top of the file
to import the Auth0 React SDK and the Next.js router:
// src/pages/_app.js

import { Auth0Provider } from '@auth0/auth0-react'
import Router from 'next/router'
Then let's completely replace the existing App function with a new one that integrates
the Auth0 provider:
// src/pages/_app.js

export default function App({ Component, pageProps }) {
  return (
    <Auth0Provider
      domain={process.env.NEXT_PUBLIC_AUTH0_DOMAIN}
      clientId={process.env.NEXT_PUBLIC_AUTH0_CLIENT_ID}
      onRedirectCallback={onRedirectCallback}
      authorizationParams={{
        redirect_uri: typeof window !== 'undefined' && window.location.origin,
        audience: process.env.NEXT_PUBLIC_AUTH0_AUDIENCE,
        scope: process.env.NEXT_PUBLIC_AUTH0_SCOPE
      }}
    >
      <Component {...pageProps} />
    </Auth0Provider>
  )
}
The new App function that we've just added will wrap the component for each page
in our application with the Auth0 provider. This allows us to then access the features
of the Auth0 React SDK inside our components.
Now let's add in an onRedirectCallback function above the App function in src/pages/_app.js:
// src/pages/_app.js

const onRedirectCallback = (appState) => {
  Router.replace(appState?.returnTo || '/');
}
The function that we've just added will be called whenever Auth0 is redirecting the user, for example after they've logged in. It's calling the Next.js router for our application to ensure that the correct page is shown to the user.
Create the blog home page
To start creating our blog home page, let's open up src/pages/index.js and delete all
of the code that create-next-app generated for us.
Then we can replace it with our own Home component:
// src/pages/index.js

export default function Home() {
  return (
    <p>Welcome to my blog home page!</p>
  )
}
Now let's start up our Next.js application in development mode:
npm run dev
If we load up http://localhost:3000 in our browser, we should see a page that looks like this:

Now we're ready to start building features in our blog front end.
Create a layout for all pages
We're going to create a layout component that we'll use to wrap every page in our application.
First, let's create a new directory to store our components, src/components:
mkdir -p src/components
Then let's create a new file, src/components/layout.js, and add a couple of imports:
// src/components/layout.js

import { useAuth0 } from '@auth0/auth0-react'
import Link from 'next/link'
Then we can define our Layout component function:
// src/components/layout.js

export default function Layout({ children }) {
  const { user, error, isAuthenticated, isLoading } = useAuth0()

  const wrapperClasses = "prose max-width-xl mx-auto my-8"

  if (isLoading) {
    return <div className={wrapperClasses}><p>Loading ...</p></div>
  }

  if (error) {
    return <div className={wrapperClasses}><p>Oops... {error.message}</p></div>
  }

  return (
    <div className={wrapperClasses}>
      <header>
        <h1>
          <Link href="/">My blog</Link>
        </h1>
      </header>
      <main>
        {children}
      </main>
    </div>
  )
}
There are quite a few things happening in our Layout function, we're:
- Creating an instance of the
useAuth0hook, which allows us to access user data and state from the Auth0 API. - Defining a string of wrapper classes that we can reuse with different HTML elements.
- Displaying a loading message if data is still being loaded from the Auth0 API.
- Displaying an error message if the Auth0 API returned an error.
- Displaying a basic header and any child elements that were passed to the
Layoutcomponent, if data has been succesfully loaded from the Auth0 API.
Now let's open up src/pages/_app.js and import our new Layout component:
// src/pages/_app.js

import Layout from '@/components/layout'
Then we can wrap it around <Component />, so that it will be used for every page
in our application:
// src/pages/_app.js

-      <Component {...pageProps} />
+      <Layout>
+        <Component {...pageProps} />
+      </Layout>
Now our home page should look like this:

Create login and logout buttons
We've integrated Auth0 into our front end app, but currently there's no way for our users to login. Let's go ahead and add login and logout functionality to our app.
First, we'll create a new file, src/components/login.js, and add a LoginButton
component:
// src/components/login.js

import { useAuth0 } from '@auth0/auth0-react'

export default function LoginButton() {
  const { loginWithRedirect } = useAuth0()

  return (
    <button
      onClick={() => loginWithRedirect()}
      className="bg-green-400 text-gray-800 rounded p-3"
    >
      Log in
    </button>
  )
}
The LoginButton component that we've just added renders a button, which when
clicked will take the user to the Auth0 login page for our application.
Now let's create another new file, src/components/logout.js, and add a LogoutButton
component:
// src/components/logout.js

import { useAuth0 } from '@auth0/auth0-react'

export default function LogoutButton() {
  const { logout } = useAuth0();

  return (
    <button
      onClick={() => logout({ logoutParams: { returnTo: window.location.origin } })}
      className="bg-green-400 text-gray-800 rounded p-3"
    >
      Log out
    </button>
  );
}
When the button in our LogoutButton component is clicked, it will log the user out
of our application and redirect them back to the blog home page.
Now let's open up our layout component, src/components/layout.js, and integrate the
two components that we've just created. First, we'll import the components:
// src/components/layout.js

import LoginButton from '@/components/login'
import LogoutButton from '@/components/logout'
And then let's add some code that uses them, after the closing </h1> tag inside the <header> element:
// src/components/layout.js

        <section>
          {isAuthenticated ? (
            <>
              <p>
                <strong>Logged in as {user.name}</strong>
              </p>
              <LogoutButton />
            </>
          ) : (
            <LoginButton />
          )}
        </section>
In the code block above, we're using the isAuthenticated boolean that's provide by the useAuth0 hook to determine if the user is logged in. If they are logged in, we'll display the user's name and a logout button, but if they're not logged in then we'll display a login button.
Now if we take a look in our web browser, we should see the Login button being displayed:

When we click on the Login button, we'll be taken to the login page for our Auth0 application:

Let's then click on the Sign up link, enter our email address and a password for our new account, then click on the Continue button.
The next page we'll see is the Auth0 Authorize App page, where we can click on the Accept button, and then we'll be redirected back to our app.

Now we're back on our blog app, we should see that we're logged in and the Logout button will now be showing too:

This is the signup and login flow that users will see when using our blog app.
Create a hook to call the blog API
We're now going to create a React hook that we'll use to call our blog API. This hook will also take care of sending the user's JWT — containing the user metadata that we added earlier — to our API, where it will be used to verify authorization for our protected API routes.
Let's create a new src/hooks directory:
mkdir -p src/hooks
Then let's create a new file, src/hooks/use-blog-api.js, and import a couple of things that we'll need to use in our hook:
// src/hooks/use-blog-api.js

import { useState } from 'react'
import { useAuth0 } from '@auth0/auth0-react'
Then let's start to build up our hook function:
// src/hooks/use-blog-api.js

export default function useBlogApi(defaultValue) {
  const [data, setData] = useState(defaultValue)
  const [error, setError] = useState(null)
  const [isLoading, setIsLoading] = useState(false)

  const { isAuthenticated, getAccessTokenSilently } = useAuth0()

  const makeRequest = () => {}

  return {
    data,
    error,
    isLoading,
    makeRequest
  }
}
In the code block above, we've set up a few state variables that we'll be using to help us keep track of what's happening when an API request has been made. We've also created a useAuth0 hook instance that we'll be using to retrieve the logged in user's JWT.
The makeRequest function that we've added doesn't do anything just yet, so let's replace it:
// src/hooks/use-blog-api.js

const makeRequest = (url, options = {}) => {
  const executeRequest = async () => {
    setIsLoading(true)

    let accessToken = null
    if (isAuthenticated) {
      accessToken = await getAccessTokenSilently()
    }

    const apiOrigin = process.env.NEXT_PUBLIC_BLOG_API_ORIGIN
    const fetchOptions = constructFetchOptions(options, accessToken)

    try {
      const apiResponse = await fetch(`${apiOrigin}${url}`, fetchOptions);

      if (apiResponse.ok) {
        setData(await apiResponse.json())
      } else {
        const errorText = await apiResponse.text()
        const error = new Error(`[useBlogApi] Blog API error: ${errorText} (${apiResponse.status})`);

        setError(error)
        console.error(error)
      }
    } catch (error) {
      error = new Error(`[useBlogApi] fetch error: ${error.message}`)

      setError(error)
      console.error(error)
    }

    setIsLoading(false)
  }

  executeRequest()
}
There are quite a few moving parts here, so let's break them down.
First, we set the state of the isLoading state variable to true to indicate that an API request is in progress:
setIsLoading(true)
This will allow components that use the useBlogApi hook to display a message to the user when the request is loading.
Next, if the user is authenticated (logged in), we're retrieving the JWT from Auth0:
let accessToken = null
if (isAuthenticated) {
  accessToken = await getAccessTokenSilently()
}
Then we're preparing what we're going to pass to fetch() when we make our request:
const apiOrigin = process.env.NEXT_PUBLIC_BLOG_API_ORIGIN
const fetchOptions = constructFetchOptions(options, accessToken)
You might remember that a little earlier, we configured the NEXT_PUBLIC_BLOG_API_ORIGIN environment variable to contain the origin for our Platformatic app, which in our case is http://127.0.0.1:3042.
We'll be coming back to the constructFetchOptions() function in just a moment.
Next, we call fetch() and start the request to our blog API, using the url that was passed into the makeRequest method:
const apiResponse = await fetch(`${apiOrigin}${url}`, fetchOptions);
The code after that takes care of handling the response and any errors that might occur.
If we get a successful response from our blog API, we parse the JSON response body and store it our data state variable:
setData(await apiResponse.json())
The data state variable will be available to components that use the useBlogApi hook, allowing them to access the data from the API response.
If something has gone wrong with the request or if we receive an error response from our API, we handle that error, store it in our error state variable and log it out to the console:
setError(error)
console.error(error)
The error state will also be available to components that use the useBlogApi hook so that they can implement error handling and display an error message to the user if needed.
Finally, once the request has completed (or failed) we set the state of the isLoading state variable back to false to indicate that the API request is no longer in progress:
setIsLoading(false)
Now let's go ahead and add in a constructFetchOptions function before the useBlogApi function in src/hooks/use-blog-api.js:
// src/hooks/use-blog-api.js

function constructFetchOptions(options, accessToken) {
  const fetchOptions = {
    headers: {},
    ...options
  }

  if (fetchOptions.body) {
    fetchOptions.body = JSON.stringify(fetchOptions.body)
    fetchOptions.headers['content-type'] = 'application/json'
  }

  if (accessToken) {
    fetchOptions.headers.Authorization = `Bearer ${accessToken}`
  }

  return fetchOptions
}
This function takes care of preparing a JSON request body and adding the JWT as an Authorization request header. We're passing the object that's returned from this function directly to fetch() in our hook's makeRequest method.
Let's go ahead and start using the useBlogApi hook in our app.
Create the write post page
The first place we'll be using the useBlogApi hook is on a new page: the write post page. Before we create that page, first we'll create a form component that we can reuse for writing and editing a blog post.
Let's create a new file, src/components/blog-post-form.js, and add the skeleton structure for our BlogPostForm component:
// src/components/blog-post-form.js

export default function BlogPostForm({ submitLabel, handleFormData, saveError, loadError = false, values = {} }) {
  const handleSubmit = (event) => {

  }

  return (
    <>

    </>
  )
}
We want our component to render a form, and when that form is submitted we'll run the handleSubmit event handler function.
Let's start with adding in the form:
// src/components/blog-post-form.js

return (
  <>
    {saveError && <p className="bg-red-200 p-4">There was an error saving the post. Please try again.</p>}
    {loadError && <p className="bg-red-200 p-4">There was an error loading the post. Please try again.</p>}

    <form onSubmit={handleSubmit} className="grid grid-cols-1 gap-6">
      <label htmlFor="title" className="block">
        <span>Title</span>
        <input type="text" id="title" name="title" defaultValue={values.title} required="required" maxLength="255" className="mt-1 w-full" />
      </label>
      <label htmlFor="quote" className="block">
        <span>Post</span>
        <textarea id="body" name="body" defaultValue={values.body} required="required" className="mt-1 w-full"></textarea>
      </label>
      <input type="submit" value={submitLabel} disabled={loadError && "disabled"} className="bg-green-400 text-gray-800 rounded p-3" />
    </form>
  </>
)
In the code block above, we can see that we'll display a message if there was a problem saving the blog post after the form has been submitted. When editing a blog post, if there's an error loading the blog post, we'll display a message and disable the form's submit button. If a values object is provided as a prop to the component, it'll be used to populate the values of the form fields.
Now let's replace our skeleton handleSubmit event handler function:
// src/components/blog-post-form.js

const handleSubmit = (event) => {
  event.preventDefault()

  const formData = {
    title: event.target.title.value,
    body: event.target.body.value,
  }

  handleFormData(formData)
}
The handleSubmit function takes the form field values and passes them to whatever handleFormData function is passed as a prop into the component. This will allow the page that uses this component to implement it's own handling of the form data.
Now we can create a new file, src/pages/write.js, and start creating our write post page:
// src/pages/write.js

import { withAuthenticationRequired } from '@auth0/auth0-react'
import { useRouter } from 'next/router'

import useBlogApi from '@/hooks/use-blog-api'
import BlogPostForm from '@/components/blog-post-form'

function Write() {

}

export default withAuthenticationRequired(Write)
In the code block above we can see that we're wrapping our Write page component with withAuthenticationRequired() from the Auth0 React SDK. If the user is not logged in when they try to access this page, they'll be redirected to the Auth0 login page for our app.
Let's add the following code into the Write function:
// src/pages/write.js

const { makeRequest, data: newPost, error: saveError } = useBlogApi(null)

const handleFormData = (formData) => {
  makeRequest('/posts', {
    method: 'POST',
    body: formData
  })
}

const router = useRouter()
if (newPost) {
  router.push('/')
}
The code above uses the useBlogApi hook to make a POST request to our blog API. We'll be passing the handleFormData function to our BlogPost component to handle saving the blog post. When the blog post has been saved, the value of the data state variable — which we've renamed here to newPost — is populated by the useBlogApi hook. When newPost has a value, we use it as a trigger to redirect the user back to the home page.
Finally, let's render the BlogPostForm component at the end of the Write function:
// src/pages/write.js

return (
  <>
    <h2>Write new post</h2>
    <BlogPostForm
      submitLabel="Publish post"
      handleFormData={handleFormData}
      saveError={saveError}
    />
  </>
)
Now let's add a link to the write post page into our layout, src/components/layout.js:
// src/components/layout.js

               <p>
                 <strong>Logged in as {user.name}</strong>
               </p>
+              <Link
+                href="/write"
+                className="bg-green-400 text-gray-800 rounded p-3 inline-block mr-4"
+              >
+                Write new post
+              </Link>
               <LogoutButton />
             </>
Our home page should now look like this:

And if we click on the Write new post link, our write post page should look like this:

Let's fill out the form, and click Publish post to save the blog post. We'll then be redirected back to our home page, and it's time to start displaying our blog posts.
Display blog posts on the home page
Before we update our home page to retrieve and display blog posts, first we're going to create a new component that we can use to render a blog post.
Let's create a new file, src/components/blog-post.js, and add a BlogPost component:
// src/components/blog-post.js

export default function BlogPost({ id, title, body, authorUserId, authorName, createdAt, updatedAt }) {
  return (
    <div>
      <h2>{title}</h2>
      <p>
        <em>Published {new Date(Number(createdAt)).toUTCString()}</em><br />
        {createdAt !== updatedAt && (
          <><em>Updated {new Date(Number(updatedAt)).toUTCString()}</em><br /></>
        )}
        <em>By {authorName}</em>
      </p>
      <p>{body}</p>
    </div>
  )
}
Then let's delete all of the current code in src/pages/index.js, and replace it with a few imports that we'll need:
// src/pages/index.js

import { useEffect } from 'react'

import useBlogApi from '@/hooks/use-blog-api'
import BlogPost from '@/components/blog-post'
Now we can add a Home component that retrieves blog posts from our API and renders them using the BlogPost component:
// src/pages/index.js

export default function Home() {
  const { makeRequest, data: posts, error, isLoading } = useBlogApi([])

  useEffect(() => {
    makeRequest('/posts?limit=100&orderby.createdAt=desc')
  }, [])

  if (error) {
    return <p>Error loading blog posts.</p>
  }

  if (isLoading) {
    return <p>Loading blog posts...</p>
  }

  return posts.map(post => <BlogPost {...post} key={post.id} />)
}
In the code block above we can see how the state variables exposed by our useBlogApi hook allow us to handle the error and loading states.
Our blog home page should now be displaying the blog post that we added a little earlier:

Create the edit post page
We want users to be able to edit blog posts that they've published. Let's create a new page, src/pages/edit/[postId].js, and add in the skeleton page structure:
// src/pages/edit/[postId].js

import { withAuthenticationRequired } from '@auth0/auth0-react'
import { useRouter } from 'next/router'
import { useEffect } from 'react'

import useBlogApi from '@/hooks/use-blog-api'
import BlogPostForm from '@/components/blog-post-form'

function Edit() {
  const router = useRouter()
  const { postId } = router.query
}

export default withAuthenticationRequired(Edit)
Now let's add code at the end of the Edit function to retrieve the blog post that will be edited from the blog API:
// src/pages/edit/[postId].js

const { makeRequest: getPost, data: values, error: loadError } = useBlogApi({})

useEffect(() => {
  getPost(`/posts/${postId}`)
}, [])
Then let's add code to handle saving the edited blog post to the blog API:
// src/pages/edit/[postId].js

const { makeRequest: updatePost, data: updatedPost, error: saveError } = useBlogApi(null)

const handleFormData = (formData) => {
  updatePost(`/posts/${postId}`, {
    method: 'PUT',
    body: formData
  })
}

if (updatedPost) {
  router.push('/')
}
And then we'll render the blog post for editing in the BlogPostForm component:
// src/pages/edit/[postId].js

return (
  <>
    <h2>Edit post</h2>
    <BlogPostForm
      loadError={loadError}
      values={values}
      submitLabel="Publish changes"
      handleFormData={handleFormData}
      saveError={saveError}
    />
  </>
)
Now we can update our BlogPost component, src/components/blog-post.js, to add in edit links. Let's add a couple of imports:
// src/components/blog-post.js

import { useAuth0 } from '@auth0/auth0-react'
import Link from 'next/link'
Then let's add the following code at the top of the BlogPost function to check if the logged in user is the author of the blog post:
// src/components/blog-post.js

const { user } = useAuth0()

const currentUserIsAuthor = user?.sub === authorUserId
And then we'll add display the edit link if the logged in user is the author:
       <p>{body}</p>
+      {currentUserIsAuthor && <Link href={`/edit/${id}`}>Edit</Link>}
     </div>
   )
 }
Now let's go to our blog home page and click on the edit link for the blog post we published earlier. We should see an edit page which looks like this:

We can edit our blog post and click the Publish changes button, then our updated blog post will be sent to our blog API and we'll be redirected back to the home page.
Display count of logged in author's posts
We're going to add one last feature to our blog app: displaying a count of blog posts that the logged in user has written.
Create a custom REST API endpoint
In our Platformatic app, the user metadata that's been automatically parsed from the JWT — such as the user's ID — is made available as the request.user object in the request object that is passed into REST API route handlers. We're going to use this to help us build a protected custom REST API endpoint.
Let's open up plugin.js and add this route inside the empty function:
// plugin.js

app.get('/posts/count', async function (request, reply) {
  await request.setupDBAuthorizationUser()

  if (!request.user || !request.user['X-PLATFORMATIC-USER-ID']) {
    return reply.status(401).send()
  }

  return {
    count: await app.platformatic.entities.post.count({
      where: {
        authorUserId: {
          eq: request.user['X-PLATFORMATIC-USER-ID']
        }
      }
    })
  }
})
In the code above, we're calling request.setupDBAuthorizationUser() to populate the request.user object. Then we're checking that the user object exists with a user ID. If it doesn't, we return a 401 (Unauthorized) HTTP status code. If the user is authorized, we use the Platformatic SQL Mapper to count the number of blog posts that the user has created and then send it back as a response.
Display author posts count
To display the posts count for the logged in user in our blog front end, let's first import the useEfect and useBlogApi hooks in src/components/layout.js:
// src/components/layout.js

import { useEffect } from 'react'
import useBlogApi from '@/hooks/use-blog-api'
Then let's add code that calls our custom REST API route inside the Layout function, after we call the useAuth0 hook:
// src/components/layout.js

const { makeRequest, data: authorPostsCount } = useBlogApi([])

useEffect(() => {
  if (!isAuthenticated) {
    return
  }

  makeRequest('/posts/count')
}, [isAuthenticated])
And finally, let's update the <header> in our Layout component to display the posts count:
 {isAuthenticated ? (
   <>
     <p>
-      <strong>Logged in as {user.name}</strong>
+      <strong>Logged in as {user.name}{authorPostsCount?.count !== undefined && (<em>({authorPostsCount.count} posts)</em>)}</strong>
     </p>
The header of our pages should now look like this:

Wrapping up
You can find all of the code for this tutorial on GitHub. If you've followed it through step-by step, you should now have a full stack blog application that integrates Platformatic, Auth0 and Next.js.
You have full flexibility over where you deploy and run the applications if you want to get your blog into production. For example, you could deploy the API to Platformatic Cloud and the front end to a service like Vercel or Netlify.
Here are a few ideas for next steps if you'd like to develop things further:
- Add a
userstable for the blog API to store details about blog post authors. - Use a state management library in the front end React app to avoid needing to retrieve the access token for every request.
- Parse and display validation errors from the blog API on the front end.
To learn more about how authorization works in Platformatic DB, you can take a look at the Authorization documentation.