Deploy a full stack app with Platformatic, Vercel and Neon
Introduction
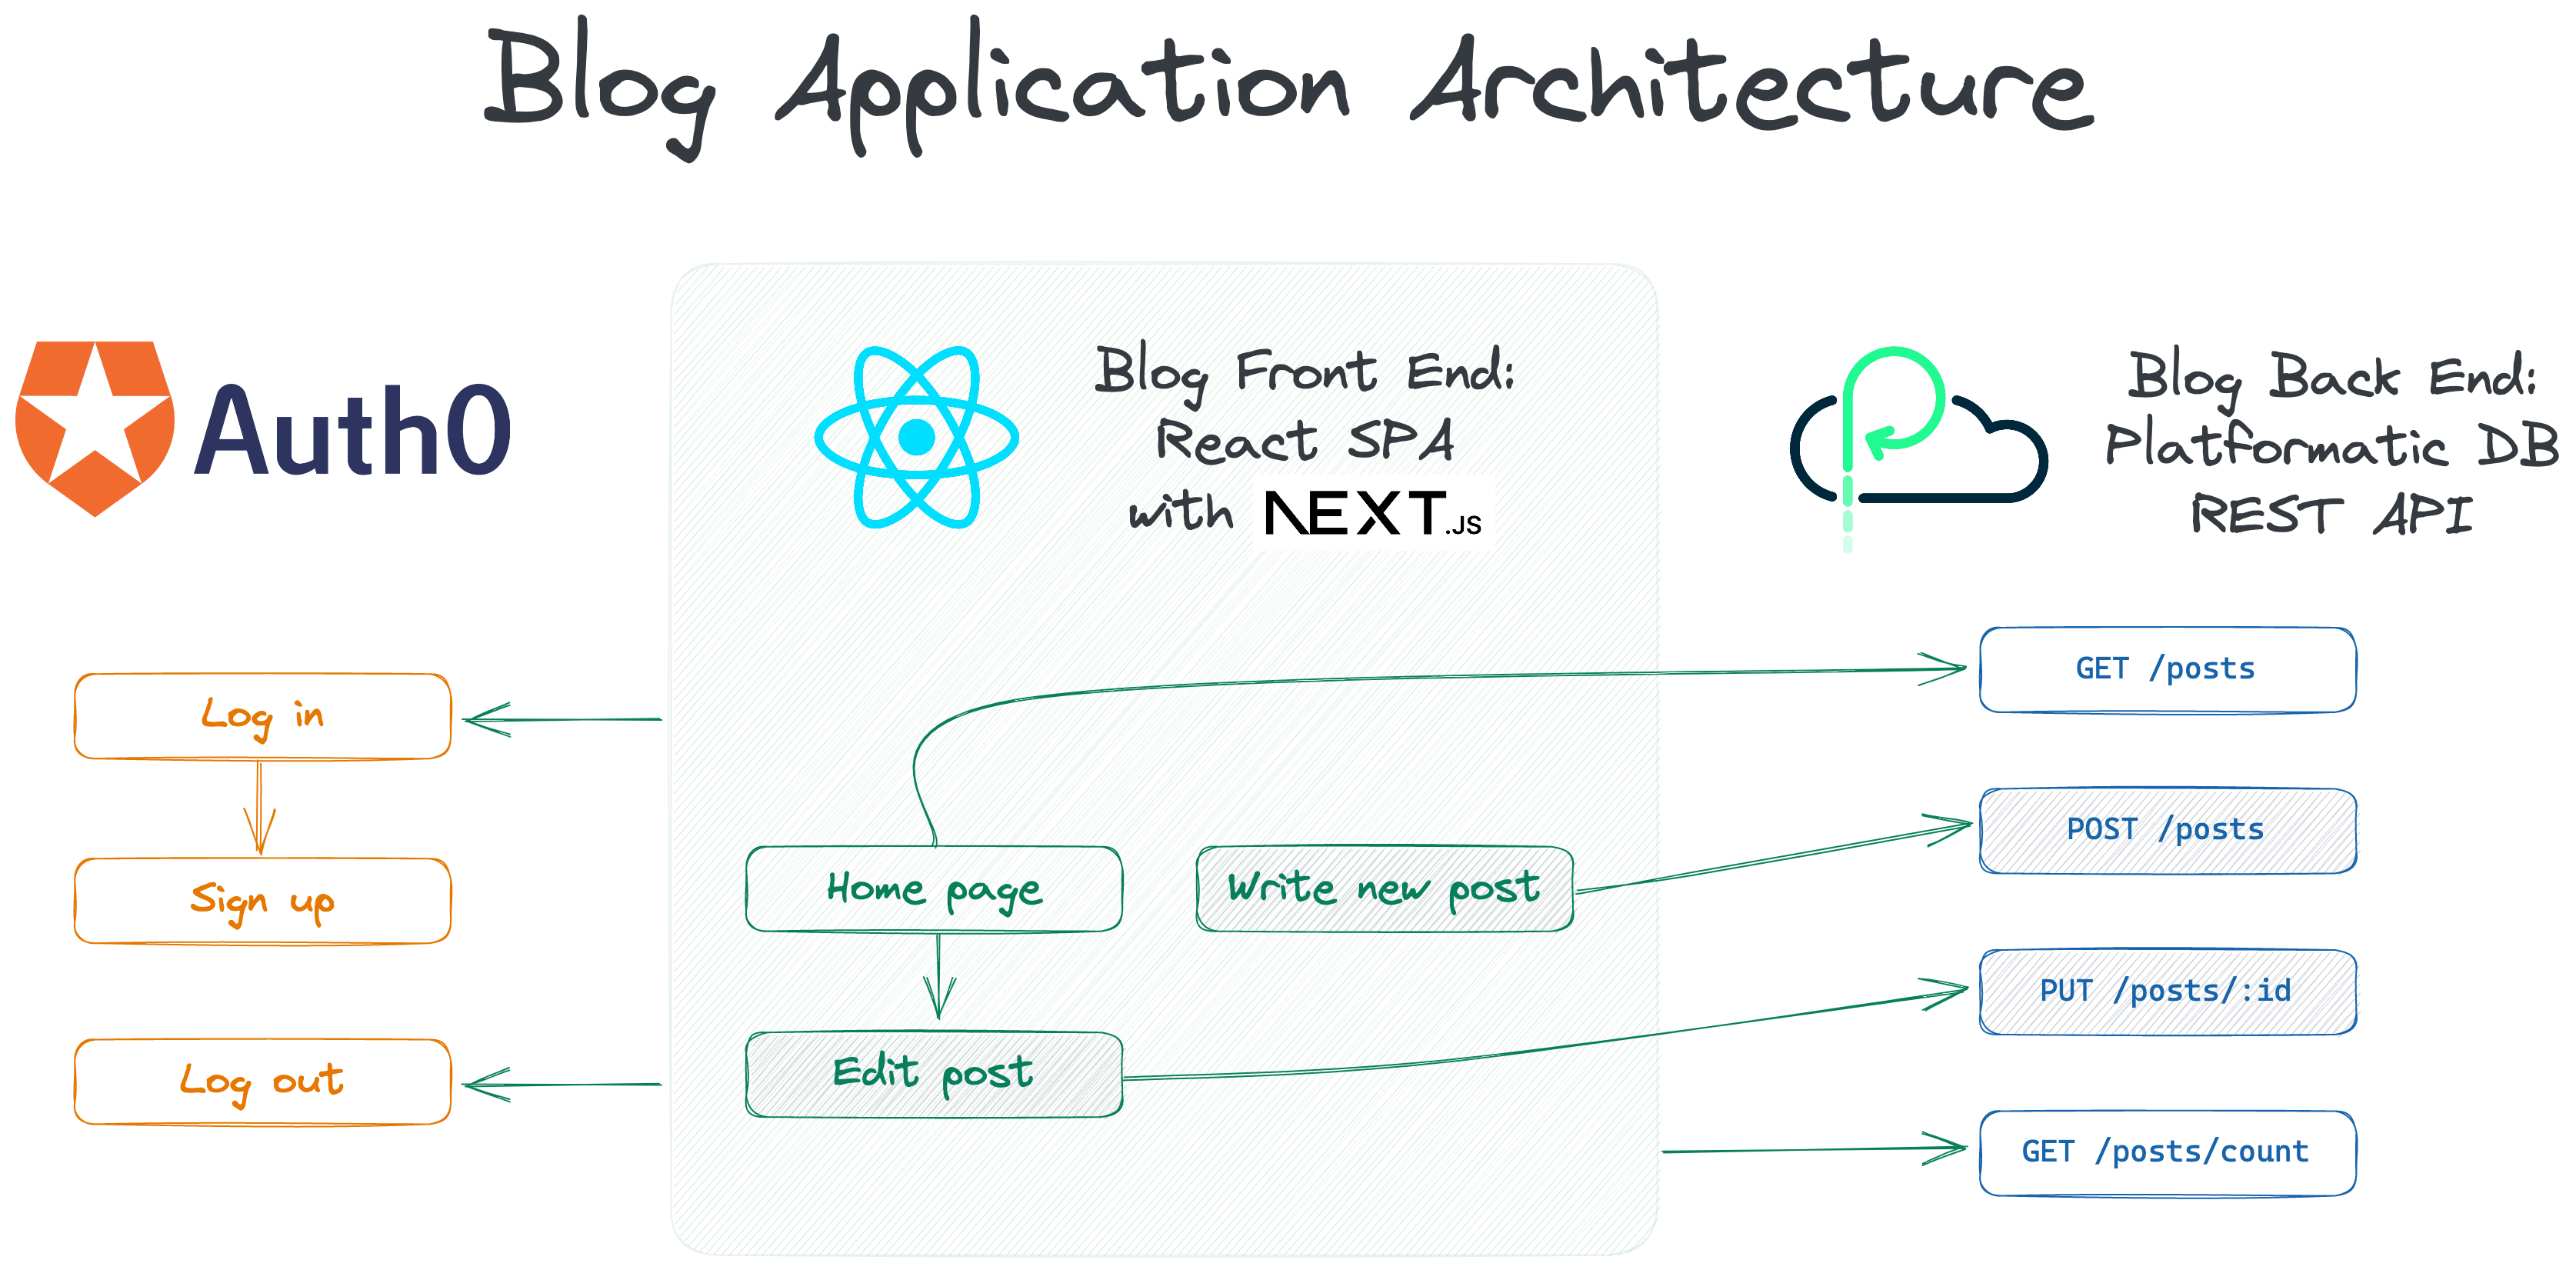
In our Build a secure web application with Platformatic, Auth0 and Next.js tutorial, we created a full stack blog application with Platformatic, Auth0 and Next.js. Now we're going to deploy it to Platformatic Cloud, Neon, Vercel and Auth0 using GitHub Actions.
You don't need to have followed the previous tutorial to be able to follow this one.
The architecture for our blog application looks like this:
In this tutorial we'll learn how to:
- Create an app on Platformatic Cloud to deploy our Platformatic DB app to
- Create a project on Neon to deploy our Postgres database to
- Create a project on Vercel to deploy our Next.js front end app to
- Create applications on Auth0 to enable authentication flows for preview and production apps
- Create GitHub Actions workflows to:
- Automatically deploy a preview of our blog app when we open a pull request on GitHub
- Automatically deploy our blog app to production when we merge a pull request or push to our
mainbranch on GitHub
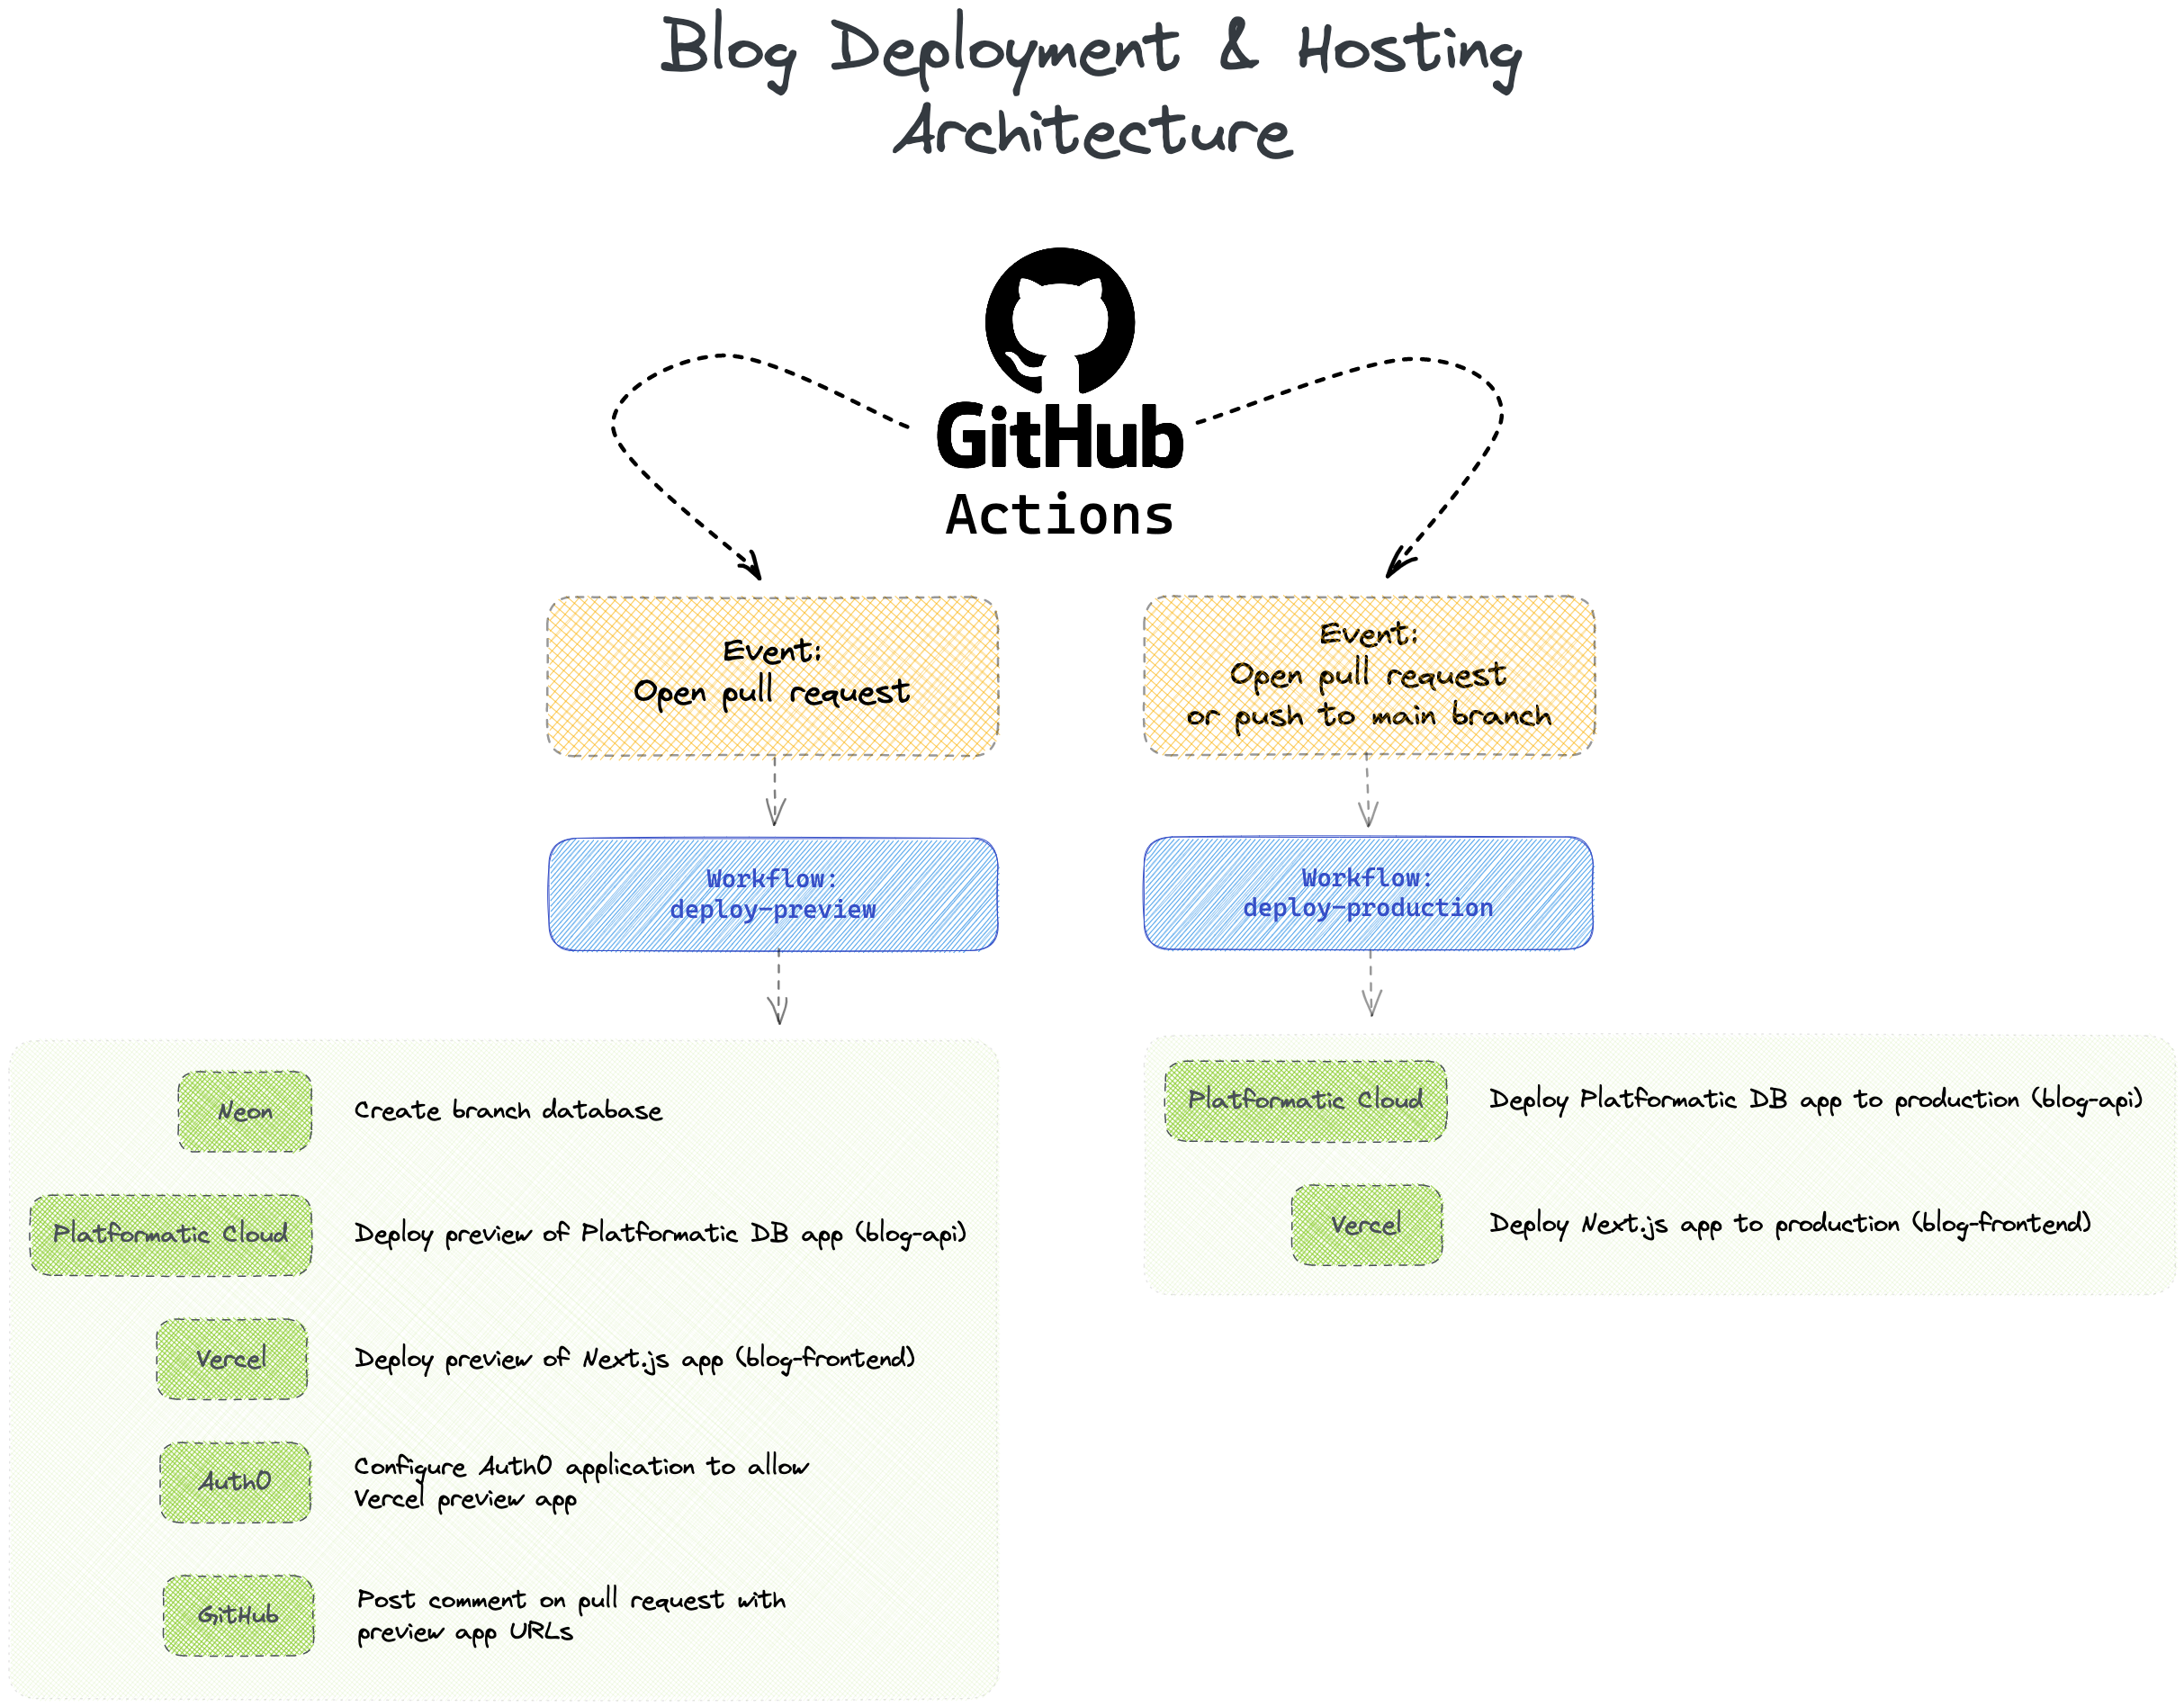
The deployment and hosting architecture for our blog app will look like this:
The complete code for this tutorial is available on GitHub.
Prerequisites
To follow along with this tutorial, you'll need to have this software installed:
- Node.js >= v18.8.0
- npm v7 or later
- A code editor, for example Visual Studio Code.
- GitHub CLI (optional) — This is optional, but highly recommended as it makes it much easier to set secrets and variables on GitHub.
You'll also need to create accounts with the following services, if you don't have them already:
All of the above services offer free plans and don't require a credit card to sign up.
Create a new GitHub repository from the template repository
The front end and back end applications for our blog are available in the tutorial-platformatic-auth0-nextjs template GitHub repository.
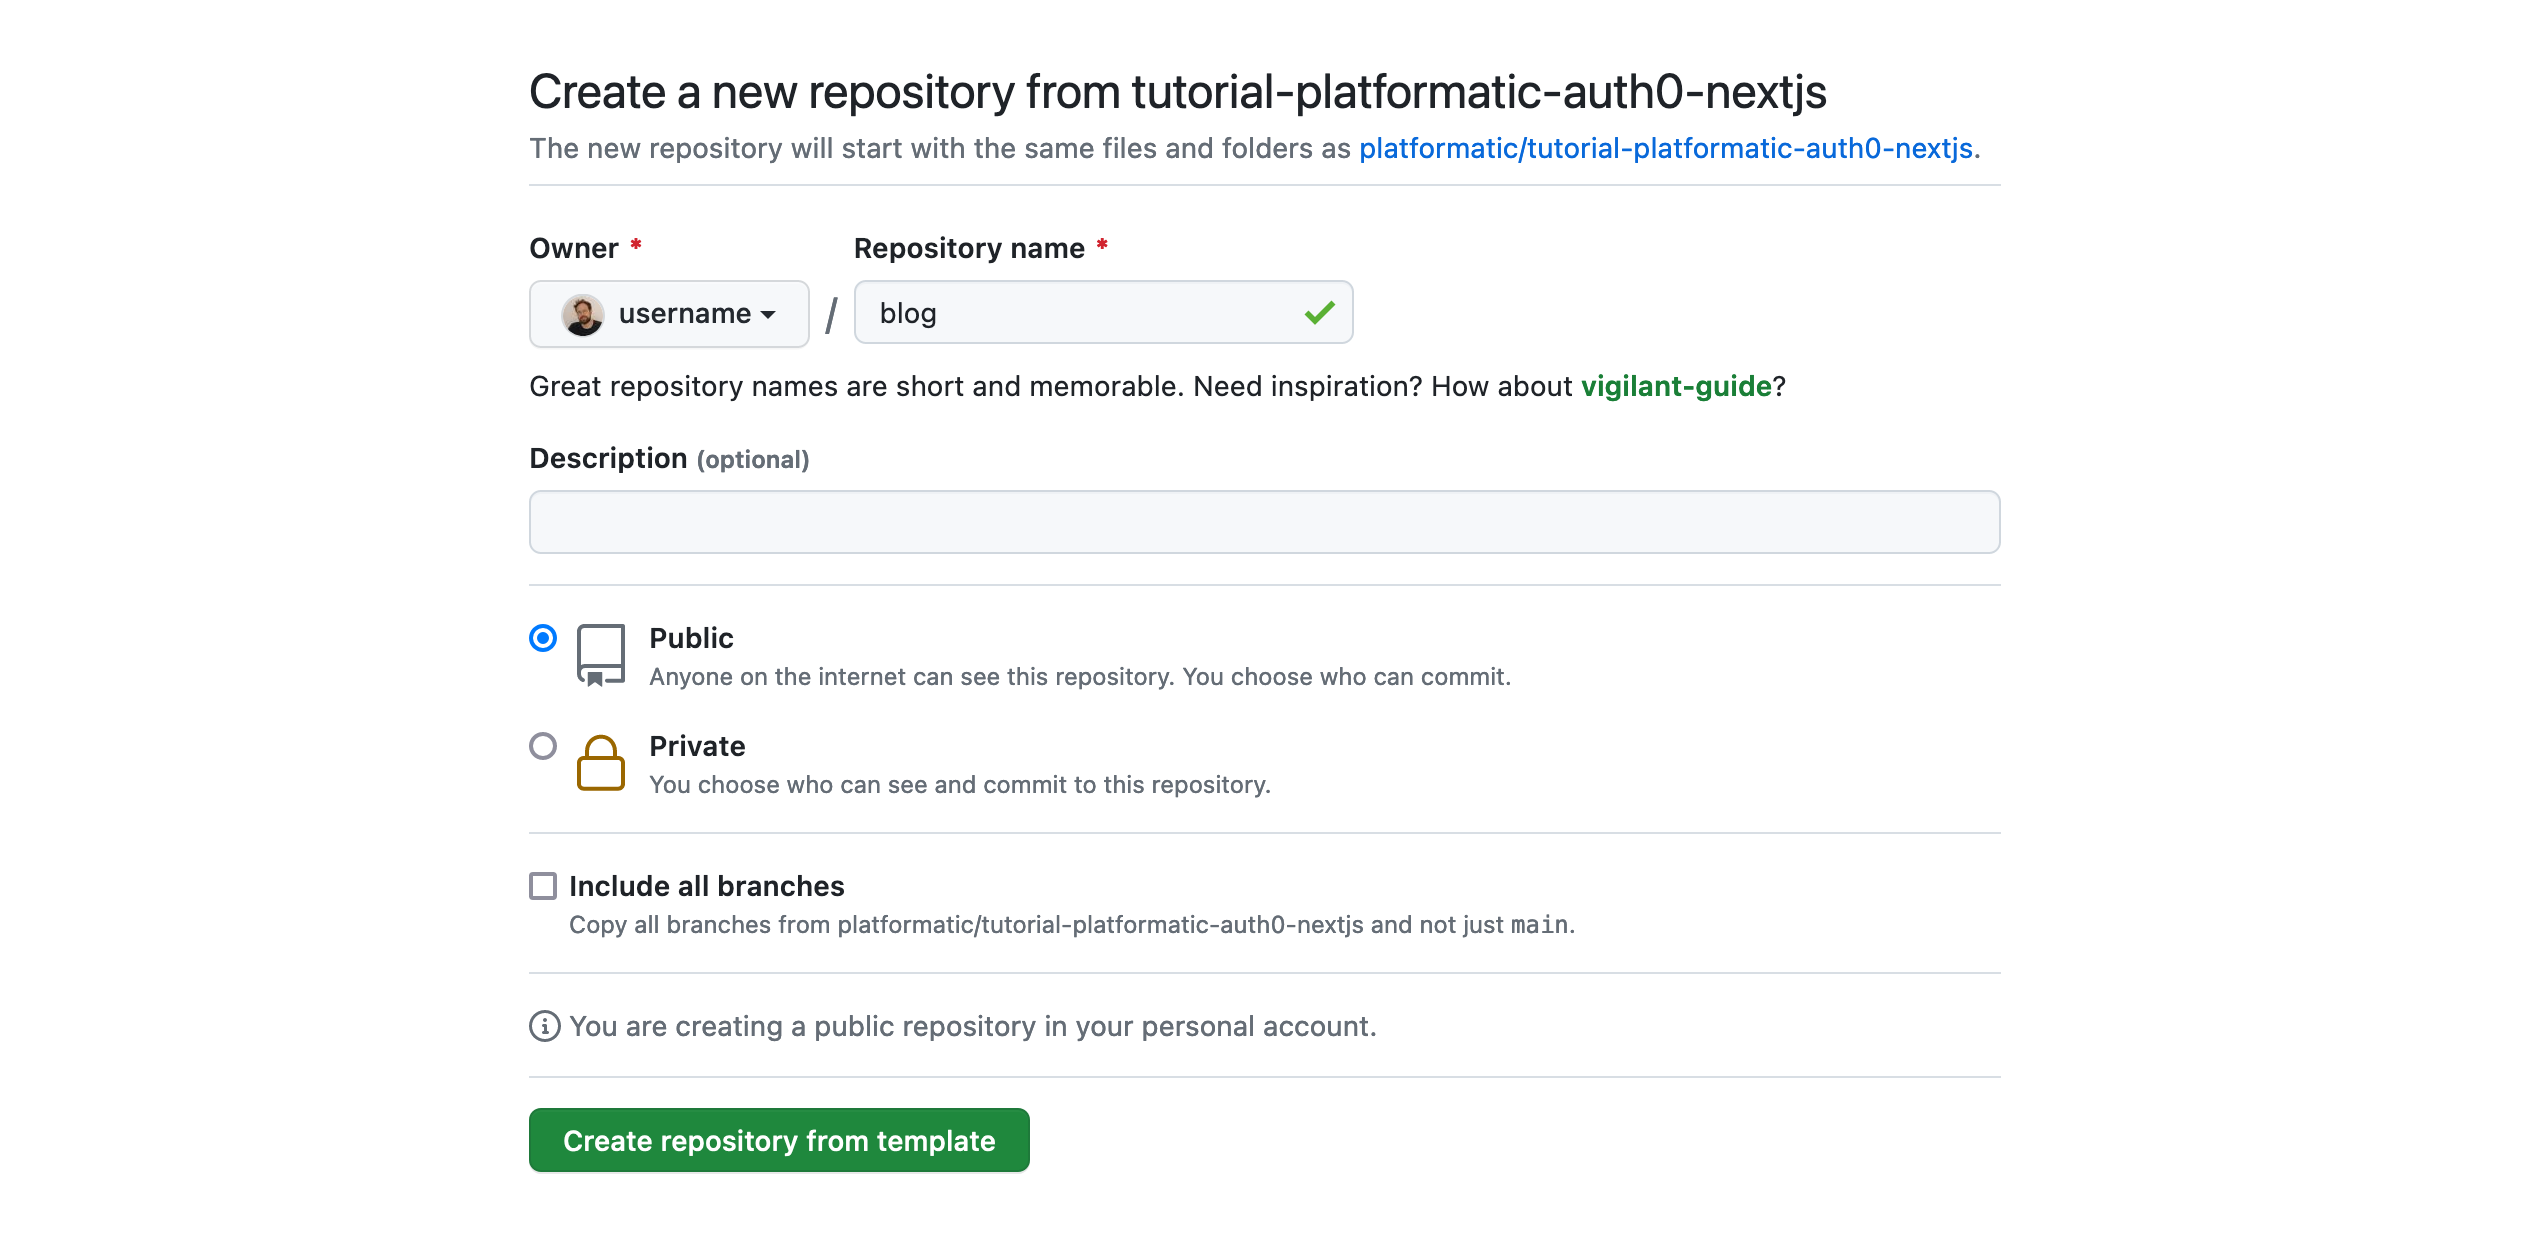
Let's head over here to create a new repository in our own GitHub account from this template repository:
https://github.com/platformatic/tutorial-platformatic-auth0-nextjs/generate
Now we can enter blog as the Repository name, and click on the Create repository from template button. A few seconds later we should have a complete copy of the template repository in our GitHub account.
If you followed our Build a secure web application with Platformatic, Auth0 and Next.js tutorial, you'll still need to follow the steps above, as we've made a few minor changes to allow our Platformatic DB app to work with Postgres and to support requests from Vercel preview apps (pull request).
Clone the GitHub repository and create a new git branch
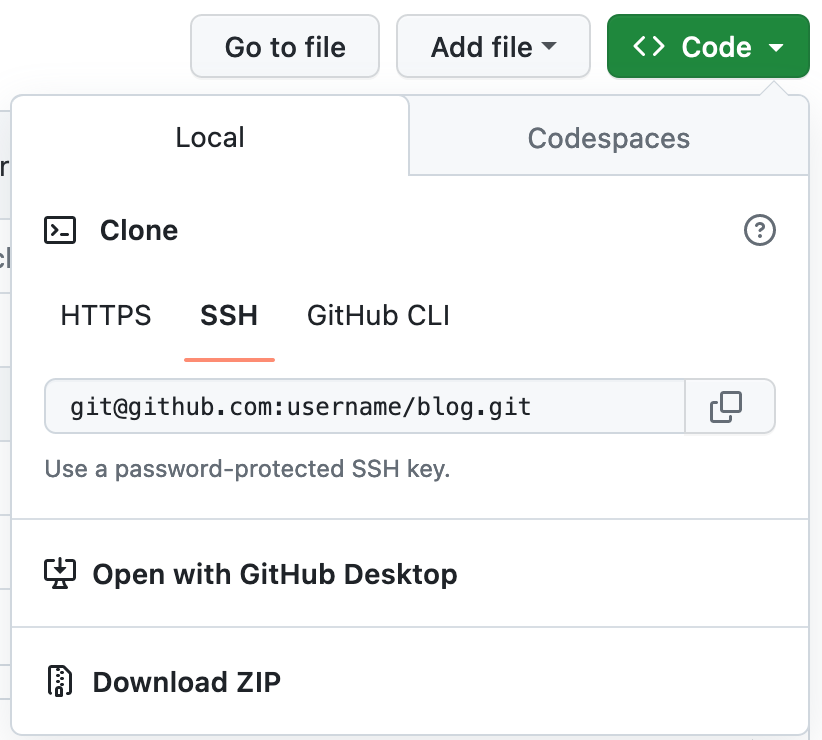
Let's clone our GitHub repository to our local machine so we can start making some changes:
git clone git@github.com:<YOUR_GITHUB_USERNAME>/blog.git

# Replace <YOUR_GITHUB_USERNAME> with your actual GitHub username.
You can also clone the repository over HTTPS or with the GitHub CLI if you prefer.
Then let's change into the blog directory and create a new Git branch:
cd blog

git checkout -b configure-api-deployment
Store values for configuration settings
As we set up and configure things throughout this tutorial, there will be a number of different values that we need to note down and use later on as configuration settings for our GitHub Actions workflows. We'll create a couple of files to store them in as we go along, then when we're ready to use them we'll set them as secrets and variables on our project's GitHub repository.
In our code editor, let's create a new file to store sensitive configuration values, such as API keys and passwords. These types of configuration values are referred to as "secrets" by GitHub, so we'll name this file .env.github.secrets.
Then let's copy and paste this in as the file's contents:
# .env.github.secrets

# -- Platformatic Cloud config secrets --

PLATFORMATIC_STATIC_WORKSPACE_API_KEY=not_set
PLATFORMATIC_DYNAMIC_WORKSPACE_API_KEY=not_set

# -- Neon config secrets --

NEON_API_KEY=not_set
NEON_DB_USER=not_set
NEON_DB_PASSWORD=not_set
NEON_DB_URL_PRODUCTION="not_set"

# -- Vercel config secrets --

VERCEL_TOKEN=not_set
VERCEL_ORG_ID=not_set
VERCEL_PROJECT_ID=not_set

# -- Auth0 config secrets --

AUTH0_BLOG_GHA_CLIENT_SECRET=not_set
We'll also need to store what GitHub refers to as "variables": values which aren't sensitive and don't need to be encrypted by GitHub.
Let's create a new file, .env.github.variables, and copy and paste this in as the file's contents:
# .env.github.variables

# -- Platformatic Cloud config --

PLATFORMATIC_STATIC_WORKSPACE_ID=not_set
PLATFORMATIC_DYNAMIC_WORKSPACE_ID=not_set

# -- Platformatic app config - open blog-api/platformatic.db.json to see how these are used --

PLT_SERVER_HOSTNAME=127.0.0.1
PLT_SERVER_PORT=3042
PLT_SERVER_LOGGER_LEVEL=info
PLT_MIGRATIONS_DB_TYPE=postgres
PLT_SERVER_CORS_ORIGIN=https:\/\/blog-frontend-[a-z0-9\-]+\.vercel\.app
PLT_AUTHORIZATION_JWT_NAMESPACE=https://blog-api.dev/
PLT_AUTHORIZATION_JWT_JWKS_ALLOWED_DOMAINS=https://<not_set_AUTH0_DOMAIN>/

# -- Neon config --

NEON_PROJECT_ID=not_set

# -- Auth0 config --

AUTH0_DOMAIN=not_set
AUTH0_AUDIENCE=https://blog-api.dev
AUTH0_SCOPE="openid profile email"
AUTH0_BLOG_PREVIEW_APPS_CLIENT_ID=not_set
AUTH0_BLOG_PRODUCTION_APP_CLIENT_ID=not_set
AUTH0_BLOG_GHA_CLIENT_ID=not_set
We'll be replacing all of the placeholder not_set values in these files as we work our way through this tutorial.
If we create these files inside a directory that contains a Git repository, we must be very careful not to commit them, as later on they'll contain API keys and passwords. The
.gitignorefile in our project contains the line.env*to help prevent them from being committed.
Setting GitHub repository secrets and variables with the GitHub CLI
We can set secrets and variables on our project's GitHub repository using the GitHub CLI. This is the most reliable way to set them, as it reduces the risk of mistakes that are easily made when manually copying and pasting values into a form on GitHub.
If you'd prefer not to use the GitHub CLI for any reason, skip to the next section to learn how to manually set secrets and variables on your GitHub repository.
If we've only just installed the GitHub CLI, we first need to authenticate the CLI with our GitHub account by running the command gh auth login. Once we've completed the CLI login process, we can then use the CLI to set set secrets and variables on our blog repository.
We can load secret names and values from our .env.github.secrets file and set them as secrets with the gh secret set command. Similarly, we can load variable names and values from our .env.github.variables file and set them as variables with the gh variable set command.
We'll run these commands a litle later, after we've set things up on Platformatic Cloud and Neon.
If you already had the GitHub CLI installed before starting this tutorial, run
gh --versionto check that the version is >= 2.25.0 (earlier versions don't support thegh variable setcommand).
Manually setting GitHub repository secrets and variables
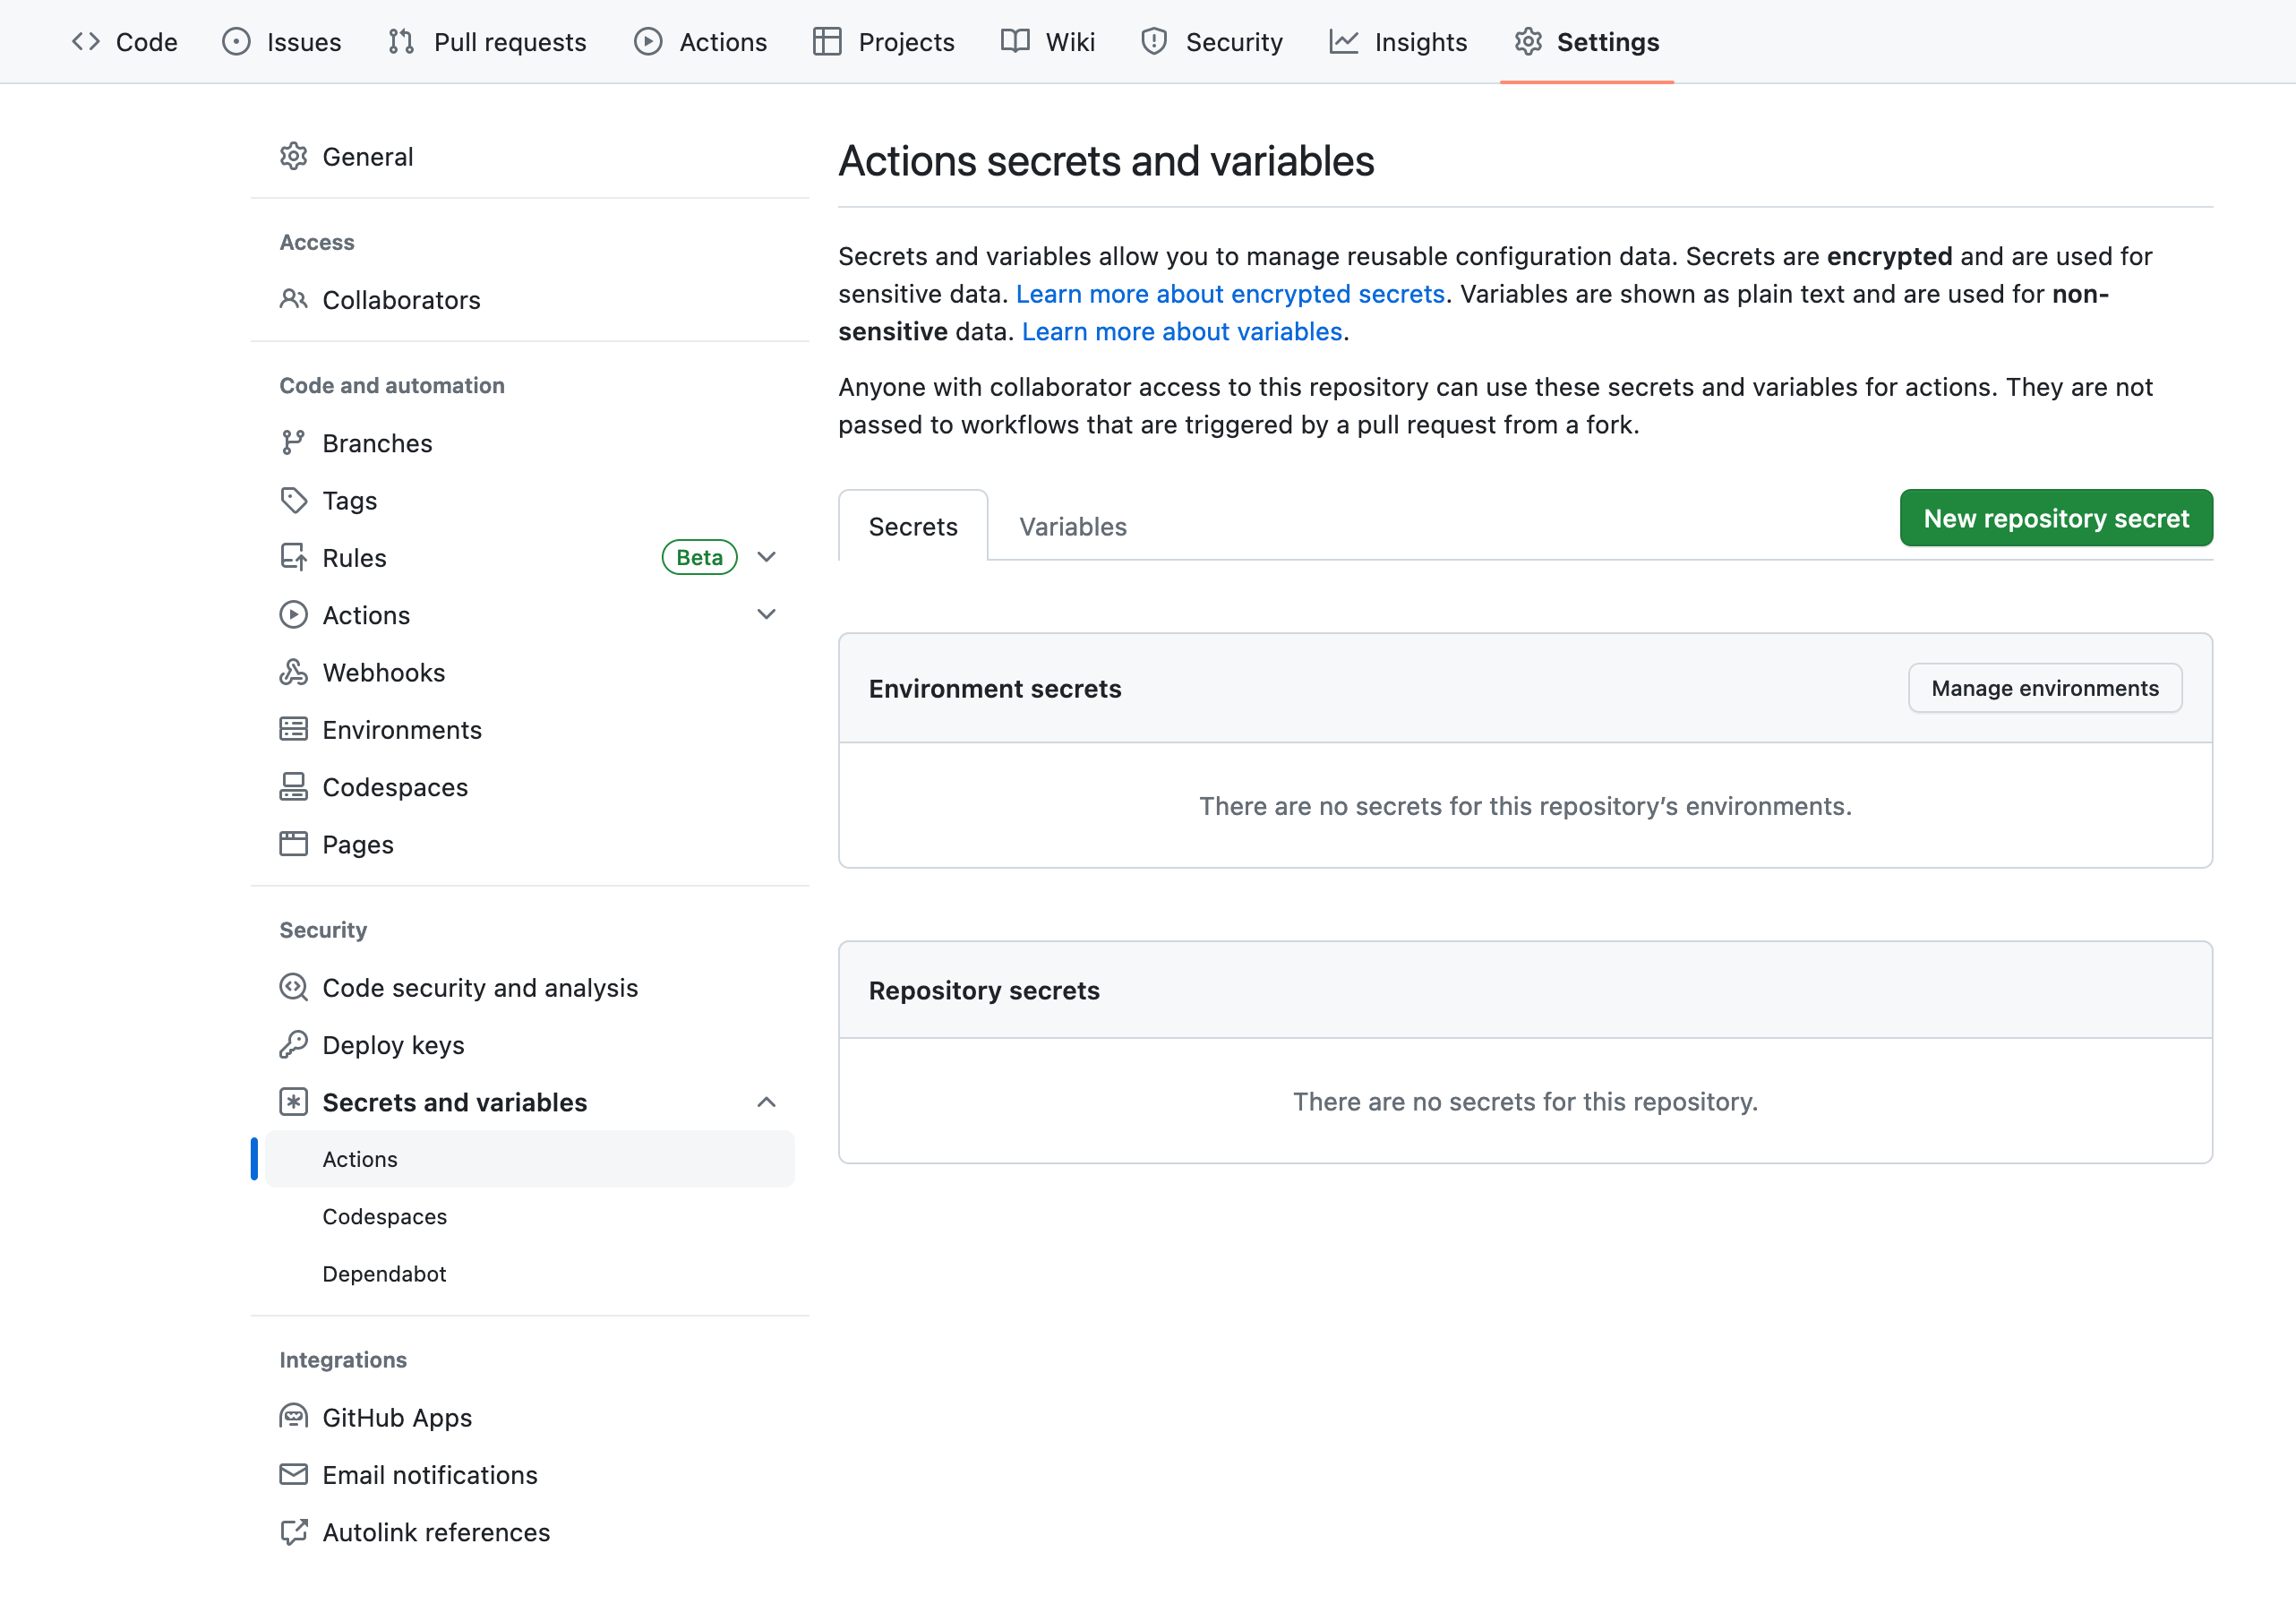
If we don't want to use the GitHub CLI, we can manually set secrets and variables for our repository by heading to the repository's Settings tab on GitHub:
- Click on Secrets and variables under Security in the sidebar.
- Click on Actions.
- To add a secret: click on the New repository secret button.
- To add a variable: click on the Variables tab, then click on the New repository variable button.
We can use GitHub Environments to control access to secrets and variables in our GitHub Actions workflows. Environments functionality is currently only available for paid GitHub accounts, so in this tutorial we'll be setting all Actions secrets and variables at the repository level.
Deploy the API
To deploy our API, we're first going to create an app and app workspaces on Platformatic Cloud, then we'll create a Postgres database on Neon. Once we have all the configuration values that we need for deploying our Platformatic app and our database, we'll add them as secrets and variables on our GitHub repository. Then we'll create GitHub Actions workflows to automate preview and production deployments for our API.
Create an app on Platformatic Cloud
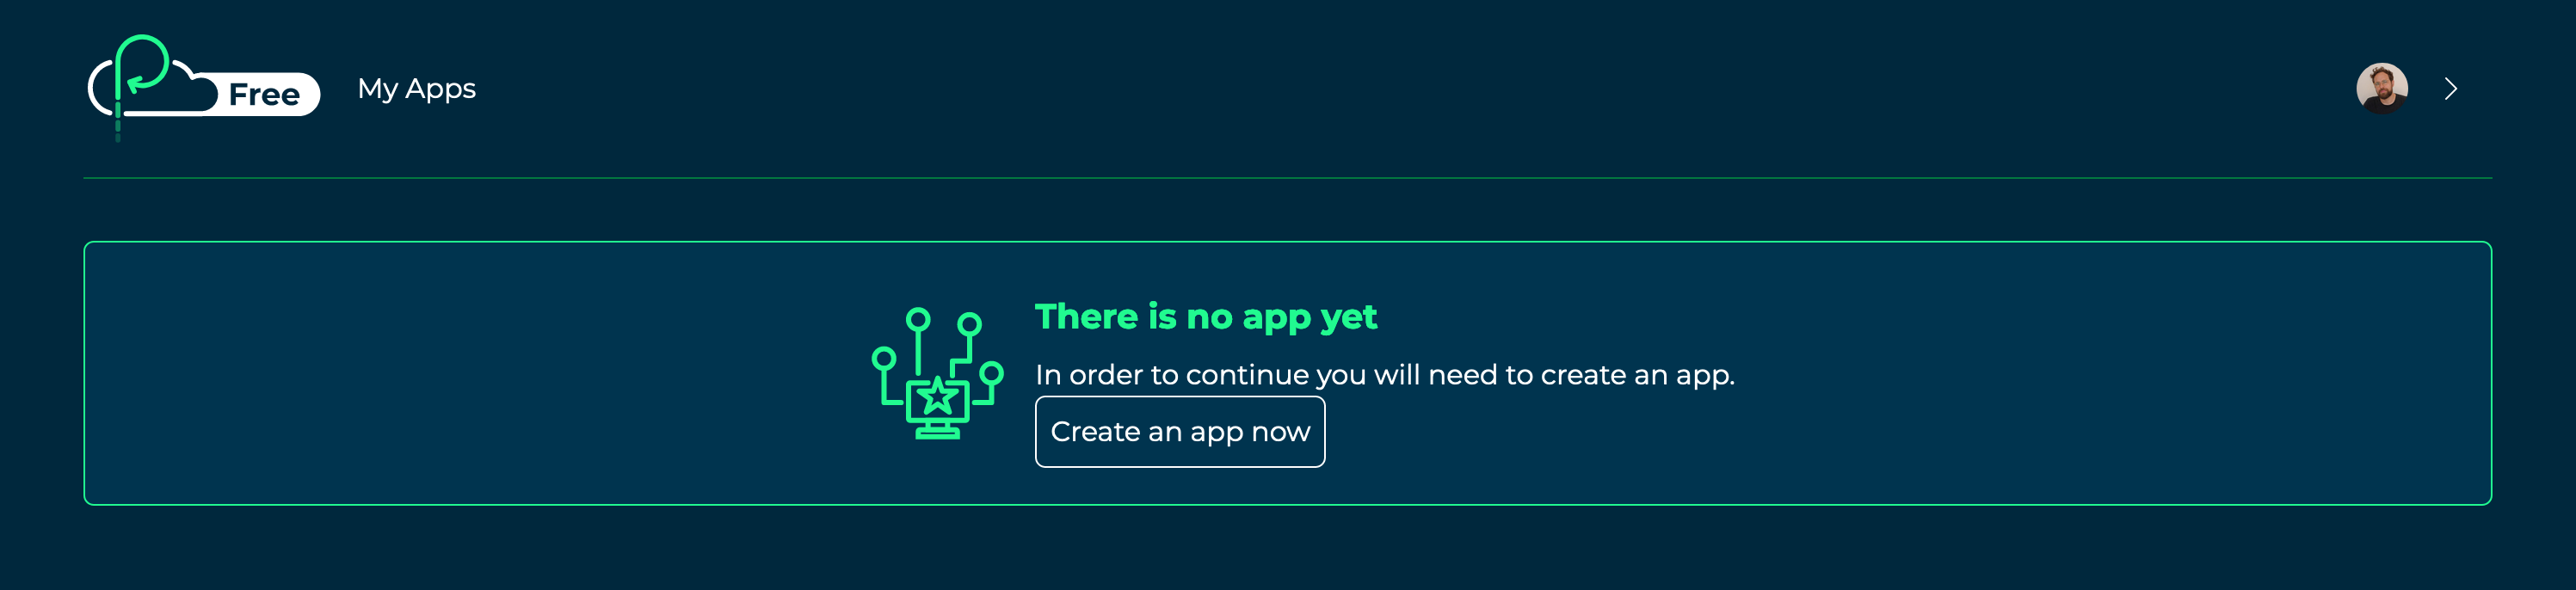
Let's log in to our Platformatic Cloud account, then we can click the Create an app now button on our Cloud Dashboard page.
We'll enter blog-api as our application name. Then we can click the Create Application button to create our new app.
Create a static app workspace
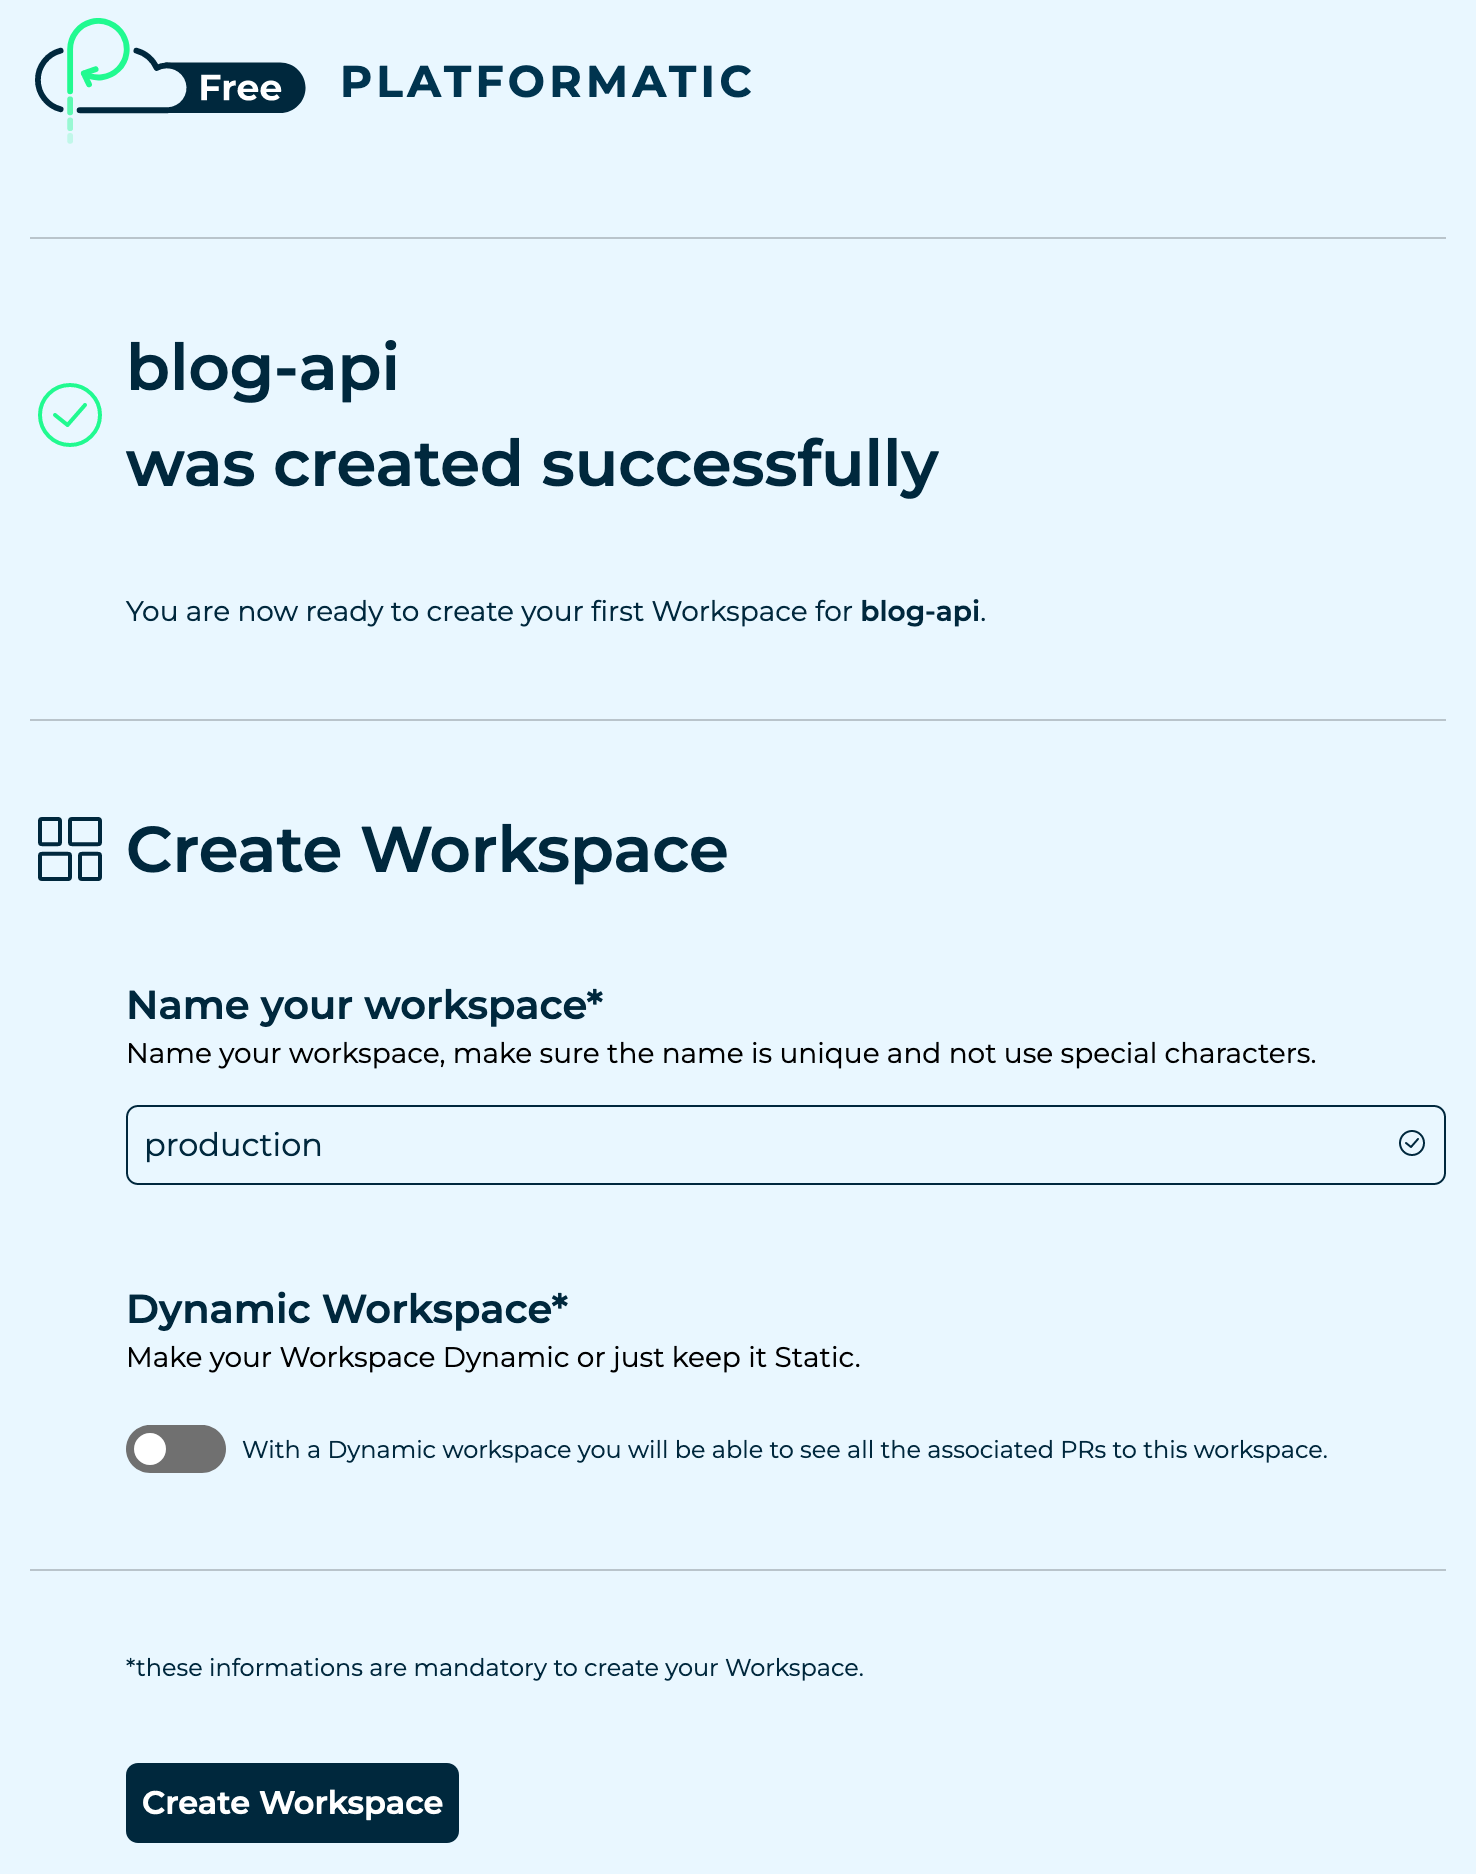
Let's enter production as the name for our workspace, and then click on the Create Workspace button.
On the next page we'll see the Workspace ID and API key for our app workspace. Let's copy and paste those values into our variables and secrets files:
Variables to update in .env.github.variables
PLATFORMATIC_STATIC_WORKSPACE_ID— Copy the Workspace ID value.
Secrets to update in .env.github.secrets
PLATFORMATIC_STATIC_WORKSPACE_API_KEY— Copy the API key value.
We'll be using the Workspace ID and API key later to deploy our production app to the static workspace that we've just created.
Now let's click on the Back to dashboard button.
Create a dynamic app workspace
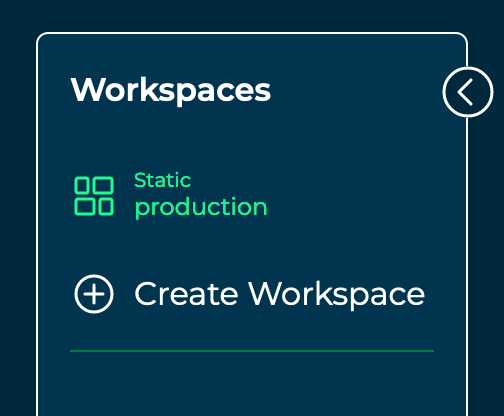
On our Cloud Dashboard, let's click on our blog-api app, then let's click on Create Workspace in the Workspaces sidebar.
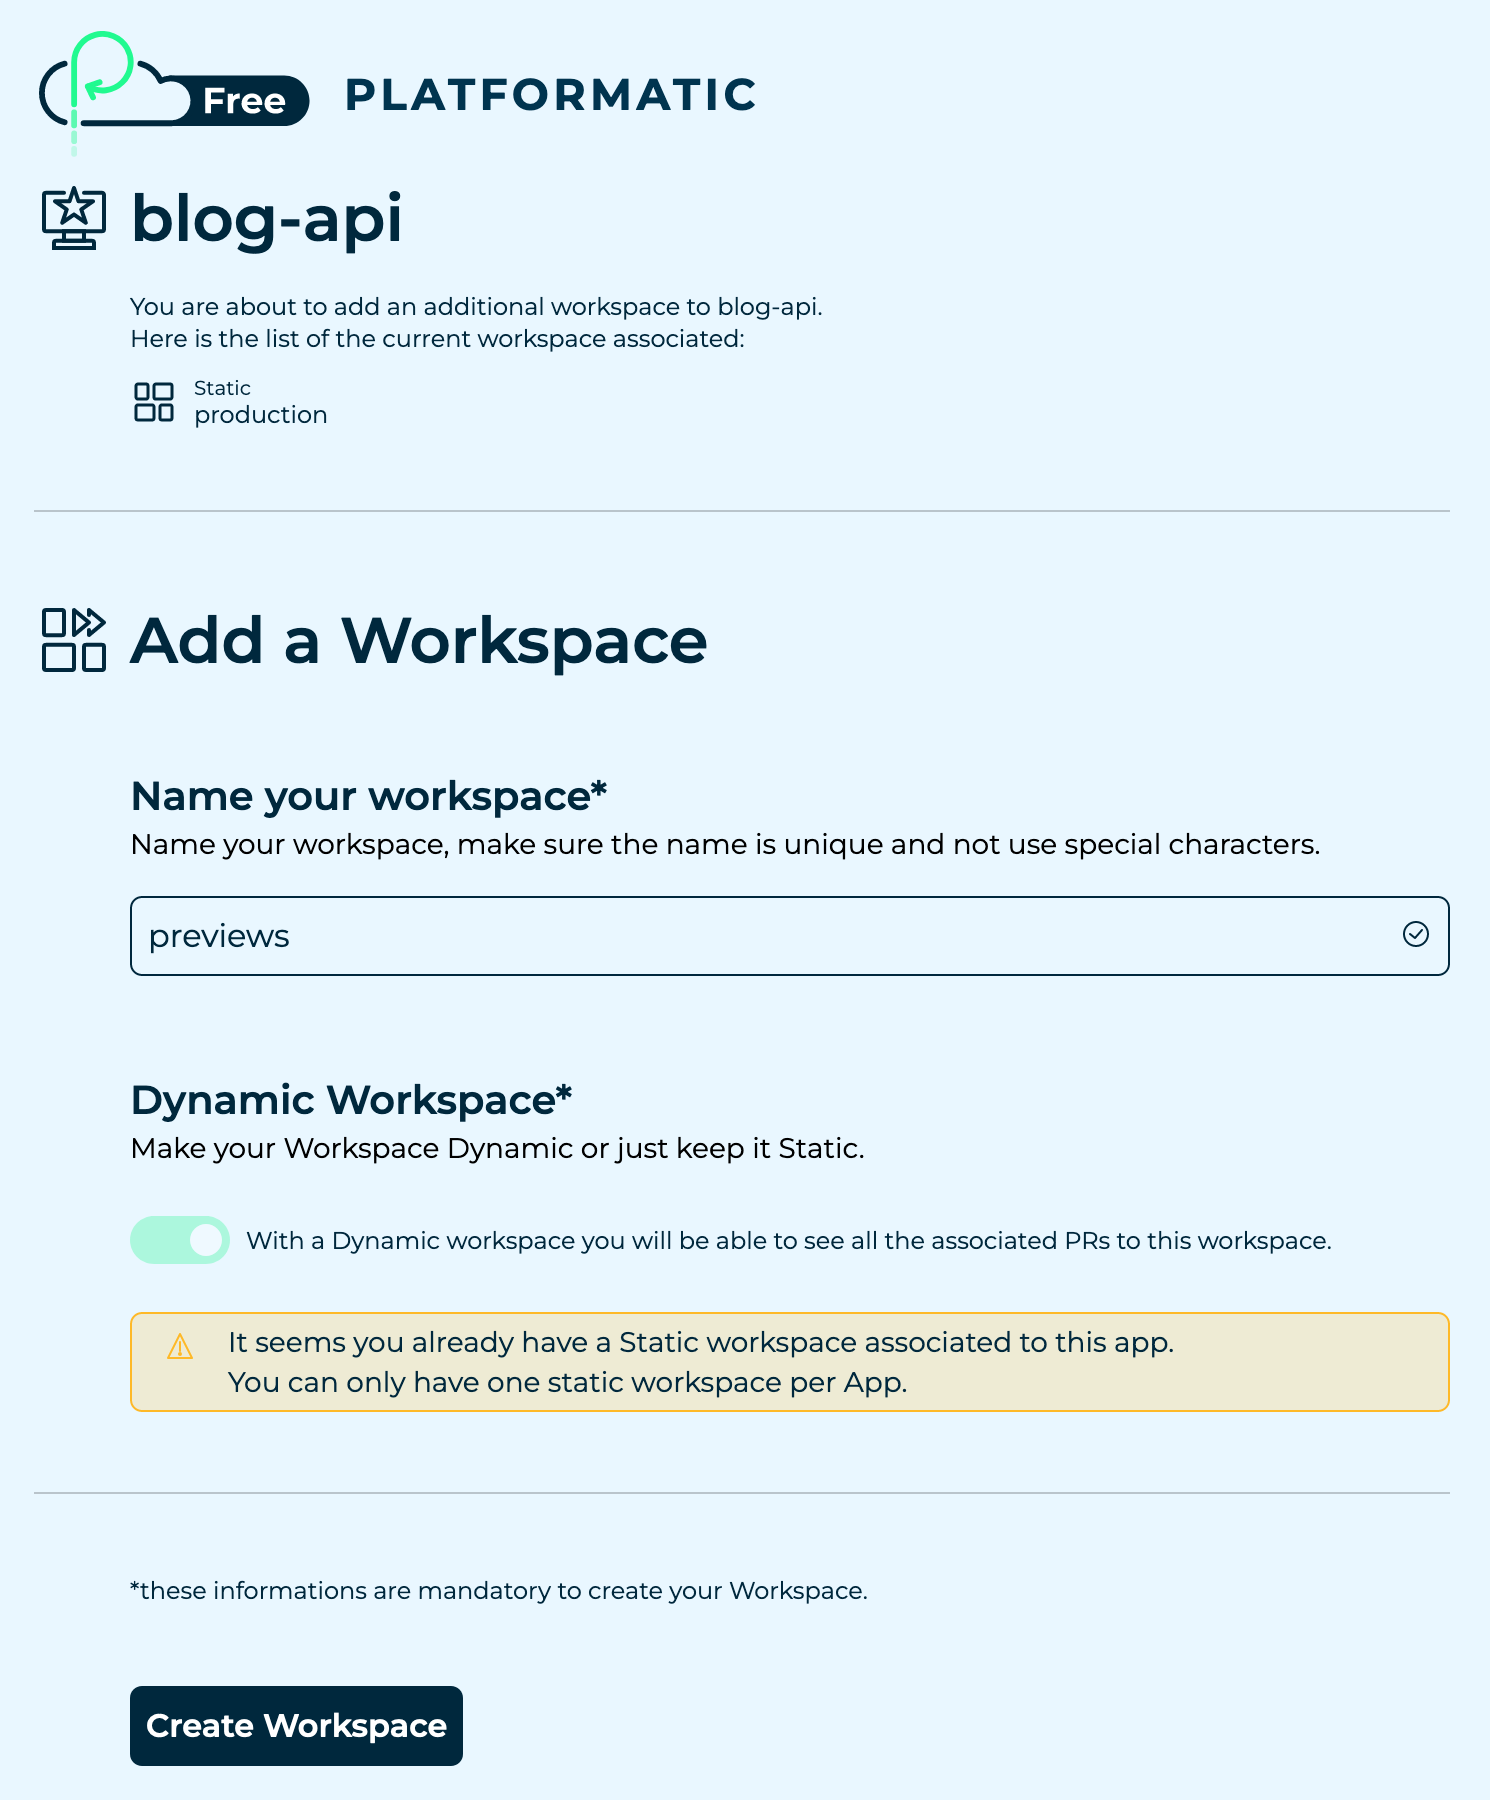
The Dynamic Workspace option will be enabled automatically as we've already created a static workspace. Dynamic workspaces are designed to allow for the deployment of multiple preview applications, for example when we open a pull request on GitHub.
Let's enter previews as the name for workspace, then we can click on the Create Workspace button.
On the next page, let's copy the Workspace ID and API key for our dynamic workspace and store them in our variables and secrets files:
Variables to update in .env.github.variables
PLATFORMATIC_DYNAMIC_WORKSPACE_ID— Copy the Workspace ID value.
Secrets to update in .env.github.secrets
PLATFORMATIC_DYNAMIC_WORKSPACE_API_KEY— Copy the API key value.
We'll be using these later to deploy preview apps to the dynamic workspace whenever we open a pull request on GitHub.
That's everything set up on Platformatic Cloud, so we can now get things ready with our database on Neon.
Create a Postgres database on Neon
Let's log in to our Neon account, then we can click on the Create a project link to set up a new project.
When the Project Creation form pops up, let's fill out the following settings:
- Name: blog
- Postgres version: Leave on default selected value.
- Region: Leave on default selected value.
And then let's click on the Create project button.
Now that we've created our project, we're going to note down a few values from our Neon project and account. Let's copy and paste the following values into our variables and secrets files:
Variables to update in .env.github.variables
NEON_PROJECT_ID— Project Settings page > Copy the Project ID value.
Secrets to update in .env.github.secrets
NEON_DB_URL_PRODUCTION— Project Dashboard page > Connection Details panel > Click the copy icon under Direct connection to copy the fullpostgres://...URL value, including the database password.
The value we've noted down for NEON_DB_URL_PRODUCTION is a string in the format postgres://<username>:<password>@.... Let's copy the username and password values from that string and store them in the following secrets:
NEON_DB_USER— Theusernamevalue fromNEON_DB_URL_PRODUCTION.NEON_DB_PASSWORD— Thepasswordvalue fromNEON_DB_URL_PRODUCTION.
Finally, let's create an API key:
- Click the account icon in the bottom left corner of the Neon Console, then click on Account.
- Click on Developer Settings, then click the Generate new API Key button.
- Enter the name:
blog-github-actions - Click the Create button.
Then let's copy the API key and set it as the value of NEON_API_KEY in .env.github.secrets.
To learn more about Neon API keys, check out the Neon Manage API Keys documentation.
Set secrets and variables for GitHub Actions
Now we're going to make the secrets and variables that we've been storing available to GitHub Actions on our blog repository.
First, let's set the secrets:
gh secret set --app actions --env-file .env.github.secrets --repos <YOUR_GITHUB_USERNAME>/blog

# Replace <YOUR_GITHUB_USERNAME> with your actual GitHub username.
And then let's set the variables:
gh variable set --env-file .env.github.variables --repos <YOUR_GITHUB_USERNAME>/blog

# Replace <YOUR_GITHUB_USERNAME> with your actual GitHub username.
Configure deployment of the Platformatic app and database
We're going to create three GitHub Actions workflows. These workflows will deploy our blog-api app to Platformatic Cloud and our database to Neon:
deploy-preview.yml— We'll configure this workflow to run when we open a pull request. It'll deploy a preview app to the dynamic workspace for our Platformatic Cloud app, and it'll create a branch database on Neon for the app to connect to.deploy-production.yml— We'll configure this workflow to run when we merge a pull request or push directly to ourmainGit branch. It'll deploy the app to the static workspace for our Platformatic Cloud app. This will be our production instance of the app.deploy-preview-cleanup.yml— We'll configure this workflow to run when a pull request is merged or closed. It'll delete any Neon branch database that was created for the pull request as it's no longer needed.
Later on, we'll extend these workflows to deploy our blog front end app to Vercel and configure authentication on Auth0.
If there's any syntax in the following code blocks that you don't recognise, take a look at the Workflow syntax for GitHub Actions documentation.
Create a deploy-preview GitHub Actions workflow
First, let's create a new directory to store our workflows:
mkdir -p .github/workflows
We're now going to build up the workflow step by step, but if you prefer you can copy and paste the the full configuration from the example repository and move on to the next section.
Then let's create a new file inside the .github/workflows directory, named deploy-preview.yml.
Let's add the following code to our deploy-preview.yml file:
# .github/workflows/deploy-preview.yml

name: Deploy preview blog app

on:
  pull_request:
    paths-ignore:
      - 'docs/**'
      - '**.md'
This configures the workflow so it will run when a pull request has been opened, changes have been pushed to the pull request branch, or the pull request has been reopened. The workflow won't run if the only files changed in the pull request are under a docs/ directory or if they all have the file extension .md (Markdown format). This prevents a preview app and database from being deployed if we've only made documentation changes in a pull request.
Now let's start building up the build-and-deploy-api job:
# .github/workflows/deploy-preview.yml

jobs:
  build-and-deploy-api:
    permissions:
      contents: read
      pull-requests: read
    runs-on: ubuntu-latest
    defaults:
      run:
        working-directory: blog-api
    steps:
      - name: Checkout application project repository
        uses: actions/checkout@v3
The permissions we've set allow the job to read files from our repository and to read the details of the pull request which triggered the workflow. Any commands that we run in this job will be run in the blog-api directory.
Now let's add a few steps to handle the creation of a Neon branch database:
# .github/workflows/deploy-preview.yml

    steps:
      # ...

      - name: Delete any existing Neon database for this branch
        uses: neondatabase/delete-branch-by-name-action@main
        with:
          project_id: ${{ vars.NEON_PROJECT_ID }}
          branch_name: ${{ github.head_ref }}
          api_key: ${{ secrets.NEON_API_KEY }}

      - name: Wait for any existing Neon branch database to be deleted
        run: sleep 10

      - name: Create Neon branch database
        id: create-branch-db
        uses: neondatabase/create-branch-action@v3
        with:
          project_id: ${{ vars.NEON_PROJECT_ID }}
          branch_name: ${{ github.head_ref }}
          api_key: ${{ secrets.NEON_API_KEY }}
          username: ${{ secrets.NEON_DB_USER }}
          password: ${{ secrets.NEON_DB_PASSWORD }}
Each time our preview workflow runs, we want it to delete any existing Neon branch database for this pull request and create a new one. This means that when we push new changes to an existing pull request branch, we'll always have a fresh branch database for our preview Platformatic app to connect to. We're also using some of the secrets and variables that we set earlier, as well as the Neon delete-branch-by-name-action and create-branch-action GitHub Actions to take care of calling the Neon API for us.
Now we'll add a couple of steps to build and deploy our Platformatic app to our app's dynamic workspace on Platformatic Cloud:
# .github/workflows/deploy-preview.yml

    steps:
      # ...

      - name: Install Platformatic app dependencies
        run: npm install --omit=dev

      - name: Deploy preview app to Platformatic Cloud
        id: deploy-preview-app
        uses: platformatic/onestep@latest
        with:
          github_token: ${{ secrets.GITHUB_TOKEN }}
          platformatic_workspace_id: ${{ vars.PLATFORMATIC_DYNAMIC_WORKSPACE_ID }}
          platformatic_workspace_key: ${{ secrets.PLATFORMATIC_DYNAMIC_WORKSPACE_API_KEY }}
          platformatic_config_path: ./blog-api/platformatic.db.json
          post_pr_comment: false
          secrets: DATABASE_URL
        env:
          PLT_SERVER_HOSTNAME: ${{ vars.PLT_SERVER_HOSTNAME }}
          PORT: ${{ vars.PLT_SERVER_PORT }}
          PLT_SERVER_LOGGER_LEVEL: ${{ vars.PLT_SERVER_LOGGER_LEVEL }}
          PLT_MIGRATIONS_DB_TYPE: ${{ vars.PLT_MIGRATIONS_DB_TYPE }}
          PLT_SERVER_CORS_ORIGIN: ${{ vars.PLT_SERVER_CORS_ORIGIN }}
          PLT_AUTHORIZATION_JWT_NAMESPACE: ${{ vars.PLT_AUTHORIZATION_JWT_NAMESPACE }}
          PLT_AUTHORIZATION_JWT_JWKS_ALLOWED_DOMAINS: ${{ vars.PLT_AUTHORIZATION_JWT_JWKS_ALLOWED_DOMAINS }}
          DATABASE_URL: ${{ steps.create-branch-db.outputs.db_url }}/neondb
In these steps, we're installing the dependencies for our Platformatic app and then running the Platformatic onestep GitHub Action. This bundles our Platformatic app and deploys it to Platformatic Cloud.
Later in our preview workflow, we'll be posting our own custom comment on the pull request after the deployment completes, so we've disabled the onestep GitHub Action from posting a comment with post_pr_comment: false.
We're using the env block to pass configuration settings as environment variables to our Platformatic app. These settings are then used in our app's platformatic.db.json configuration file.
In the DATABASE_URL environment variable, we're using the Postgres URL for the Neon branch database that we created in the previous steps. This environment variable is a sensitive configuration setting, as it can be used to connect to the Neon branch database. By setting secrets: DATABASE_URL in the deploy-preview-app step, this value will be encrypted by Platformatic Cloud when we deploy our app.
Now we're going define a couple of output values for the build-and-deploy-api job. This will allow us to use them in an other job. Let's add an outputs block at the top of our build-and-deploy-api job so that it looks like this:
# .github/workflows/deploy-preview.yml

jobs:
  build-and-deploy-api:
    permissions:
      contents: read
      pull-requests: read
    runs-on: ubuntu-latest
    outputs:
      platformatic_app_url: ${{ steps.deploy-preview-app.outputs.platformatic_app_url }}
      neon_branch_url: https://console.neon.tech/app/projects/${{ vars.NEON_PROJECT_ID }}/branches/${{ steps.create-branch-db.outputs.branch_id }}
And finally, lets add a comment-on-pr to post a comment on the pull request that triggered this workflow:
# .github/workflows/deploy-preview.yml

jobs:
  # ...

  comment-on-pr:
    permissions:
      pull-requests: write
    runs-on: ubuntu-latest
    if: ${{ always() }}
    needs: build-and-deploy-api
    steps:
      - name: Comment on pull request with preview URLs
        uses: thollander/actions-comment-pull-request@v2
        with:
          message: |
            ### :cloud: Blog API preview app
            ${{ needs.build-and-deploy-api.outputs.platformatic_app_url }} (Platformatic Cloud)

            ### :elephant: Blog branch database
            ${{ needs.build-and-deploy-api.outputs.neon_branch_url }} (Neon)
          comment_tag: preview-app-urls
          mode: upsert
In this job we're using the actions-comment-pull-request GitHub Action to post a comment on the pull request. The comment includes the URLs that we defined as outputs in the build-and-deploy-api job.
The if: ${{ always() }} statements that we've added for this job means that it will always run, even if the build-and-deploy-api job fails. For example, if the deployment of the Platformatic preview app is successful, but there's an error when deploying the Neon branch database, we'll still be able to post a comment on the pull request with the Platformatic preview app URL.
Now that we've put together our preview GitHub Actions workflow, we're ready to use it to deploy a preview API and database.
Deploy a preview API and database
First, let's add, commit and push our changes with Git:
git add .github/workflows/deploy-preview.yml

git commit --message "Add deploy-preview GitHub Actions workflow"

git push --set-upstream origin configure-api-deployment
And then let's open a pull request for our configure-api-deployment branch on GitHub.
This guide from GitHub shows how to open a pull request in your web browser. If you have the GitHub CLI setup, you can run
gh pr createto create a pull request from your terminal.
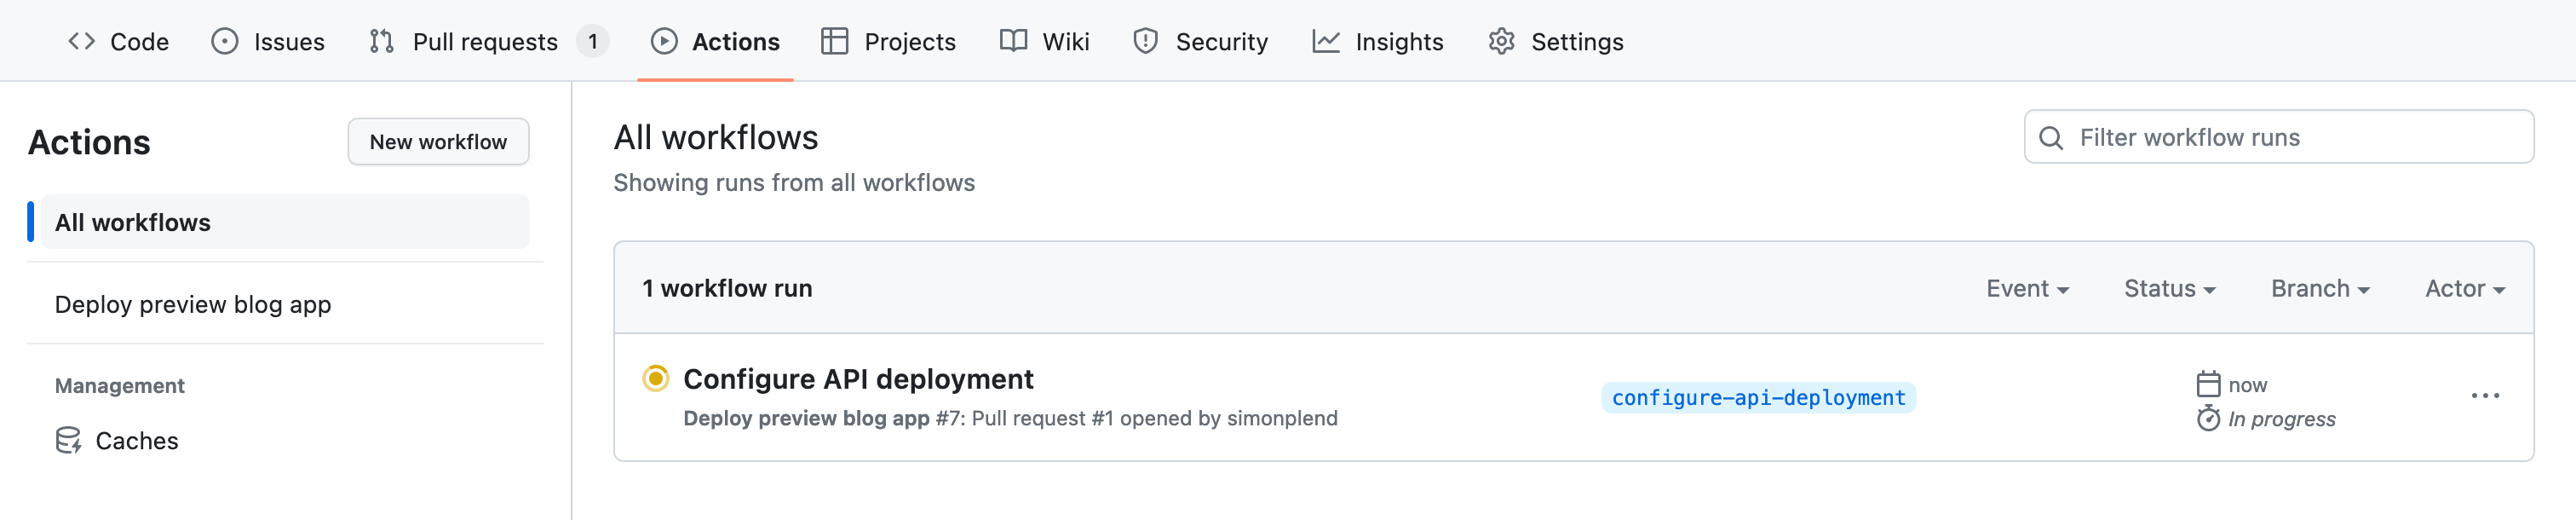
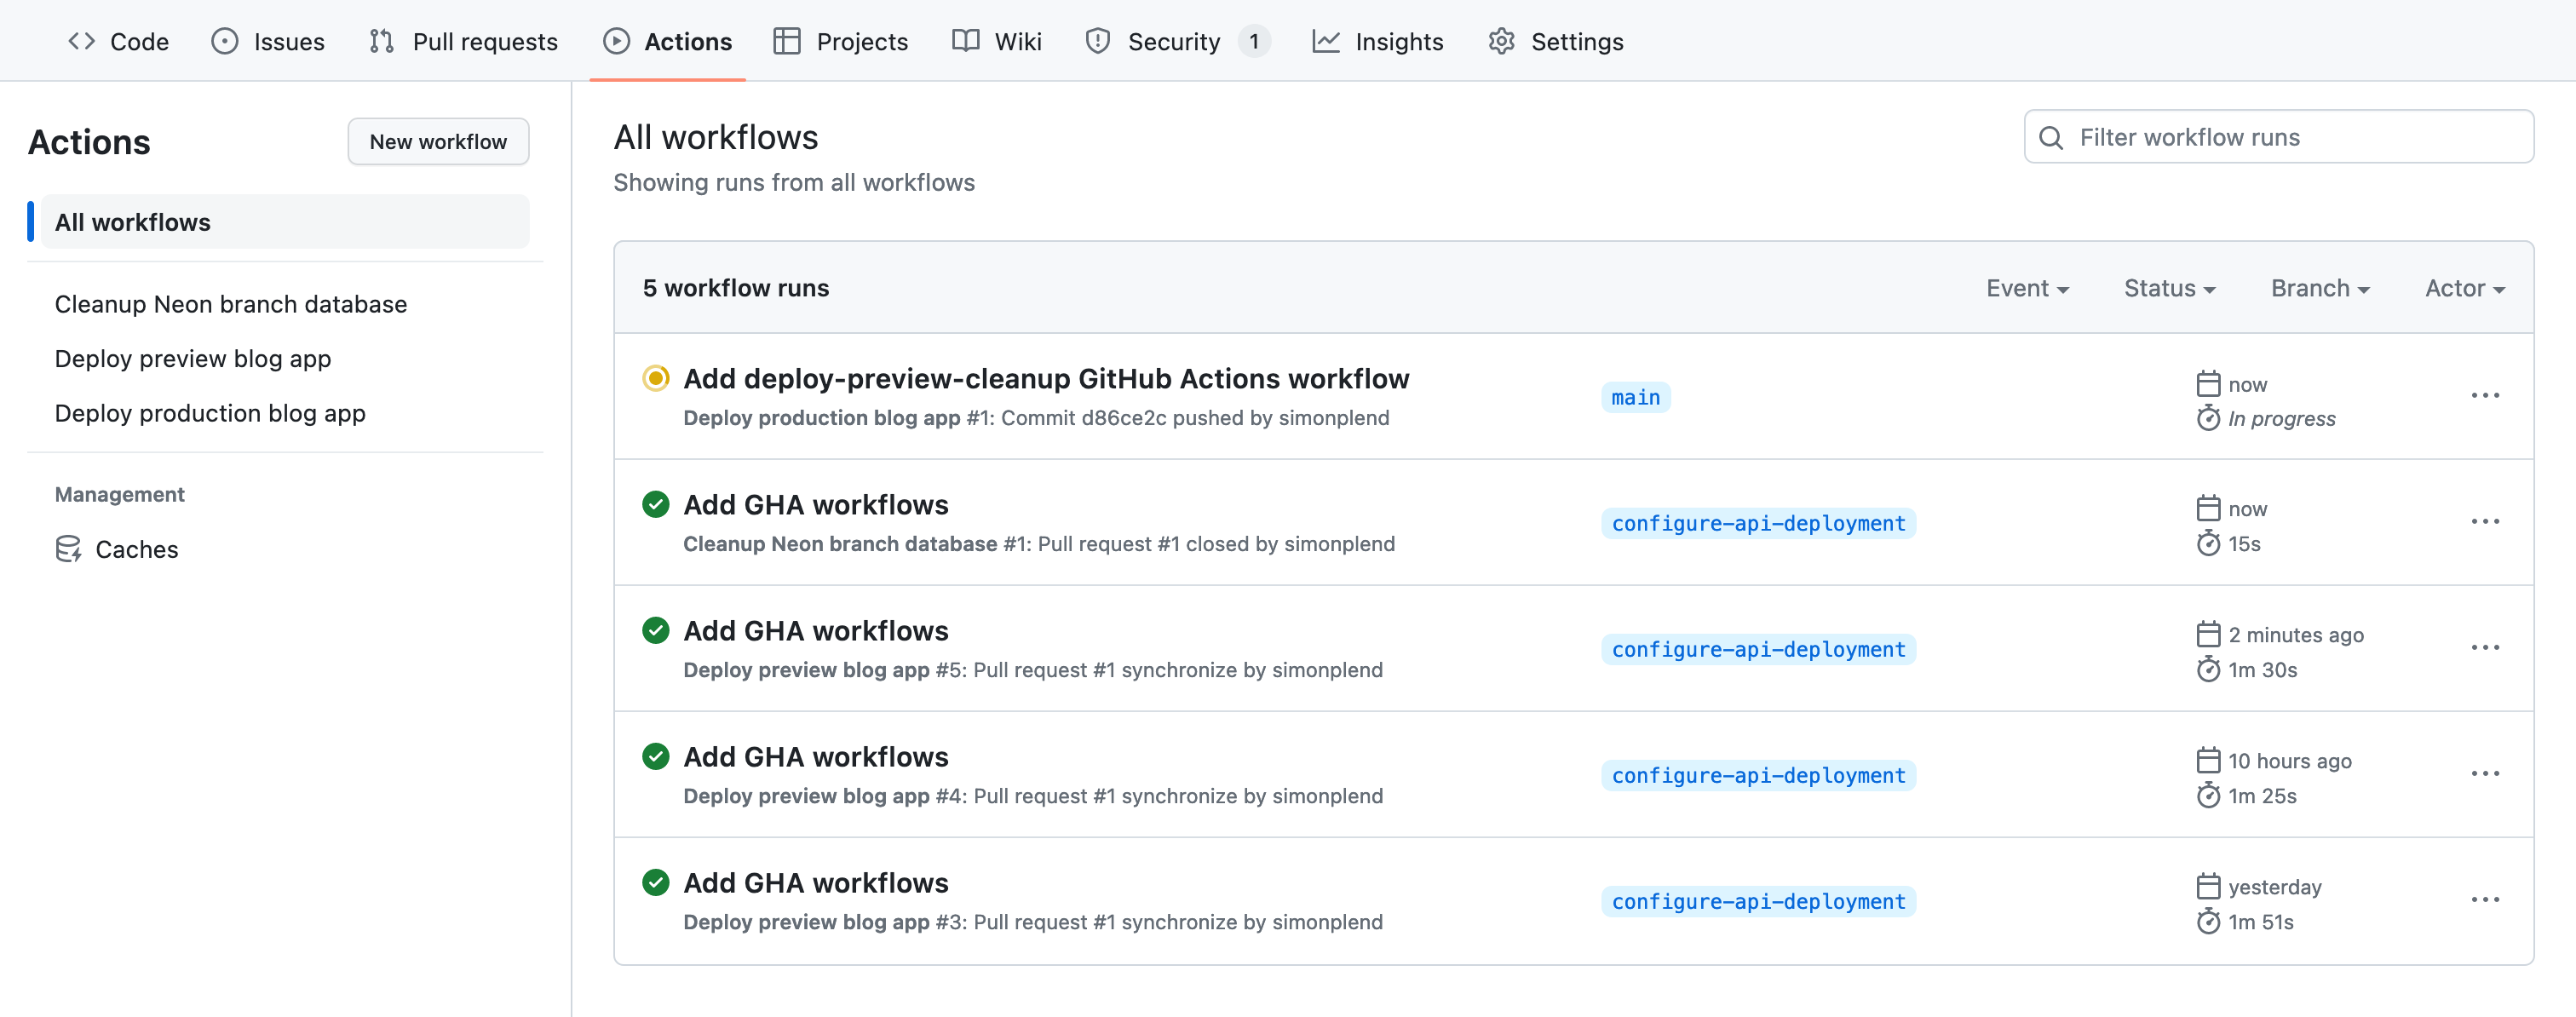
Once we've opened the pull request, let's click on the Actions tab on our GitHub repository, where we should see the preview workflow running.
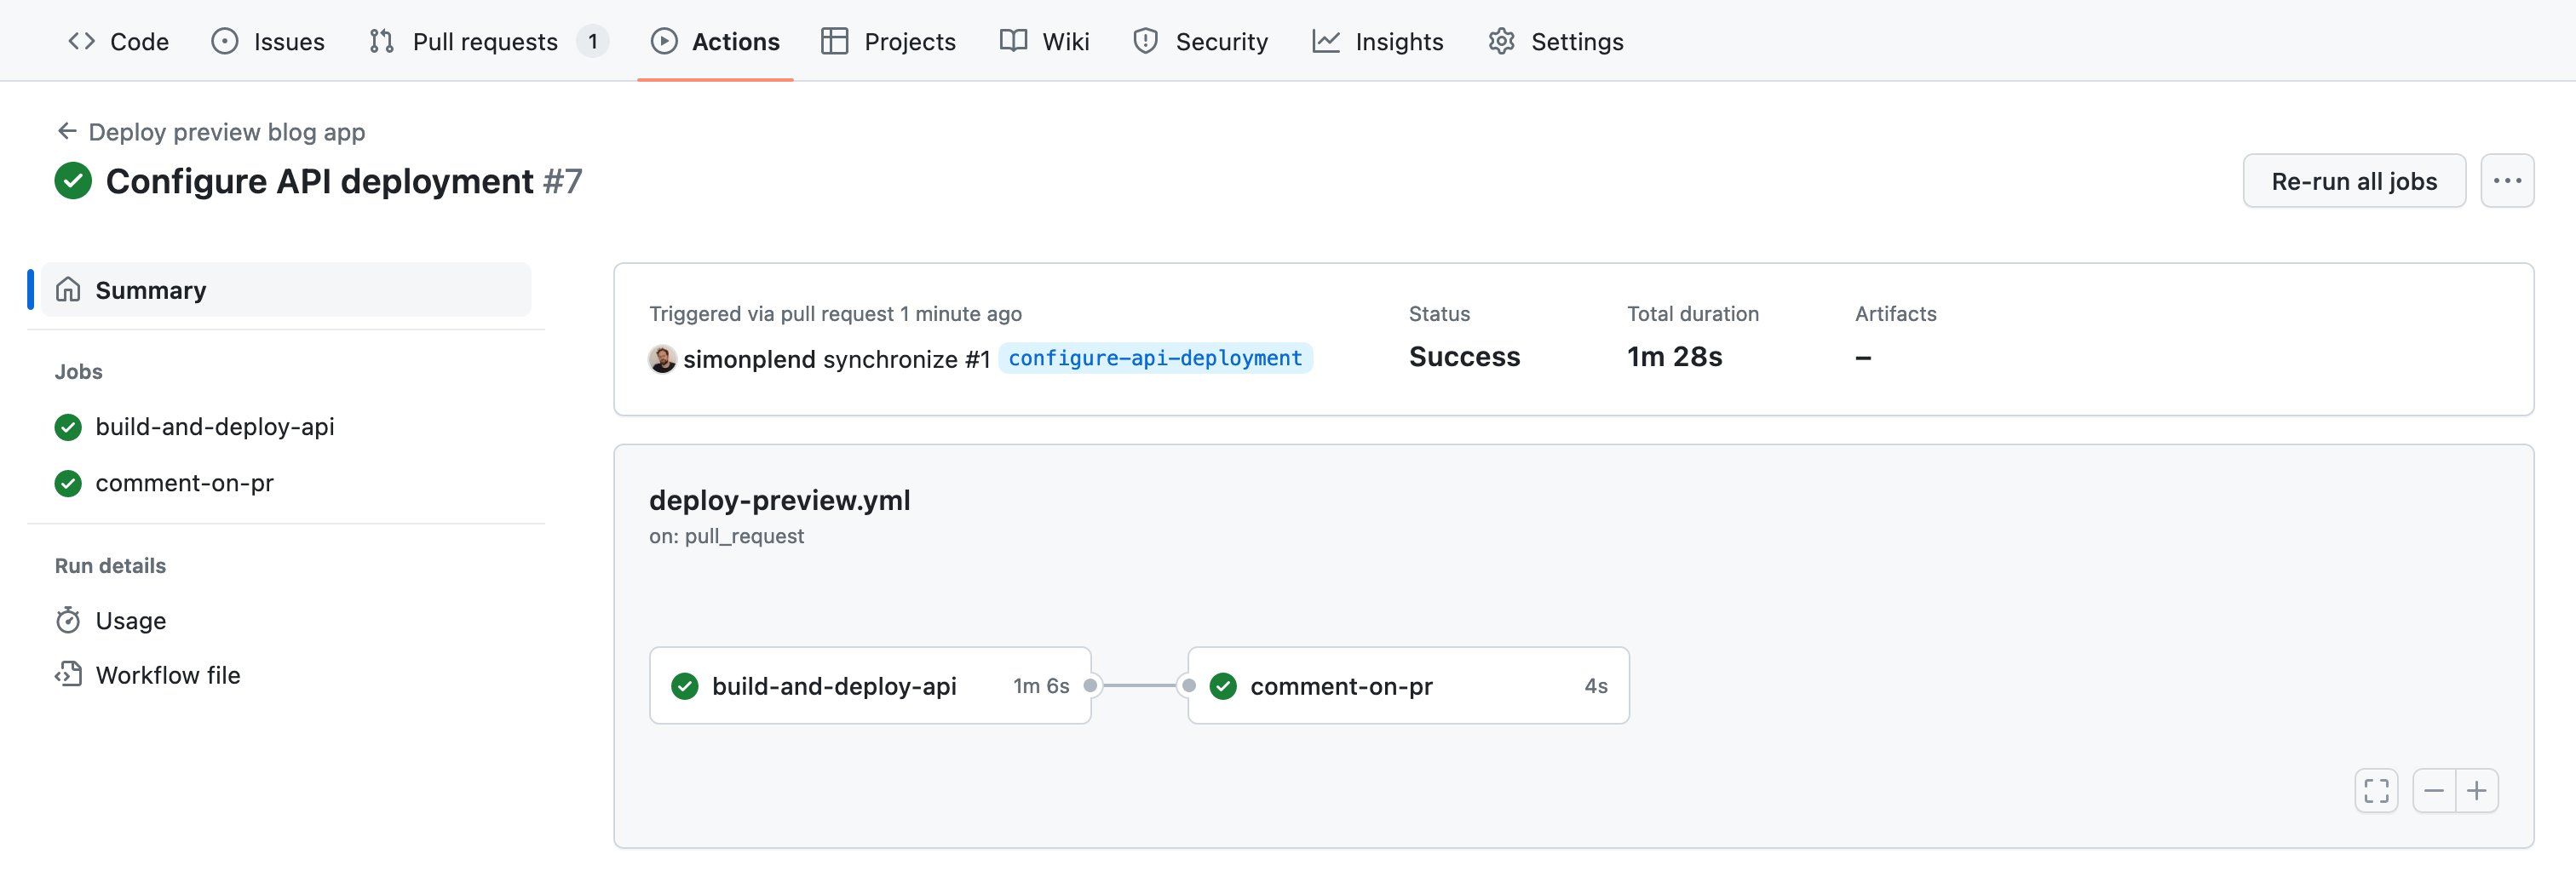
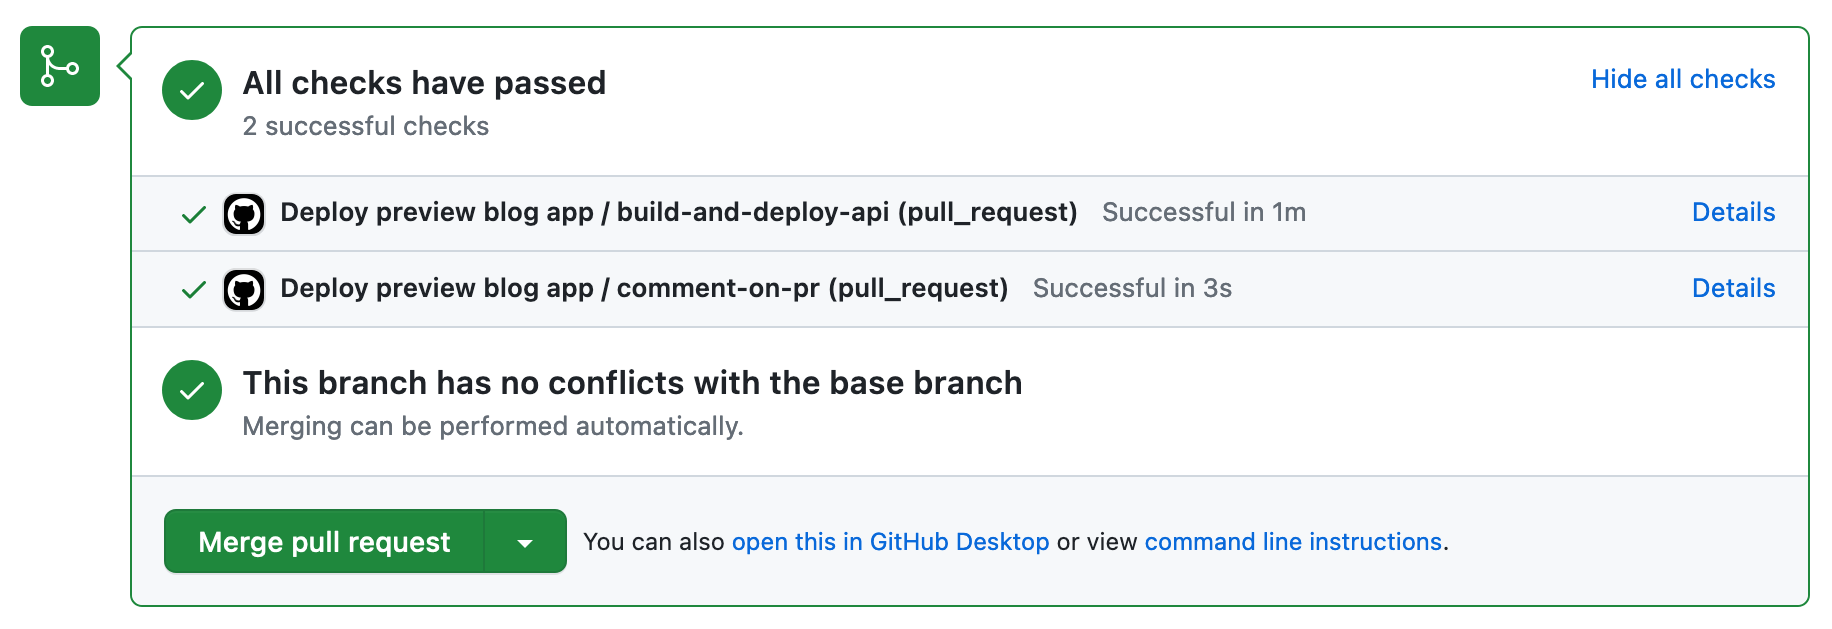
Once the workflow has completed successfully, let's go back to the page for our pull request. We should now see a comment containing preview URLs that has been posted by our workflow:
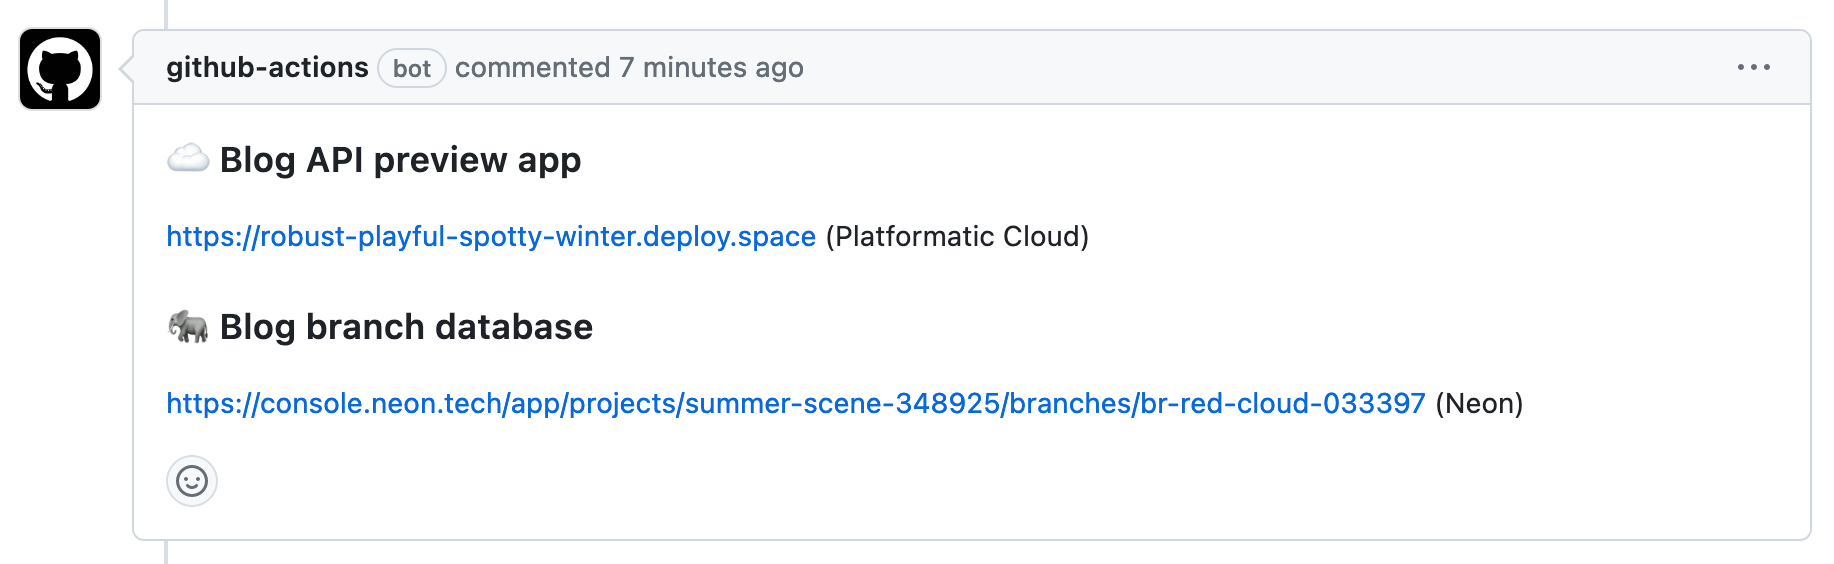
Now that we have a preview API and database deployed for our pull request, it's time to give it a test.
Test the preview API
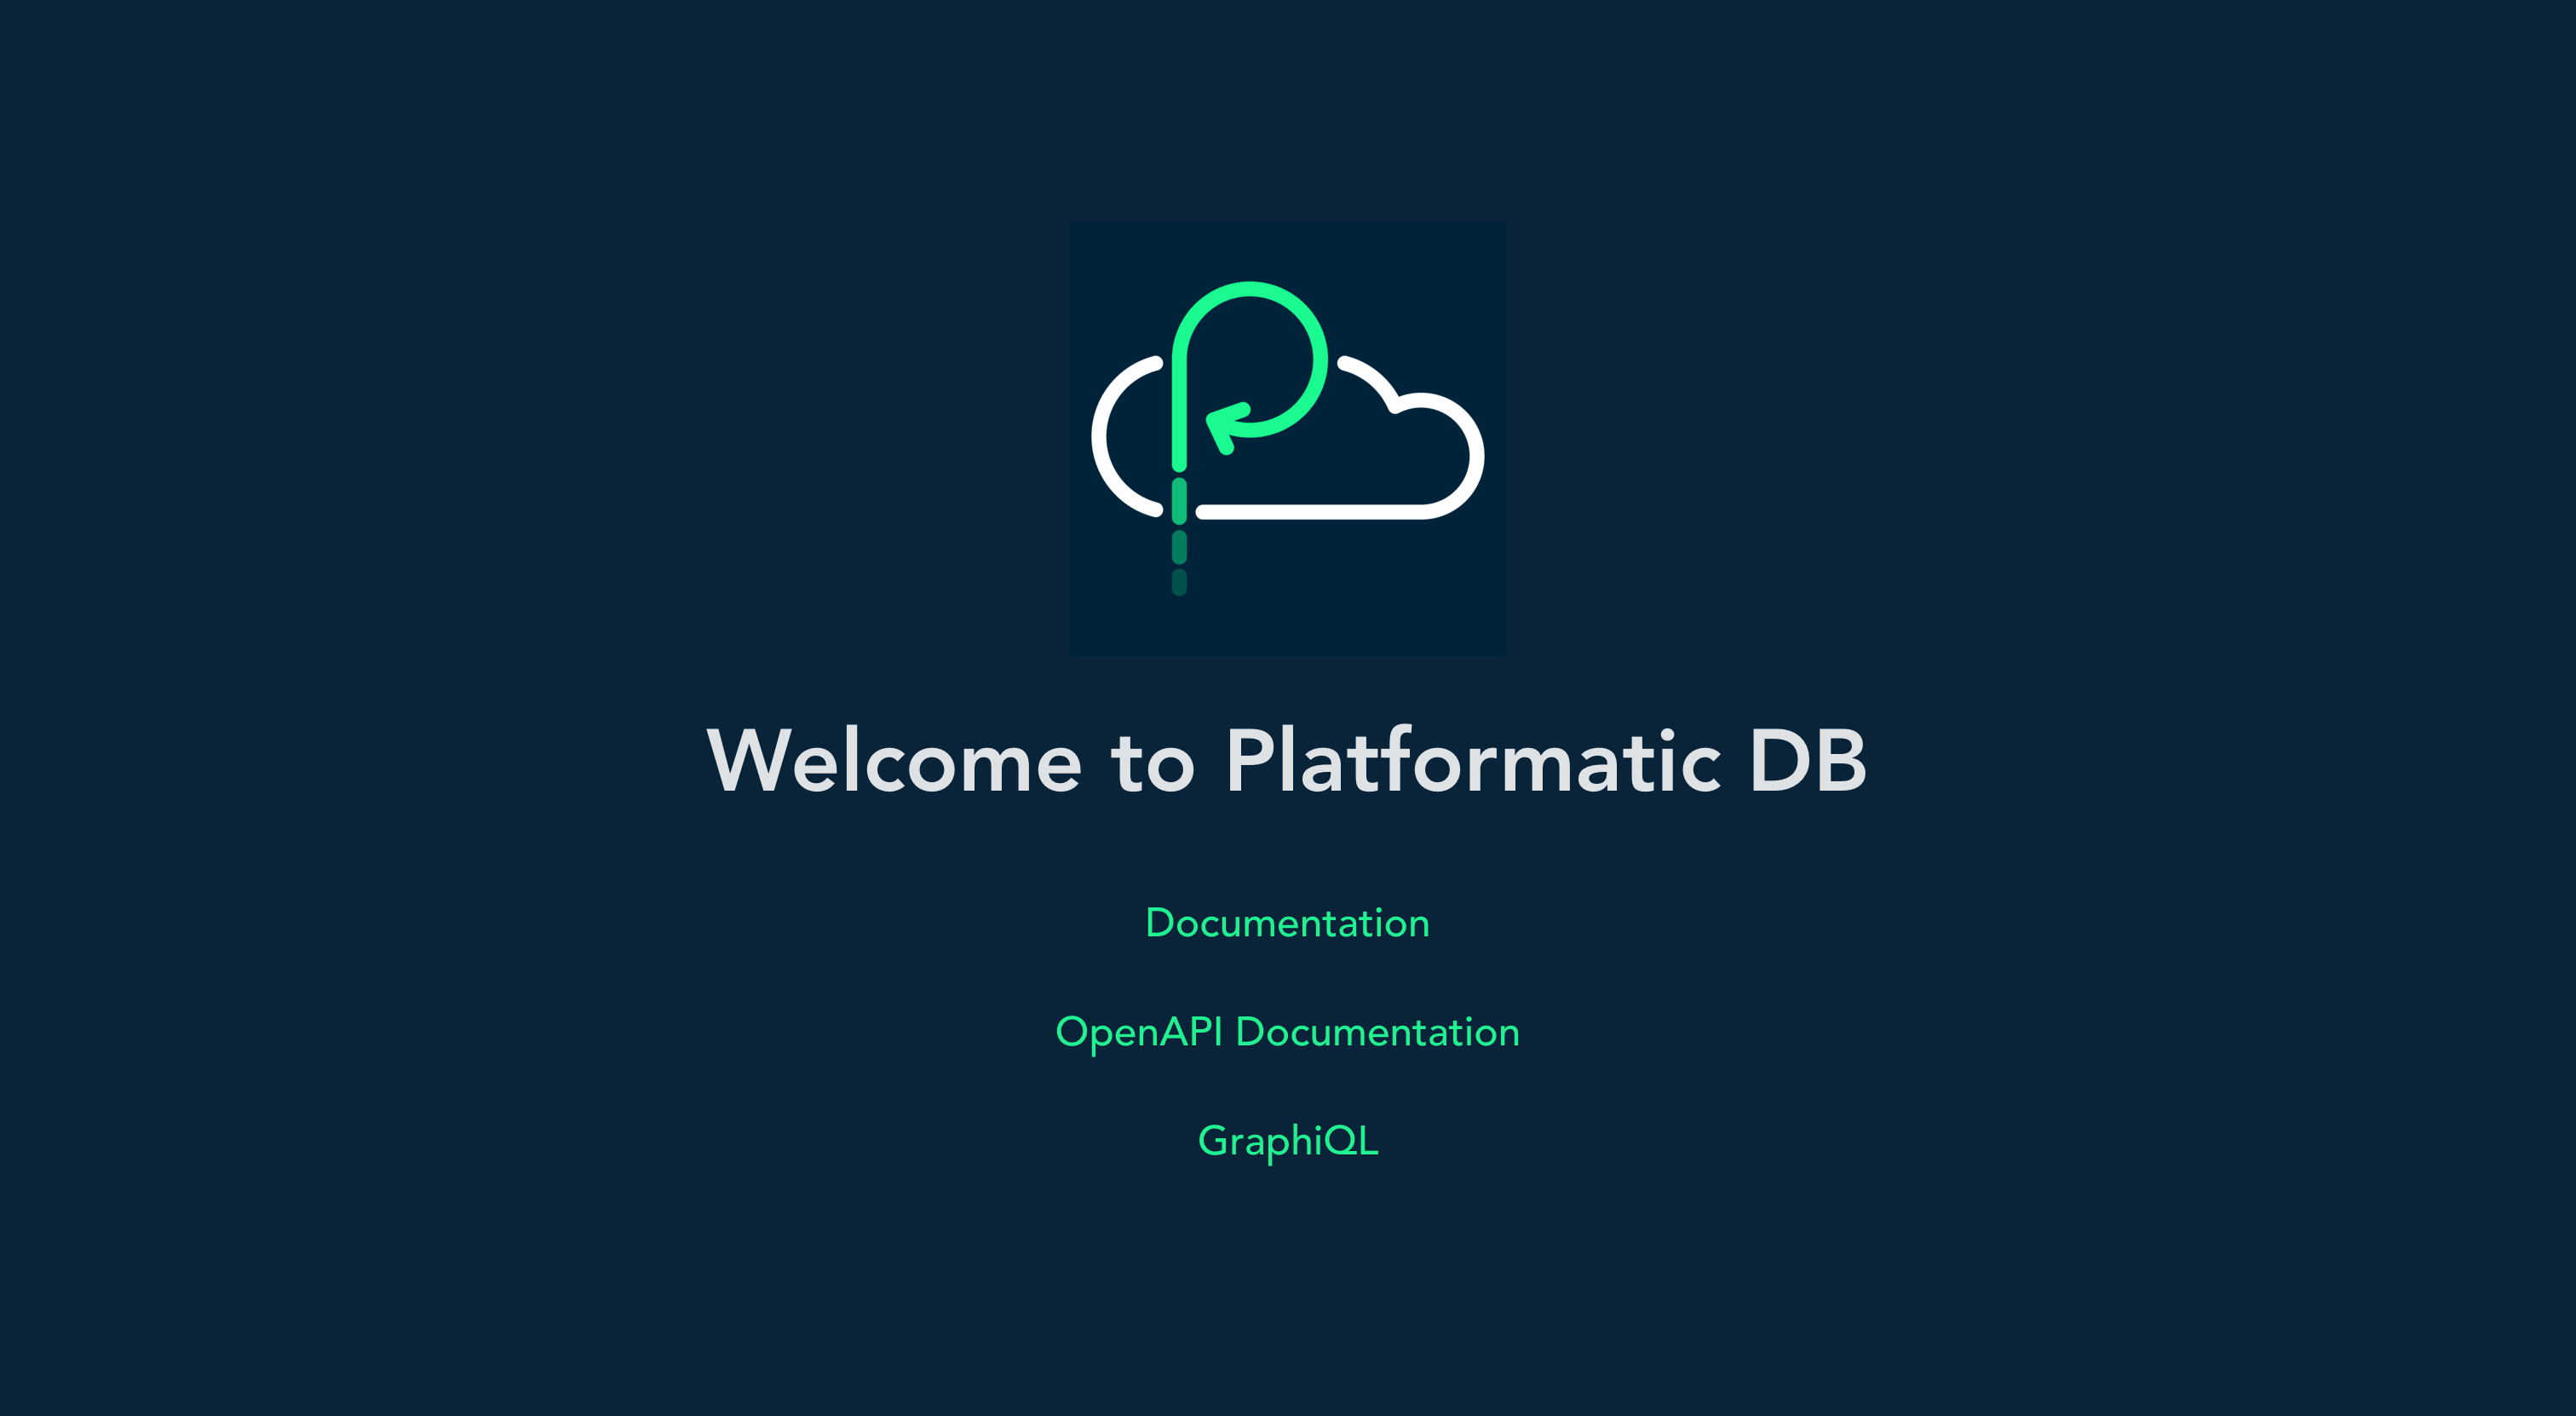
To test our preview API, let's click on the Blog API preview app link in the comment on our pull request (the one which ends with .deploy.space). We should see the Platformatic DB home page for our preview app:
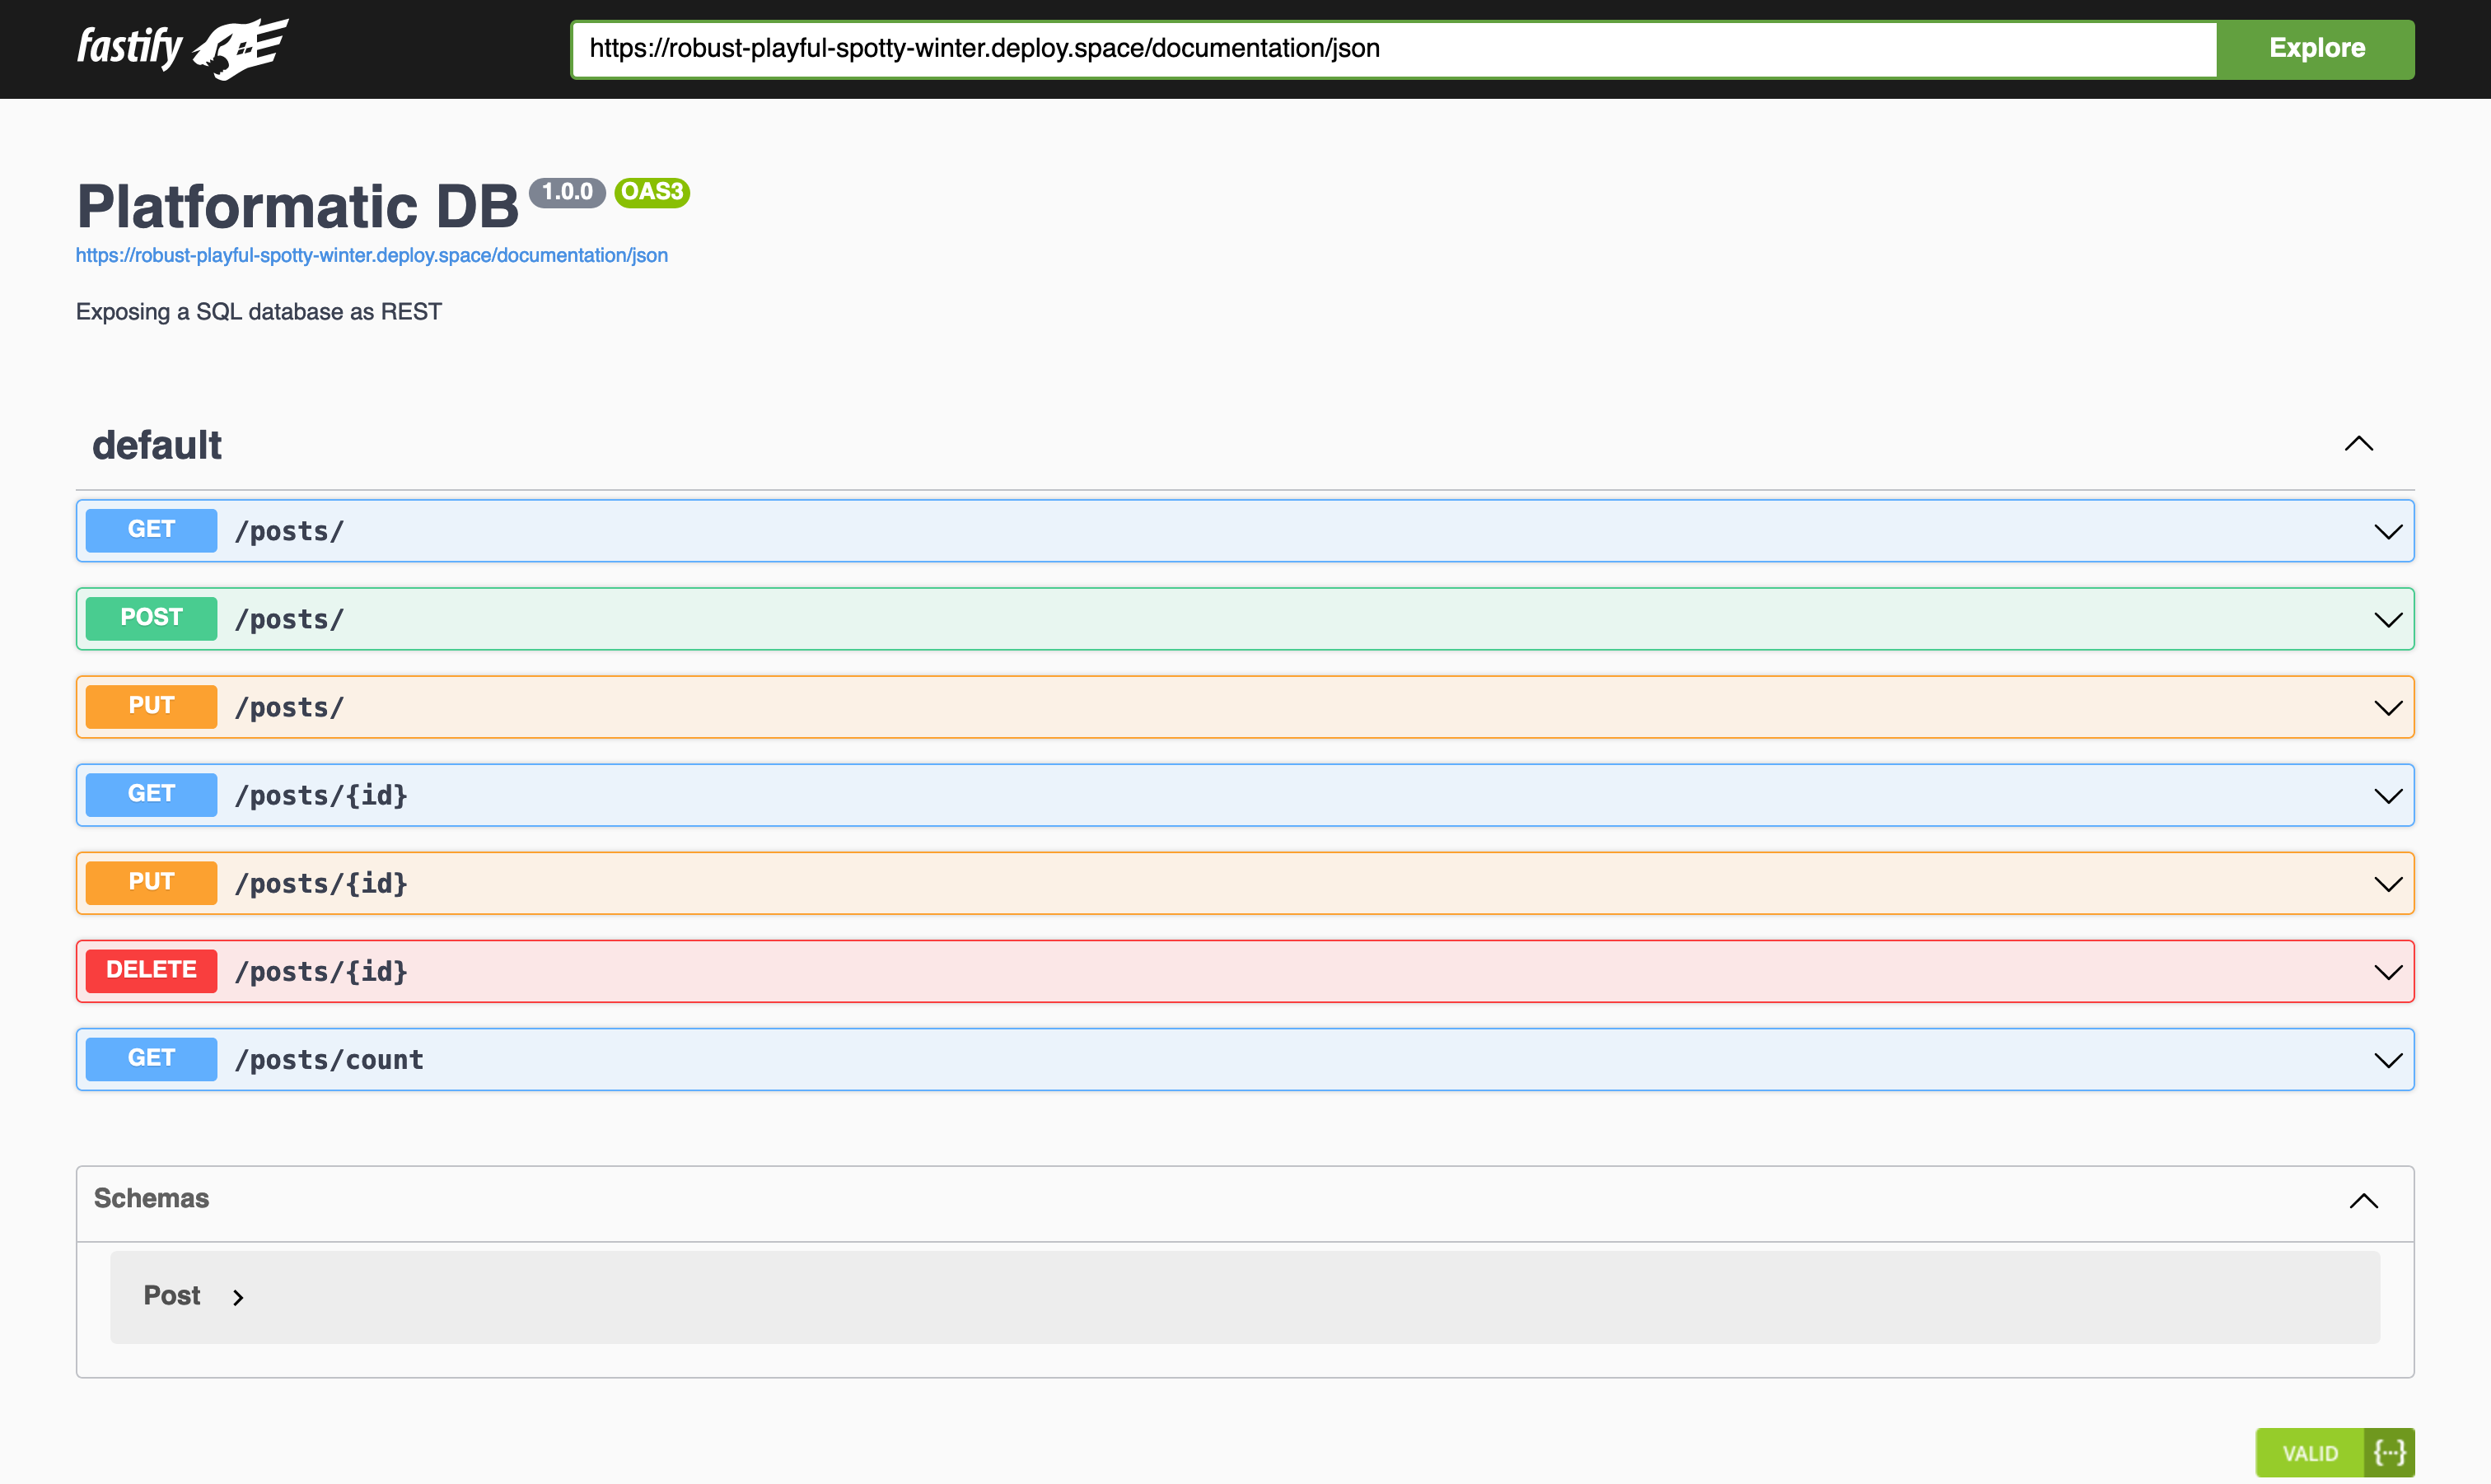
If we click on the OpenAPI Documentation link, we should then see the interactive documentation for our app's REST API:
Now, let's copy the Blog API preview app URL from the pull request comment. Then we can use it to make a request with curl to our app's /posts REST API endpoint:
curl <PLATFORMATIC_PREVIEW_APP_URL>/posts

# Replace <PLATFORMATIC_PREVIEW_APP_URL> with the URL for your preview app.
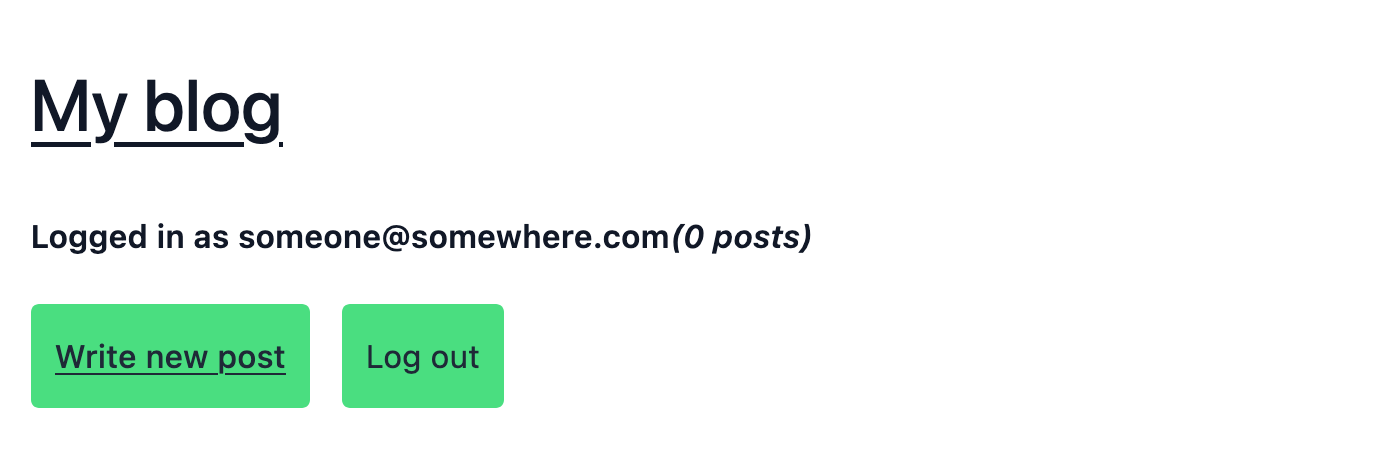
The response to this request should be an empty array:
[]
We're getting an empty array back because the posts table in our branch database doesn't yet have any records in it. We'll add some later after we've deployed our front end app, but for now everything is looking good.
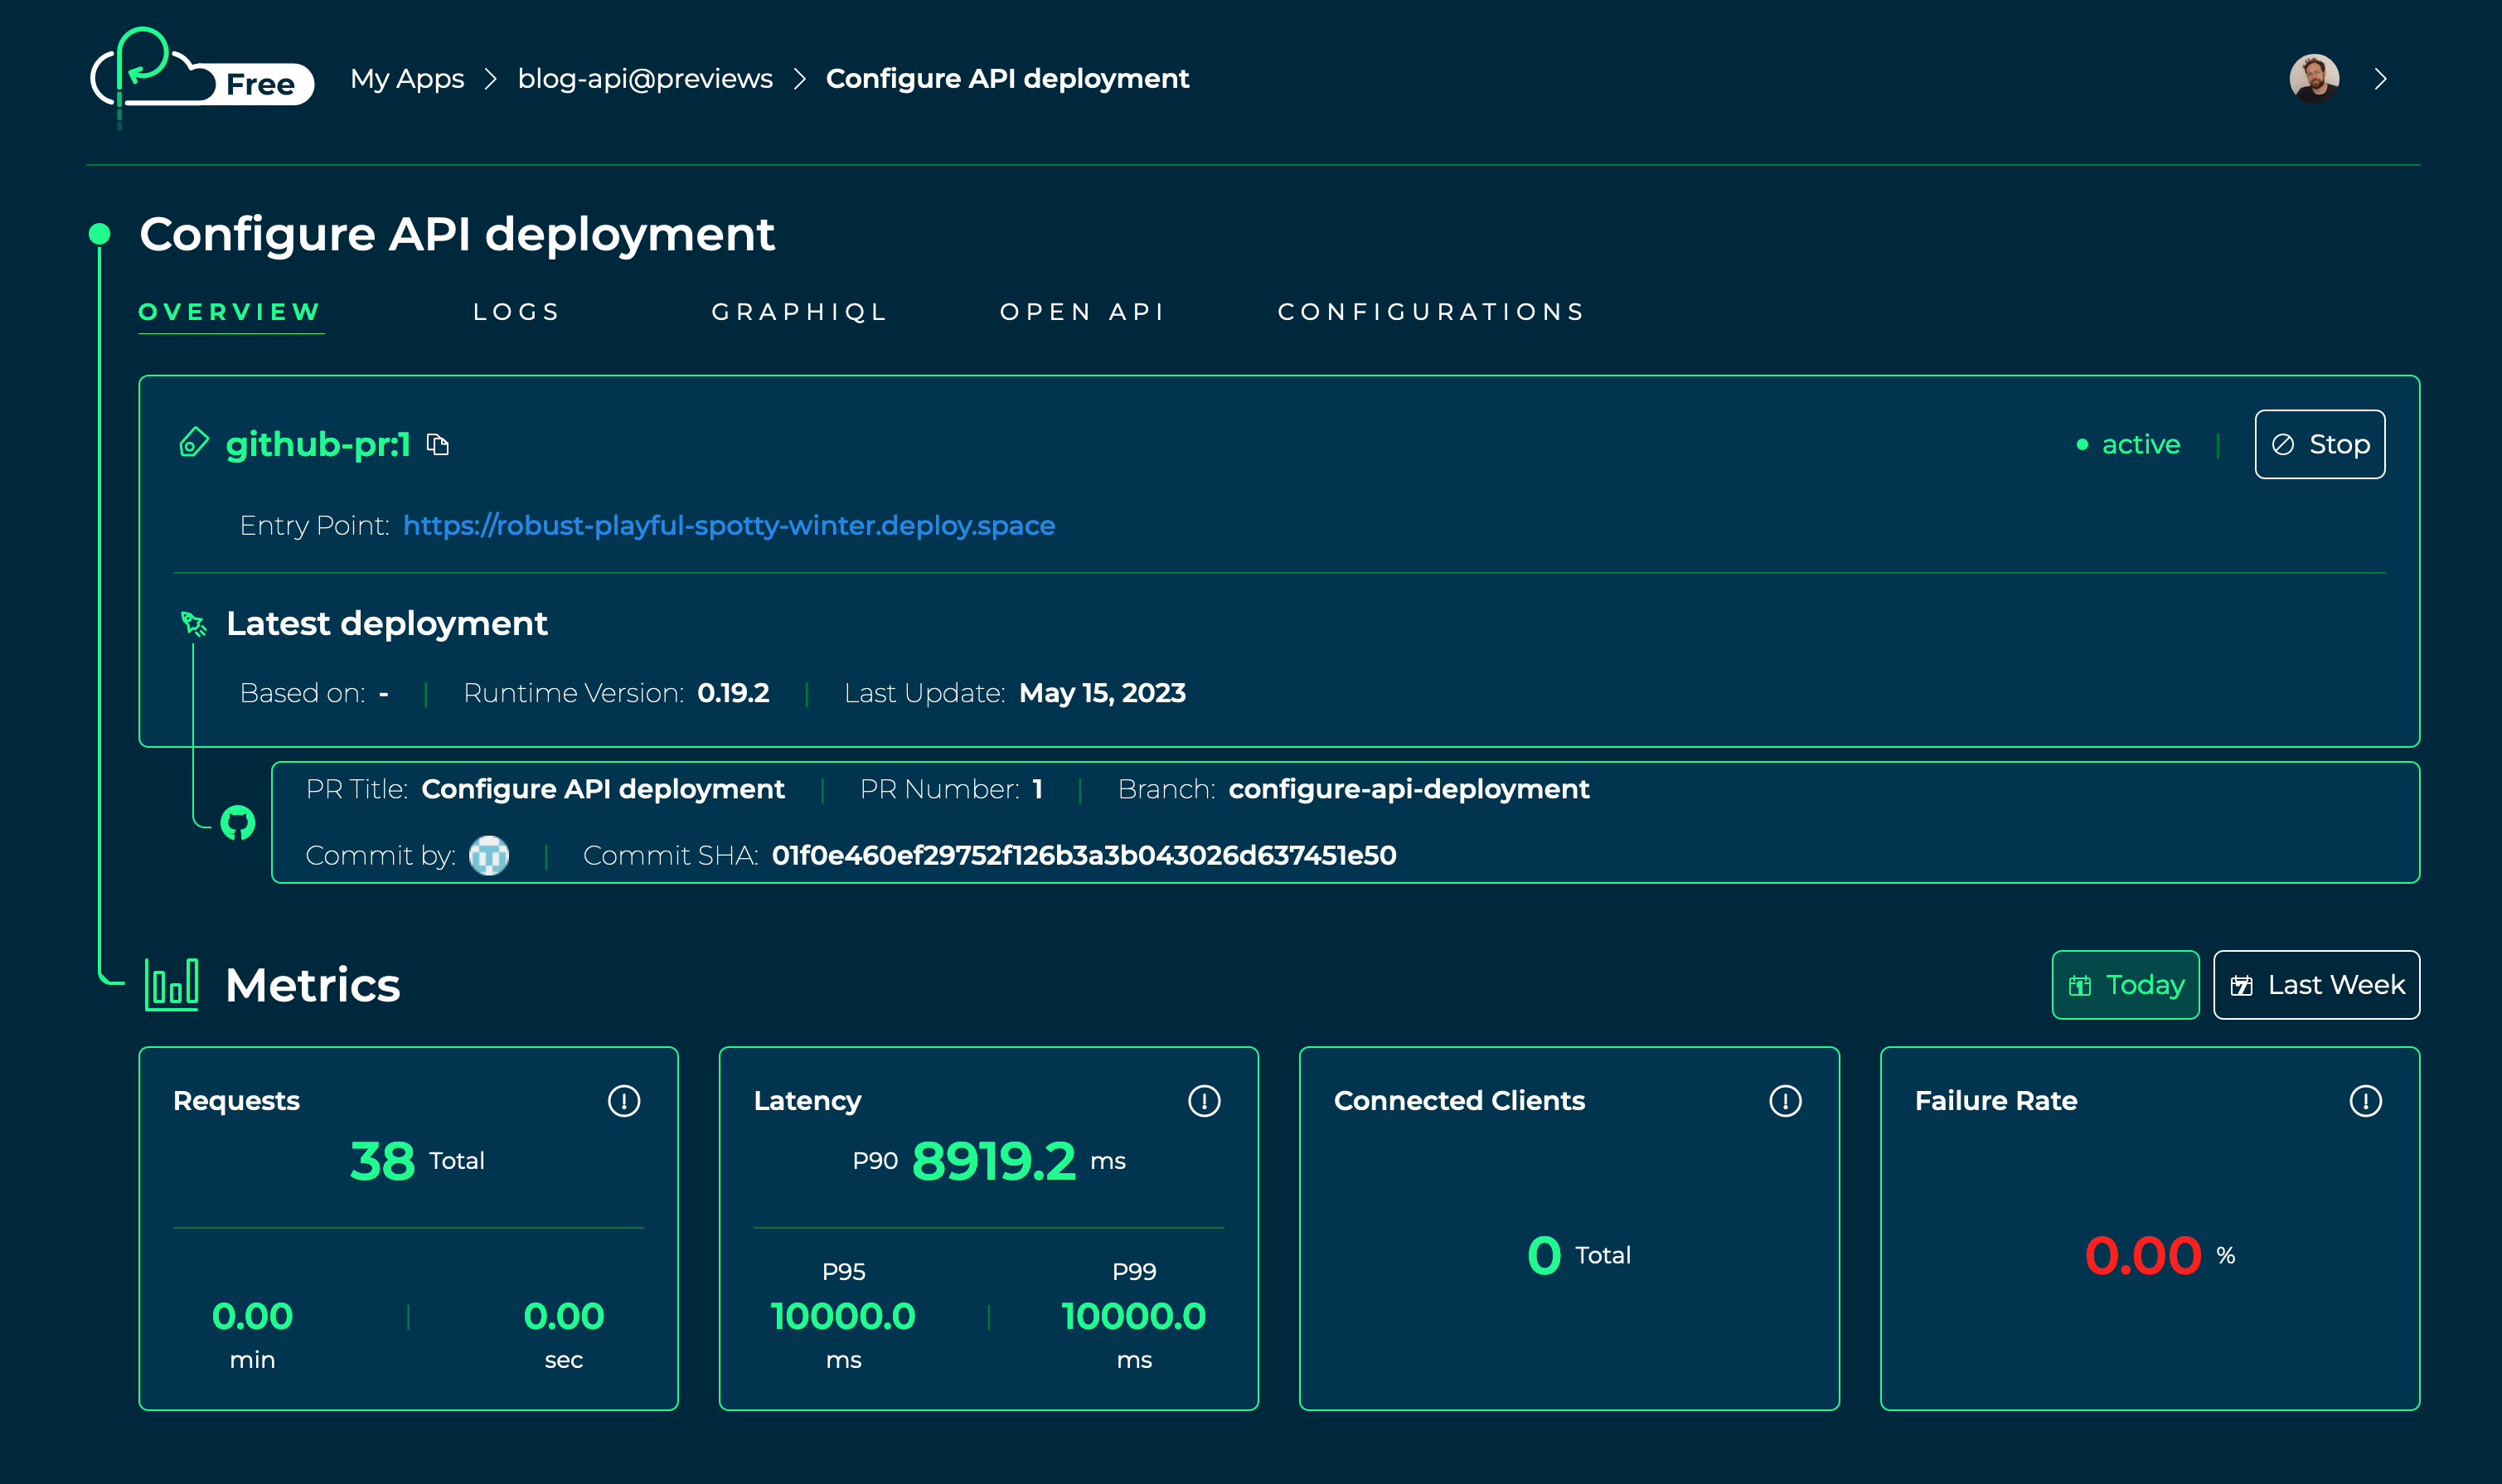
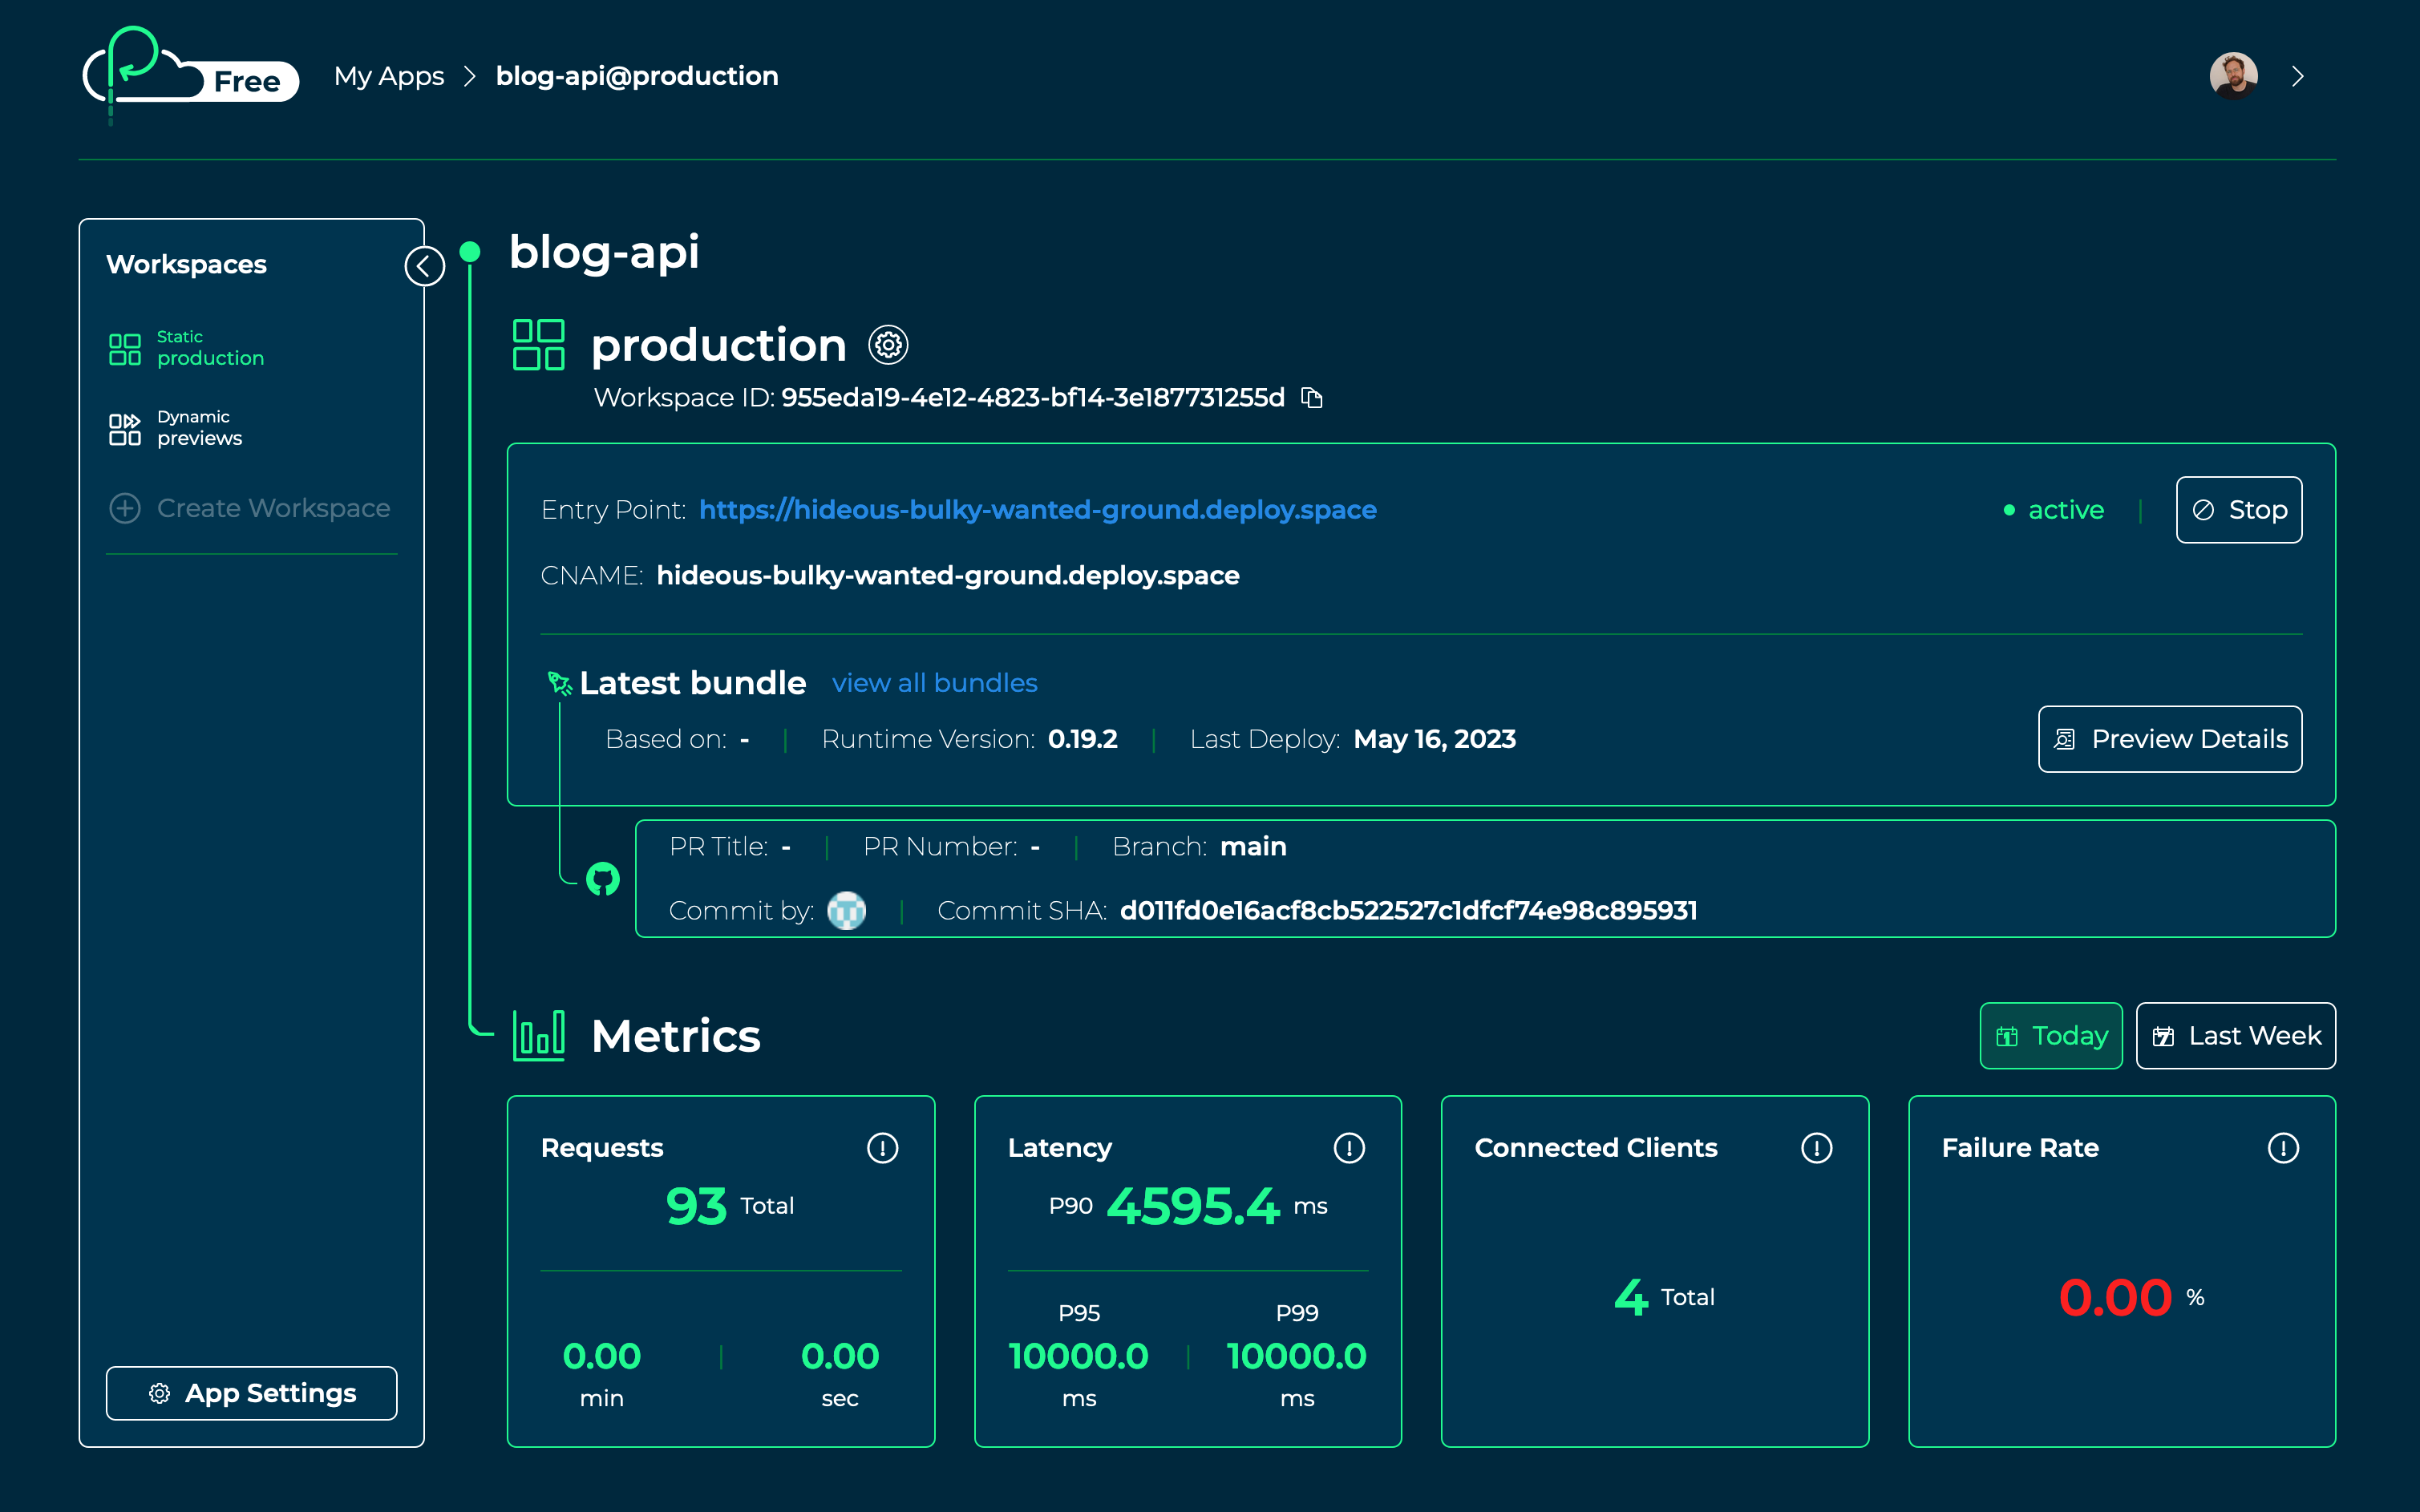
Finally, let's head over to our Platformatic Cloud dashboard and click on our blog-api app. Under Workspaces, let's click on the previews workspace, then we can click on the Preview Details button to view the metrics and logs for our preview app:
Now that our preview GitHub Actions workflow is successfully deploying a preview API and database for pull requests, we need to create a workflow to clean things up after the pull request is merged or closed.
Create a deploy-preview-cleanup GitHub Actions workflow
When a pull request is merged or closed, we want to delete the Neon branch database that was created for that pull request.
Let's create a new workflow file inside the .github/workflows directory, named deploy-preview-cleanup.yml.
We're going to build up this workflow step by step too, but if you prefer you can copy and paste the the full configuration from the example repository and move on to the next section instead of building up this workflow step by step.
And then let's add the following code:
# .github/workflows/deploy-preview-cleanup.yml

name: Cleanup Neon branch database

on:
  pull_request:
    types: closed
This configures our cleanup workflow to run whenever a pull request is merged or closed.
Now let's add a delete-branch-database job:
# .github/workflows/deploy-preview-cleanup.yml

jobs:
  delete-branch-database:
    runs-on: ubuntu-latest
    steps:
      - name: Find Neon branch database by name
        id: get-branch-id
        run: |
          branch_id=$(\
            curl --silent \
              "https://console.neon.tech/api/v2/projects/${PROJECT_ID}/branches" \
              --header "Accept: application/json" \
              --header "Content-Type: application/json" \
              --header "Authorization: Bearer ${API_KEY}" \
                | jq -r .branches \
                  | jq -c '.[] | select(.name | contains("'${BRANCH_NAME}'")) .id' \
                    | jq -r \
          )

          echo "branch_id=${branch_id}" >> $GITHUB_OUTPUT
        env:
          PROJECT_ID: ${{ vars.NEON_PROJECT_ID }}
          API_KEY: ${{ secrets.NEON_API_KEY }}
          BRANCH_NAME: ${{ github.head_ref }}

      - name: Delete Neon branch database
        uses: neondatabase/delete-branch-action@v2
        with:
          project_id: ${{ vars.NEON_PROJECT_ID }}
          branch_id: ${{ steps.get-branch-id.outputs.branch_id }}
          api_key: ${{ secrets.NEON_API_KEY }}
First, we're calling the Neon API to find the branch database with a name that matches the name of the pull request branch that was merged. Once we've extracted the ID for the matching branch database, we're then using the Neon delete-branch-action GitHub Action to delete the branch database.
Create a deploy-production GitHub Actions workflow
Now we're going to create our third and final workflow, which we'll configure to deploy our API to production.
Once again, if you prefer to, you can copy and paste the the full configuration from the example repository and move on to the next section.
First, let's create a new file inside the .github/workflows directory, named deploy-production.yml.
Then let's add the following code:
# .github/workflows/deploy-production.yml

name: Deploy production blog app

on:
  push:
    branches:
      - main
    paths-ignore:
      - 'docs/**'
      - '**.md'
This configures the workflow to run whenever we push changes to the main branch (including when a pull request is merged). We're ignoring any pushes that only contain documentation changes.
Now we'll define a build-and-deploy-api job and add a step to checkout the repository:
# .github/workflows/deploy-production.yml

jobs:
  build-and-deploy-api:
    permissions:
      contents: read
    runs-on: ubuntu-latest
    outputs:
      platformatic_app_url: ${{ steps.deploy-production-app.outputs.platformatic_app_url }}
    defaults:
      run:
        working-directory: blog-api
    steps:
      - name: Checkout application project repository
        uses: actions/checkout@v3
Then we'll add steps to build and deploy our Platformatic app to our app's static workspace on Platformatic Cloud:
# .github/workflows/deploy-production.yml

    steps:
      # ...

      - name: Install Platformatic app dependencies
        run: npm install --omit=dev

      - name: Deploy production app to Platformatic Cloud
        id: deploy-production-app
        uses: platformatic/onestep@latest
        with:
          github_token: ${{ secrets.GITHUB_TOKEN }}
          platformatic_workspace_id: ${{ vars.PLATFORMATIC_STATIC_WORKSPACE_ID }}
          platformatic_workspace_key: ${{ secrets.PLATFORMATIC_STATIC_WORKSPACE_API_KEY }}
          platformatic_config_path: ./blog-api/platformatic.db.json
          secrets: DATABASE_URL
        env:
          PLT_SERVER_HOSTNAME: ${{ vars.PLT_SERVER_HOSTNAME }}
          PORT: ${{ vars.PLT_SERVER_PORT }}
          PLT_SERVER_LOGGER_LEVEL: ${{ vars.PLT_SERVER_LOGGER_LEVEL }}
          PLT_MIGRATIONS_DB_TYPE: ${{ vars.PLT_MIGRATIONS_DB_TYPE }}
          PLT_SERVER_CORS_ORIGIN: ${{ vars.PLT_SERVER_CORS_ORIGIN }}
          PLT_AUTHORIZATION_JWT_NAMESPACE: ${{ vars.PLT_AUTHORIZATION_JWT_NAMESPACE }}
          PLT_AUTHORIZATION_JWT_JWKS_ALLOWED_DOMAINS: ${{ vars.PLT_AUTHORIZATION_JWT_JWKS_ALLOWED_DOMAINS }}
          DATABASE_URL: ${{ secrets.NEON_DB_URL_PRODUCTION }}
This production build-and-deploy-api job is similar to the one in our preview workflow. It's a little simpler though, as we don't need to create a Neon branch database. We already have a fixed main database on Neon that our production Platformatic app will connect to (the Postgres URL for this database is stored in secrets.NEON_DB_URL_PRODUCTION).
Deploy the API and database to production
Let's commit our production and cleanup workflows and push them up to GitHub:
git add .github/workflows/deploy-production.yml
git commit --message "Add deploy-production GitHub Actions workflow"

git add .github/workflows/deploy-preview-cleanup.yml
git commit --message "Add deploy-preview-cleanup GitHub Actions workflow"

git push origin configure-api-deployment
Then, on the pull request page on GitHub, let's click the Merge pull request button to merge our pull request.
Once we've merged our pull request, our production and cleanup GitHub Actions workflows should run automatically. We can head over to our repository's Actions tab to see them running.
Before we test our production API deployment, let's bring our local Git repository's main branch in sync with the main branch on GitHub:
git checkout main

git pull
Test the production API
Now that our production API has been deployed, let's open up our Platformatic Cloud dashboard and click on our blog-api app. Under Workspaces, let's click on the production workspace, then we can click on the Entry Point link (the one which ends with .deploy.space). We should see the Platformatic DB home page for our preview app.
Now, let's copy the Entry Point URL and use it to make a request to our app's /posts REST API endpoint:
curl <PLATFORMATIC_PRODUCTION_APP_URL>/posts

# Replace <PLATFORMATIC_PRODUCTION_APP_URL> with the URL for your production app.
As before with our preview app, the response to this request should be an empty array, as the posts table in our branch database doesn't yet have any records in it:
[]
Now that we've set up automated preview and production deployments for our blog API, we're ready to do the same for our blog front end app.
Deploy the front end
We're now going to configure things with Vercel ready to deploy our blog front end app. We'll then be configuring things in Auth0 so that all deployments of our blog have fully functioning authentication flows. Once everything is configured there, we'll add configuration to the preview and production GitHub Actions workflows to deploy our blog front end app.
Create a Vercel API access token
First, we need to create a Vercel API access token that we can use with the Vercel CLI.
Once we've logged into our Vercel account, let's click on Settings and then click on Tokens. On the Tokens page, we'll fill out the Create Token form with these settings:
- Token Name: deploy-blog-app
- Scope: Full Account
- Expiration: 1 Year
We can then click on the Create button to create a token.
A Token Created overlay will be displayed, showing our new token. Let's copy the token value and paste it into our .env.github.secrets file as the value for VERCEL_TOKEN.
You can learn more about Vercel API tokens in their documentation.
Create a Vercel project
First, let's globally install the Vercel CLI via the terminal:
npm install --global vercel
Once the CLI is installed, we can change into our project's blog-frontend directory:
cd blog-frontend
And run this command to link the blog-frontend directory to a new Vercel Project:
vercel link --yes --token <YOUR_VERCEL_API_TOKEN>

# Replace <YOUR_VERCEL_API_TOKEN> with the value you saved in
# the `.env.github.secrets` file for `VERCEL_TOKEN`.
This will create a new Vercel project for us. If we refresh the Vercel dashboard in our browser we should see a blog-frontend project:

When we ran the vercel link command, it created a .vercel directory containing a project.json file. Let's grab the Vercel project ID and organisation ID from project.json and store them in our .env.github.variables file.
First, let's output the contents of the project.json file:
cat .vercel/project.json
Then let's update the following secrets in .env.github.secrets:
VERCEL_ORG_ID— Copy theorgIdvalue.VERCEL_PROJECT_ID- Copy theprojectIdvalue.
Now we can remove the .vercel directory as we no longer need it:
rm -r .vercel
Configure Auth0
Before we can deploy our front end app, we first need to set up a few things with Auth0. Let's log into our Auth0 account and get started.
Create an API and add user metadata to access tokens
If you followed the Build a secure web application with Platformatic, Auth0 and Next.js tutorial, the API and adding of user metadata are already configured in your account. You can move on to the next section: Create applications for preview and production authentication flows.
Our front end app integrates Auth0 for user authentication. Once a user is logged in, the requests that it makes to our Platformatic DB app's REST API include a JSON Web Token (JWT). Our Platformatic DB app verifies this JWT and extracts user metadata from it, such as the user's role and username. To make all of this work correctly, we need to create an API on Auth0 and and add user metadata to the Auth0 access tokens.
Follow these parts in our Build a secure web application tutorial, and then jump back here to continue with this tutorial:
We already have AUTH0_AUDIENCE=https://blog-api.dev defined in our .env.github.variables file, and we've set that as a varaible on our GitHub repository. It's ready for us to use a little later on when we extend our GitHub Actions workflows.
Create applications for preview and production authentication flows
We need to create and configure three applications in our Auth0 account. These will allow the authentication flows — signup, login and logout — to work with Auth0 in our preview and production blog apps.
If you've not created and configured an Auth0 application before, take a look at the Create an application steps in our Build a secure web application tutorial to learn how it works.
First, let's set up an Auth0 application to use with the preview deployments of our blog app:
- Create the application:
- Name: Blog preview apps
- Application type: Single Page Applications
- There are no settings to update, as we'll set the Application URIs dynamically when we deploy a preview app from our preview GitHub Actions workflow.
- Click on the application's Settings tab, then update the
.env.github.variablesfile with values from the Basic Information section:AUTH0_DOMAIN— Copy the Domain value.PLT_AUTHORIZATION_JWT_JWKS_ALLOWED_DOMAINS— Copy the Domain value and set the variable to:https://<THE_DOMAIN_VALUE>/AUTH0_BLOG_PREVIEW_APPS_CLIENT_ID— Copy the Client ID value.
Then let's set up an application to use with the production deployment of our blog app:
- Create the application:
- Name: Blog production
- Application type: Single Page Applications
- Click on the application's Settings tab, then update the
.env.github.variablesfile with values from the Basic Information section:AUTH0_BLOG_PRODUCTION_APP_CLIENT_ID— Copy the Client ID value.
Finally, let's set up an application that we can use to call the Auth0 Management API from our preview GitHub Actions workflow:
- Create the application:
- Name: Blog GitHub Actions
- Application type: Machine to Machine Applications
- Authorize the application:
- Select an API: Auth0 Management API
- Permissions:
read:clients,update:clients
- Click on the application's Settings tab, then update the variables and secrets files with values from the Basic Information section:
AUTH0_BLOG_GHA_CLIENT_IDin.env.github.variables— Copy the Client ID value.AUTH0_BLOG_GHA_CLIENT_SECRETin.env.github.secrets— Copy the Client Secret value.
Update GitHub repository variables and secrets
We've added a few new variables and secrets to our .env.github.* files. Let's set them on our GitHub repository so that they're available to our GitHub Actions workflows:
gh secret set --app actions --env-file .env.github.secrets --repos <YOUR_GITHUB_USERNAME>/blog

gh variable set --env-file .env.github.variables --repos <YOUR_GITHUB_USERNAME>/blog

# Replace <YOUR_GITHUB_USERNAME> in both commands with your actual GitHub username.
Create a new git branch
Before we start updating our GitHub Actions workflows to deploy our blog front end app, let's create a new Git branch:
git checkout -b configure-frontend-deployment
Configure deployment of the Next.js app
We're now ready to update our GitHub Actions workflows to deploy the front end app for our blog to Vercel.
Update the deploy-preview GitHub Actions workflow
If you want you can copy and paste the
deploy-preview.ymlconfiguration from the example repository and move on to the next section.
First, let's open up our deploy-preview.yml workflow. Then we'll add a new job between our existing build-and-deploy-api and comment-on-pr jobs:
# .github/workflows/deploy-preview.yml

jobs:
  build-and-deploy-api:
    # ...

  build-and-deploy-frontend:
    runs-on: ubuntu-latest
    outputs:
      vercel_app_url: ${{ steps.deploy-preview-frontend.outputs.vercel_app_url }}
    needs: build-and-deploy-api
    defaults:
      run:
        working-directory: blog-frontend
    env:
      VERCEL_ORG_ID: ${{ secrets.VERCEL_ORG_ID }}
      VERCEL_PROJECT_ID: ${{ secrets.VERCEL_PROJECT_ID }}
    steps:
      - name: Checkout application project repository
        uses: actions/checkout@v3

  comment-on-pr:
    # ...
We're pulling in the VERCEL_ORG_ID and VERCEL_PROJECT_ID secrets so we can add steps that use the Vercel CLI. We'll also be adding a step shortly to provide the value for the vercel_app_url job output.
Now let's add a couple of steps to install the Vercel CLI, and pull down the preview environment details for our Vercel project:
# .github/workflows/deploy-preview.yml

    steps:
      # ...

      - name: Install Vercel CLI
        run: npm install --global vercel@canary

      - name: Pull Vercel environment information
        run: vercel pull --yes --environment=preview --token=${{ secrets.VERCEL_TOKEN }}
Then we can add steps to build and deploy our Next.js front end app to the preview environment for our Vercel project:
# .github/workflows/deploy-preview.yml

    steps:
      # ...

      - name: Build front end artifacts
        run: vercel build --token=${{ secrets.VERCEL_TOKEN }}
        env:
          NEXT_PUBLIC_BLOG_API_ORIGIN: ${{ needs.build-and-deploy-api.outputs.platformatic_app_url }}
          NEXT_PUBLIC_AUTH0_DOMAIN: ${{ vars.AUTH0_DOMAIN }}
          NEXT_PUBLIC_AUTH0_CLIENT_ID: ${{ vars.AUTH0_BLOG_PREVIEW_APPS_CLIENT_ID }}
          NEXT_PUBLIC_AUTH0_AUDIENCE: ${{ vars.AUTH0_AUDIENCE }}
          NEXT_PUBLIC_AUTH0_SCOPE: ${{ vars.AUTH0_SCOPE }}

      - name: Deploy preview front end to Vercel
        id: deploy-preview-frontend
        run: |
          vercel_app_url=$(vercel deploy --prebuilt --token=${{ secrets.VERCEL_TOKEN }})
          echo "vercel_app_url=${vercel_app_url}" >> $GITHUB_OUTPUT
          echo "Deployed preview app to Vercel: ${vercel_app_url}"
We're passing in the configuration for our front end app as environment variables in the env block. There are a couple of environment variables worth highlighting:
NEXT_PUBLIC_BLOG_API_ORIGIN— We're setting this to the root URL for our Platformatic preview app's REST API (deployed by thebuild-and-deploy-apijob). Our front end app will use this when making requests to the REST API.NEXT_PUBLIC_AUTH0_CLIENT_ID— We're setting this to the Client ID for our Auth0 'Blog preview apps' application. This will be used by theAuth0Providercomponent in our front end app to integrate with Auth0.
Now let's update our comment-on-pr job so it will only run after both the build-and-deploy-api and build-and-deploy-frontend jobs have completed:
# .github/workflows/deploy-preview.yml

    comment-on-pr:
      permissions:
        pull-requests: write
      runs-on: ubuntu-latest
      if: ${{ always() }}
-     needs: build-and-deploy-api
+     needs: [build-and-deploy-api, build-and-deploy-frontend]
      steps:
        - name: Comment on pull request with preview URLs
And lastly, let's replace the message in our comment-on-pr job:
# .github/workflows/deploy-preview.yml

          message: |
            ### :writing_hand: Blog front end preview app
            ${{ needs.build-and-deploy-frontend.outputs.vercel_app_url }} (Vercel)

            ### :cloud: Blog API preview app
            ${{ needs.build-and-deploy-api.outputs.platformatic_app_url }} (Platformatic Cloud)

            ### :elephant: Blog branch database
            ${{ needs.build-and-deploy-api.outputs.neon_branch_url }} (Neon)
Now when we post a comment on the pull request it will include the blog front end preview app URL.
Configure front end preview apps to work with Auth0
We're going to create a script that calls the Auth0 Management API. We'll use this script to dynamically update the Application URIs settings for the Blog preview apps application every time we deploy a preview app. This will ensure that the authentication flows with Auth0 are functional on each preview app.
First, Let's make sure we're in the root directory of our project in our terminal, then let's create a new directory and change in to it:
mkdir -p .github/workflows/helpers

cd .github/workflows/helpers
Now, let's create a package.json file and install the Node.js client library for Auth0:
npm init --yes

npm install auth0
Then let's create a new file in the .github/workflows/helpers/ directory, named set-auth0-application-uris.mjs.
Now we can start building up our script:
// .github/workflows/helpers/set-auth0-application-uris.mjs

import { parseArgs } from 'node:util'

const options = {
  url: { type: 'string' },
  'auth0-domain': { type: 'string' },
  'auth0-gha-client-id': { type: 'string' },
  'auth0-gha-client-secret': { type: 'string' },
  'auth0-preview-apps-client-id': { type: 'string' }
}

const scriptArgs = parseArgs({ options })

for (let optionName of Object.keys(options)) {
  if (!(optionName in scriptArgs.values)) {
    throw new Error(`A '--${optionName} <value>' argument must be passed to this script`);
  }
}
Here we're using the Node.js parseArgs API to parse command-line arguments that we'll be passing to our script. If any of them are missing, we'll throw an error. When we call this script we'll be passing the front end preview app URL as the value of the url option.
Now let's import the Auth0 Node.js client at the top of our script:
// .github/workflows/helpers/set-auth0-application-uris.mjs

import { ManagementClient } from 'auth0'
And then, at the end of our script, let's create a new ManagementClient instance that connects to the Auth0 Management API via our Auth0 Blog GitHub Actions application:
// .github/workflows/helpers/set-auth0-application-uris.mjs

const auth0 = new ManagementClient({
  domain: scriptArgs.values['auth0-domain'],
  clientId: scriptArgs.values['auth0-gha-client-id'],
  clientSecret: scriptArgs.values['auth0-gha-client-secret'],
})
Now we can use the client instance to retrieve the Application URIs settings for our Auth0 Blog preview apps application:
// .github/workflows/helpers/set-auth0-application-uris.mjs

const client = await auth0.clients.get({
  client_id: scriptArgs.values['auth0-preview-apps-client-id'],
  fields: 'callbacks,allowed_logout_urls,web_origins'
})

const newAllowedUrl = scriptArgs.values.url

if (client.callbacks.includes(newAllowedUrl)) {
  console.log(`[SKIPPING] Application URIs for Auth0 Blog previews app already contain: ${newAllowedUrl}`)
  process.exit(0)
}
We've included a check here so that if the front end preview app URL — passed as the url option — already exists in the array of callbacks URLs, we'll exit the script.
Now, if it hasn't already been added, let's add the front end preview app URL to the Application URIs settings for our Auth0 Blog preview apps application:
// .github/workflows/helpers/set-auth0-application-uris.mjs

const updatedFields = {
  callbacks: [...client.callbacks, newAllowedUrl],
  allowed_logout_urls: [...client.allowed_logout_urls, newAllowedUrl],
  web_origins: [...client.web_origins, newAllowedUrl]
}

await auth0.clients.update(
  { client_id: scriptArgs.values['auth0-preview-apps-client-id'] },
  updatedFields
)

console.log(`Added to Application URIs for Auth0 Blog previews app: ${newAllowedUrl}`)
Finally, let's add a couple of steps to the build-and-deploy-frontend job in our preview GitHub Actions workflow that use this new script:
# .github/workflows/deploy-preview.yml

  build-and-deploy-frontend:
    # ...
    steps:
      # ...

      - name: Set up Node.js
        uses: actions/setup-node@v3
        with:
          node-version: 18

      - name: Update Application URIs for Auth0 Blog previews application
        working-directory: .github/workflows/helpers
        run: |
          npm install --silent
          node set-auth0-application-uris.mjs \
            --url ${{ steps.deploy-preview-frontend.outputs.vercel_app_url }} \
            --auth0-domain '${{ vars.AUTH0_DOMAIN }}' \
            --auth0-gha-client-id '${{ vars.AUTH0_BLOG_GHA_CLIENT_ID }}' \
            --auth0-gha-client-secret '${{ secrets.AUTH0_BLOG_GHA_CLIENT_SECRET }}' \
            --auth0-preview-apps-client-id '${{ vars.AUTH0_BLOG_PREVIEW_APPS_CLIENT_ID }}'
The first step sets up Node.js so that we're able to run scripts with it. The second step then uses node to run our set-auth0-application-uris.mjs script, passing in the front end preview app URL and the Auth0 configuration that our script requires.
Deploy a preview of the blog app
We're now ready to commit our changes, open a pull request, and deploy a complete preview of our blog app stack. It will now include:
- a Platformatic preview app for our Platformatic DB app (
blog-api) - a Neon branch database for our Platformatic DB app to connect to
- a Vercel preview app for our Next.js application (
blog-frontend)
First, let's change back to the root directory of our project:
cd ../../..
Then let's add, commit and push our changes with Git:
git add .github/workflows/deploy-preview.yml
git add .github/workflows/helpers/

git commit --message "Add front end deployment to deploy-preview GitHub Actions workflow"

git push --set-upstream origin configure-frontend-deployment
And open a pull request for our configure-frontend-deployment branch on GitHub.
Once we've opened the pull request, we can click on the Actions tab on our GitHub repository, where we should see the preview workflow running.
Once the workflow has completed successfully, we should see a comment on our pull request that includes the URL for our Blog front end preview app:

Now that we have a full preview of our blog app deployed, it's time to give it a test.
Test the preview blog app
We're going to test our blog app by loading up the blog front end app, creating an account and posting a new blog post.
First, let's click on the Blog front end preview app link in the comment on our pull request. Then let's click on the Login button:

On the Auth0 login page, let's click on the Sign up link (under the Continue button). Then let's enter our email address and a password for our test account. We can then click Continue to create the account.
On the Auth0 Authorize App page, let's click the Accept button. We should then be redirected back to our blog app home page, where we can now see that we're logged in:
Let's click on the Write new post button, fill out the Write new post form, and click on the Publish post button.
We should now see the blog post that we just published displaying on our blog home page, like this:
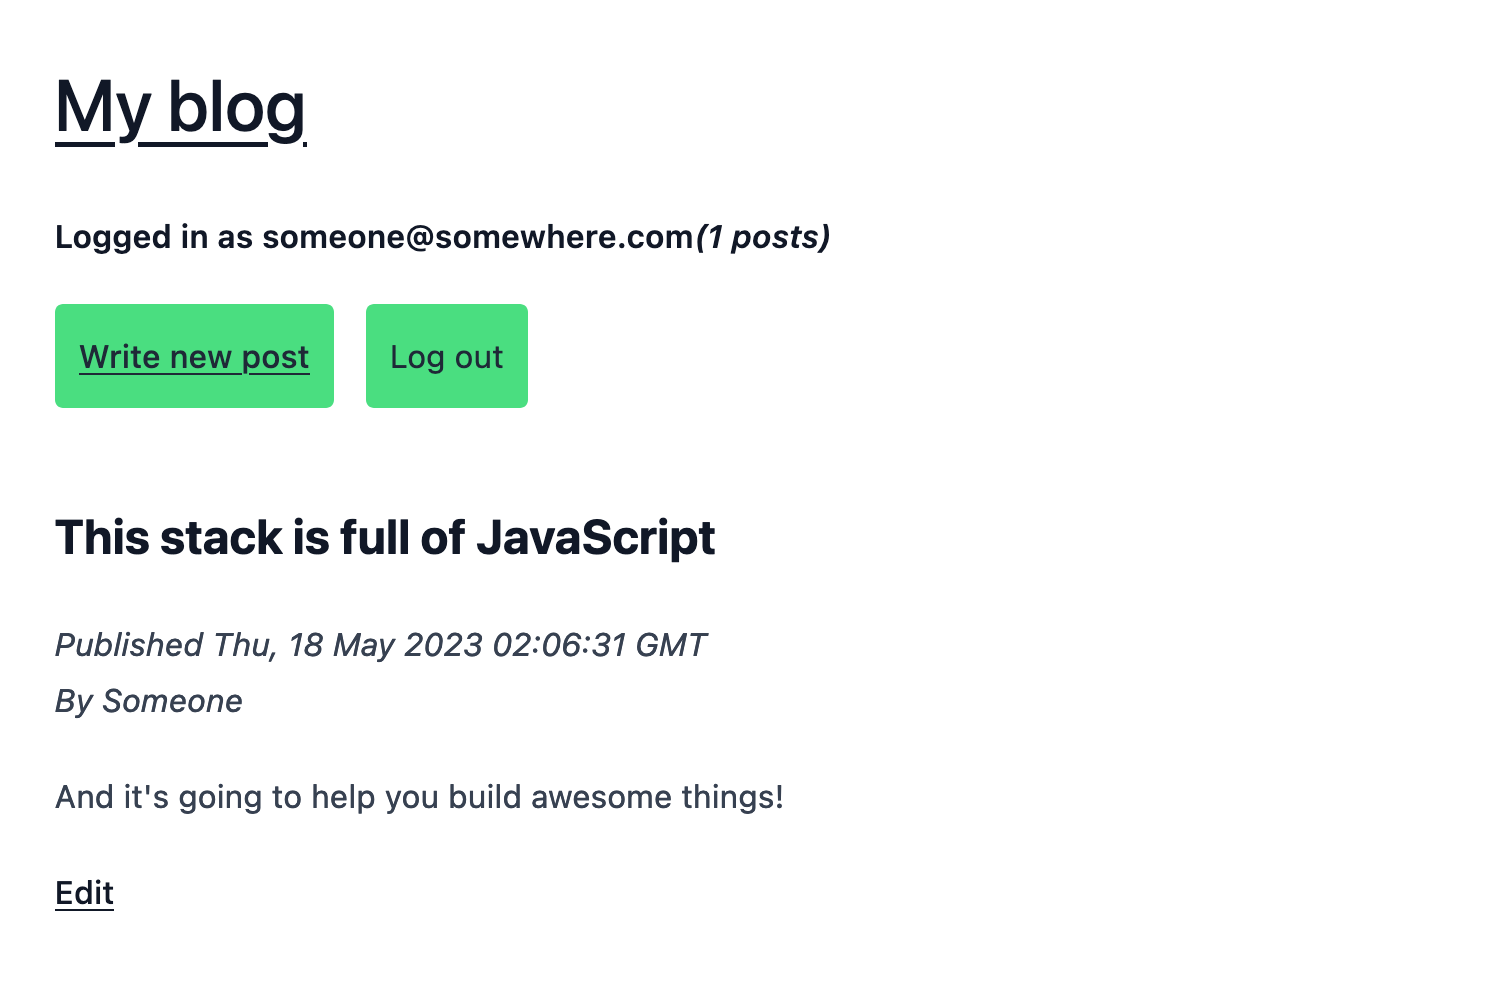
The preview of our blog app is working great!
Update the deploy-production GitHub Actions workflow
The final step in updating our workflows, is to configure the deployment of our front end app to the production environment for our Vercel project.
We can do this by adding a complete build-and-deploy-frontend job to our deploy-production.yml workflow:
# .github/workflows/deploy-production.yml

jobs:
  # ...

  build-and-deploy-frontend:
    runs-on: ubuntu-latest
    needs: build-and-deploy-api
    defaults:
      run:
        working-directory: blog-frontend
    env:
      VERCEL_ORG_ID: ${{ secrets.VERCEL_ORG_ID }}
      VERCEL_PROJECT_ID: ${{ secrets.VERCEL_PROJECT_ID }}
    steps:
      - name: Checkout application project repository
        uses: actions/checkout@v3

      - name: Install Vercel CLI
        run: npm install --global vercel@canary

      - name: Pull Vercel Environment Information
        run: vercel pull --yes --environment=production --token=${{ secrets.VERCEL_TOKEN }}

      - name: Build front end artifacts
        run: vercel build --prod --token=${{ secrets.VERCEL_TOKEN }}
        env:
          NEXT_PUBLIC_BLOG_API_ORIGIN: ${{ needs.build-and-deploy-api.outputs.platformatic_app_url }}
          NEXT_PUBLIC_AUTH0_DOMAIN: ${{ vars.AUTH0_DOMAIN }}
          NEXT_PUBLIC_AUTH0_CLIENT_ID: ${{ vars.AUTH0_BLOG_PRODUCTION_APP_CLIENT_ID }}
          NEXT_PUBLIC_AUTH0_AUDIENCE: ${{ vars.AUTH0_AUDIENCE }}
          NEXT_PUBLIC_AUTH0_SCOPE: ${{ vars.AUTH0_SCOPE }}

      - name: Deploy production front end to Vercel
        run: vercel deploy --prebuilt --prod --token=${{ secrets.VERCEL_TOKEN }}
This is very similar to the build-and-deploy-frontend job in our preview workflow. The main difference is that when we're running commands with the Vercel CLI, we're telling it to create a production build of our front end app, and to then deploy it to the production environment.
Deploy the blog to production
We're now going to deploy our blog app to production. Let's add, commit and push our production workflow changes with Git:
git add .github/workflows/deploy-production.yml
git commit --message "Add front end deployment to deploy-production GitHub Actions workflow"

git push origin configure-frontend-deployment
Then let's merge our pull request on GitHub. Once we've merged it, we should see our production and cleanup GitHub Actions workflows running under our repository's Actions tab.
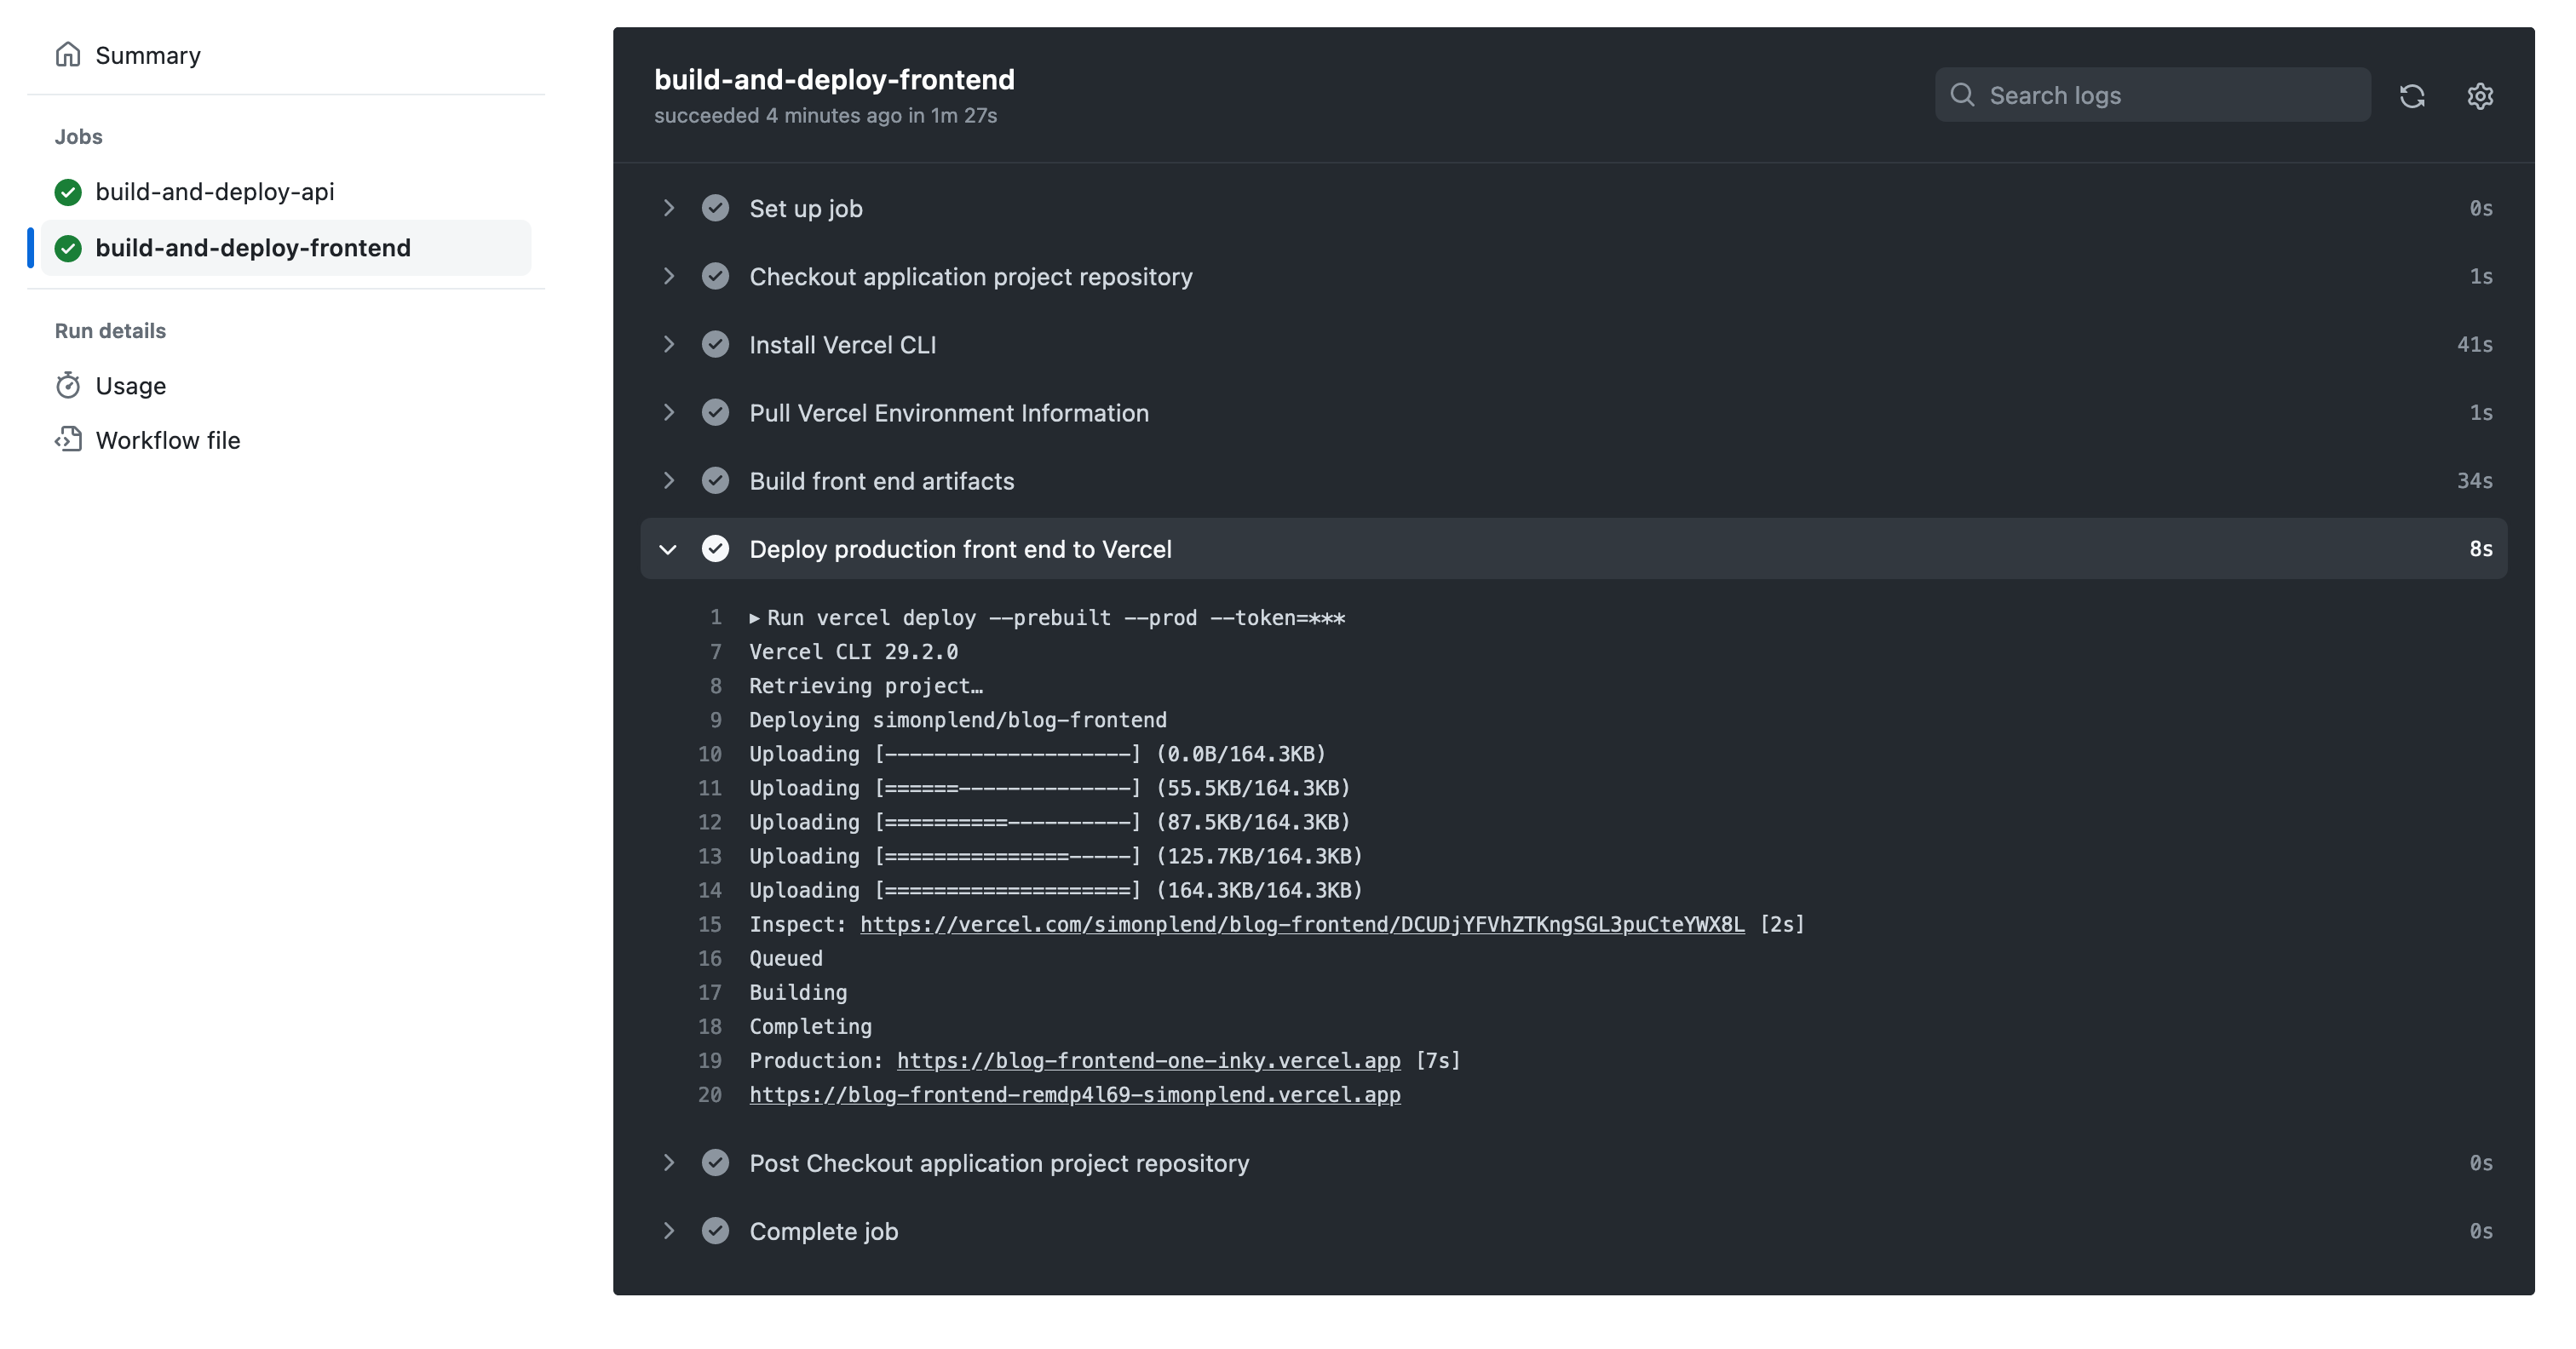
Now we need to configure our Auth0 Blog production application to work with our production front end app. First, let's grab our blog's production URL from the production workflow run:
- Click on the
Deploy production blog appworkflow run, and then on thebuild-and-deploy-frontendjob. - Click to expand the logs for the Deploy production front end to Vercel step.
- Copy the URL after
Production:at the end of the log output.
Now, let's head over to our Auth0 account and open up the Settings tab for our Blog production application. Then we can scroll down to the Application URIs section, and paste in our blog's production URL for the following settings:
- Allowed Callback URLs
- Allowed Logout URLs
- Allowed Web Origins
Then let's scroll down to the bottom of the page and click the Save Changes button.
Now that we have everything configured, we can open up our blog's production URL in our browser to access the production deployment of our blog. To check that everything's working as expected, we can repeat the steps that we followed to test the preview blog app.
Finally, let's bring our local Git repository's main branch up-to-date:
git checkout main

git pull
And we're done!
Wrapping up
You can find all of the code for this tutorial on GitHub. If you've followed it through step-by step, you should now have fully automated preview and production deployments for your blog app, powered by GitHub Actions.
When we combine Platformatic open-source tools and Platformatic Cloud, we have a powerful workflow for building, deploying and hosting our Node.js applications. We also have the freedom to use any CI/CD provider that we choose, such as GitHub Actions, GitLab CI/CD or CircleCI.
Get started with Platformatic:
- Build robust Node.js apps with our open-source tools
- Deploy your apps with Platformatic Cloud Free
- Join our community on Discord