Fastify Fundamentals: Building Your First Route

Fastify is a robust framework for Node.js developers to build neat, secure, and scalable applications. It has internal infrastructure to help with logging, testing, and error handling.
In this blog, we will teach you how to use factories and plugins, and how to handle environment variables while building your applications.
By the end of this tutorial, you will have built your first Fastify route and should better understand how Fastify works.
How to Build Your First Route: Fastify Quickstart
Let’s start by building our first route.
Step 1: Install the Package
Create an app folder, initialize a Node project and install a Fastify package by running the below code in your terminal:
mkdir app
cd app
npm init -y
npm i fastify
Step 2: Create a Server
Create a file named server.js and paste the code below into the file:
import fastify from 'fastify'

const app = fastify()

app.get('/', async (request, reply) => {
  return { hello: 'world' }
})

app.listen({ port: 3000 })
Step 3: Testing the Route
To test the route, run the curl command below in the terminal:
curl http://localhost:3000
There is more to Fastify than the quickstart above– read on to discover more complex development actions you can implement.
Pino
Pino, the fastest logger for Node.js, provides the logging functionality for Fastify. Maintained by four collaborators, Pino boasts of 22 million average monthly downloads.
Below is a demo of how Pino works:
import pino from "pino";

const logger = pino()

logger.info('hello world')

const child = logger.child({ a: 'property' })
child.info('hello child!')

// This Produces
//
// {"level":30,"time":1531171074631, "pid":77632, "hostname":"mcl", "msg":"hello world"}
// {"level":30,"time":1531171082399, "pid":77632,"hostname":"mcl, "msg":"hello child!","a":"property", "msg":"hello child!"}
Pino makes it easy to create loggers and child loggers. It can be enabled in Fastify simply, as shown below:
import fastify from 'fastify'

const app = fastify({ logger: true })

app.get('/', async (request, reply) => {
  return { hello: 'world' }
})

app.listen({ port: 3000 })

// This Produces
//
// {"level":30,"time":1531171074631, "pid":77301, "hostname":"mcl", "msg":"Server listening at http://[::1]:3000"}
// {"level":30,"time":1531171082399, "pid":77301,"hostname":"mcl, "msg":"Server listening at http://127.0.0.0:3000"}
While this output is correct, it may be considered hard to read. An alternative is to use the pino-pretty package, which improves the log output.
To use pino-pretty, install the package by running the command in the terminal.
npm i pino-pretty
import fastify from 'fastify'

const opts = {
  logger: true
}

// We want to use pino-pretty only if there is a human watching this,
// otherwise, we log as newline-delimited JSON.
if (process.stdout.isTTY) {
  opts.logger = { transport: { target: 'pino-pretty' } }
}

const app = fastify(opts)

app.get('/', async (request, reply) => {
  return { hello: 'world' }
})

app.listen({ port: 3000 })
When the terminal is started, the output message is much more verbose. However, if a human does not read the logs in the terminal, they should be logged in JSON format.

The way Pino is set up makes it easy to handle the system's failure mode. The transport runs in a separate thread, making asynchronous processing easy even if the system crashes.
Notably, the @fastify/one-line-logger package is an alternative logger to Pino in the Fastify ecosystem. This is also an easy-to-use way to make logs more compact and can be integrated by replacing the target with @fastify/one-line-logger rather than pino-pretty.
Security By Default
An important feature of Fastify is its security.
By default, it only listens to the ports 127.0.0.1 and :1 (if both are available). However, it can be made available on all ports by setting the host option to 0.0.0.0. This is important if the app is to be run on cloud-based environments or Docker.
You can run Fastify with Docker by copying the code below and pasting it into your Docker file.
FROM node:18-alpine

# Create app directory
WORKDIR /usr/src/app

# Basic deps for Node.js
RUN apk update && apk add --no-cache dumb-init python3 libc-dev make g++

# Install app dependencies
COPY package*.json ./
RUN npm ci --only=dev

# Copy app source code
COPY . .

EXPOSE 3000
ENTRYPOINT ["dumb-init"]
CMD [ "node", "server-all-addresses.js" ]
Using Factories
It is not possible to write all the code in a single file. However, using factories allows further reusability and testing.
Let’s refactor the route. Start by creating a new file called app.js, then cut the get route from the server.js file and paste it into the app.js file. The app.js file looks like this:
Let’s refactor the route. Start by creating  a new file called app.js, then cut the get route from the server.js file and paste it into the app.js file. The app.js file looks like this:
import fastify from 'fastify'

export async function build (opts = {}) {
  const app = fastify(opts)

  app.get('/', async (request, reply) => {
    return { hello: 'world' }
  })
  return app
}
Then, import the build function from the app.js and import and call it into the server.js file.
import { build } from './app.js'

const opts = {
  logger: {
    level: 'info'
  }
}

// We want to use pino-pretty only if there is a human watching this,
// otherwise we log as newline-delimited JSON.
if (process.stdout.isTTY) {
  opts.logger.transport = { target: 'pino-pretty' }
}

const app = await build(opts)
await app.listen({ port: 3000, host: '0.0.0.0' })
Testing
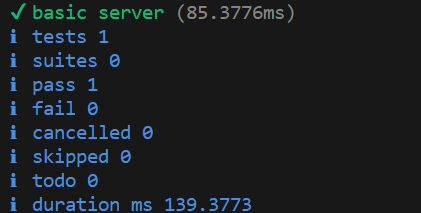
Testing is an important stage of application building. Although Fastify includes an embedded “inject” method for fast testing, we will use the node:assert and node:test modules to test our route.
import test from 'node:test'
import {equal, deepEqual} from 'node:assert/strict'
import { build } from './app.js'

test('basic server', async (t) => {
  const app = await build()
  t.after(async () => {
    await app.close()
  })

  const response = await app.inject({
    method: 'GET',
    url: '/'
  })

  equal(response.statusCode, 200)
  equal(response.headers['content-type'], 'application/json; charset=utf-8')
  deepEqual(response.json(), { hello: 'world' })
})
The below result is obtained when the test is run.
Note that the content type for the JSON includes a charset. This is important, particularly if the app will be used in countries like China and Japan as it will affect the character output. Although a few frameworks remove this to save bytes, it is not good practice.
Shutting Down Processes
There are two ways of crashing an application. The first is to crash as badly as possible, while the second is to do a graceful shutdown.
Shutting down an application gracefully is required for business continuity. Fastify allows you to do so in a way that makes sense by stopping accepting new connections and working to close all outstanding keep-alive connections before exiting the process.
A graceful shutdown means the app keeps responding to as many requests as possible while breaking as few users as possible.
There is a special module to help achieve this: close-with-grace.
Run the command below to install the package:
npm i close-with-grace
Below is a demo of how to integrate the package with our Fastify application.
import { build } from './app.js'
import closeWithGrace from 'close-with-grace'

const opts = {
  logger: {
    level: 'info'
  }
}

// We want to use pino-pretty only if there is a human watching this,
// otherwise we log as newline-delimited JSON.
if (process.stdout.isTTY) {
  opts.logger.transport = { target: 'pino-pretty' }
}

const app = await build(opts)
await app.listen({ port: 3000, host: '0.0.0.0' })

closeWithGrace(async ({ signal, err }) => {
  if (err) {
    app.log.error({ err }, 'server closing due to error')
  } else {
    app.log.info(`${signal} received, server closing`)
  }
  await app.close()
})
When the app starts and is closed by hitting CTRL + C button, the output below is logged to the terminal:

Close-with-grace has a couple of other options, including the delay option, which allows you to specify the time required for the application to shut down. The default delay is 10 seconds.
Adding .env Support
The best way to configure your application is by using a .env file. The .env file allows for local configuration and remote control.
Best practice entails never committing a .env file. Instead, a .env.sample file containing the sample of the secrets is what should be committed. A more strict implementation of this pattern is the env-schema.
Let’s look at a demo of how to load secrets from a .env file in our Fastify app.
First, install the dotenv package:
npm i dotenv
Create a .env file and paste the following keys and values.
HOST = 0.0.0.0
PORT = 3042
Now in the server.js file import the .env file and initialize it at the top of the code as shown below:
import dotenv from "dotenv"

dotenv.config()
Then edit the app and the listen method to include the secrets as shown below:
const port = process.env.PORT || 3000
const host = process.env.HOST || '127.0.0.1'

const app = await build(opts)
await app.listen({ port, host })
It’s important to use the OR statement so that if a secret is missing, the application defaults to the other provided value. We wrote this blog to enhance your knowledge of handling environment variables.
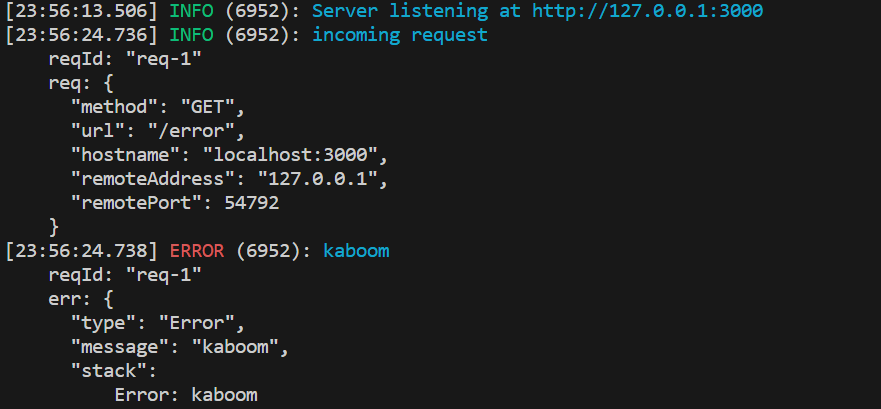
Handling Errors
Error handling is another important aspect of development. It is important to handle errors appropriately to prevent the application from disclosing sensitive information.
To handle errors, use an error handler as shown below:
 app.get('/error', async (request, reply) => {
    throw new Error('kaboom')
  })

  app.setErrorHandler(async (err, request, reply) => {
    request.log.error({ err })
    reply.code(err.statusCode || 500)

    return {error: err.message}
  })
The handler logs the error and sets its status code to 500. Then it returns the error message. If a request is sent to the error URL, it returns the response given below:
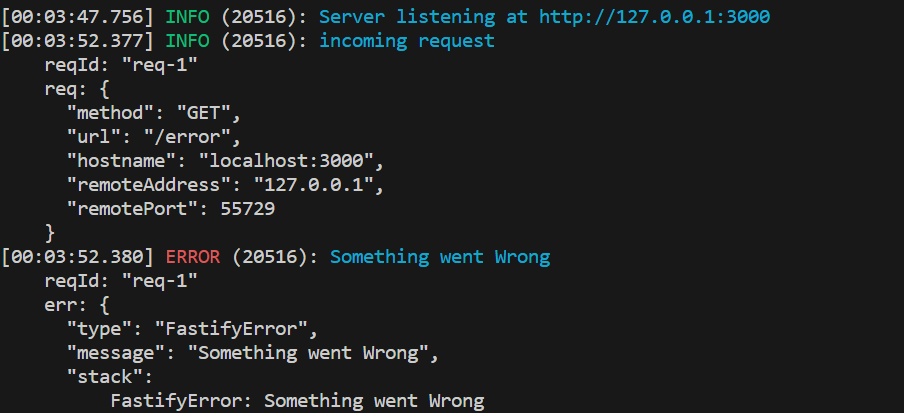
Another error handler package that can be used is the @fastify/error package. To use it, install the package by running the command:
npm i @fastify/error
Import the package into the server.js file and create the error handler. Then call the error handler within the error route as shown below:
import createError from '@fastify/error'

const KaboomError = createError('KaboomError', 'Something went Wrong', 501)

app.get('/error', async (request, reply) => {
    throw new KaboomError()
  })
When a request is sent to the error route, the error below is obtained.
However, this will not work if you call the function within any operation that is outside the promise chain such as setTimeout.
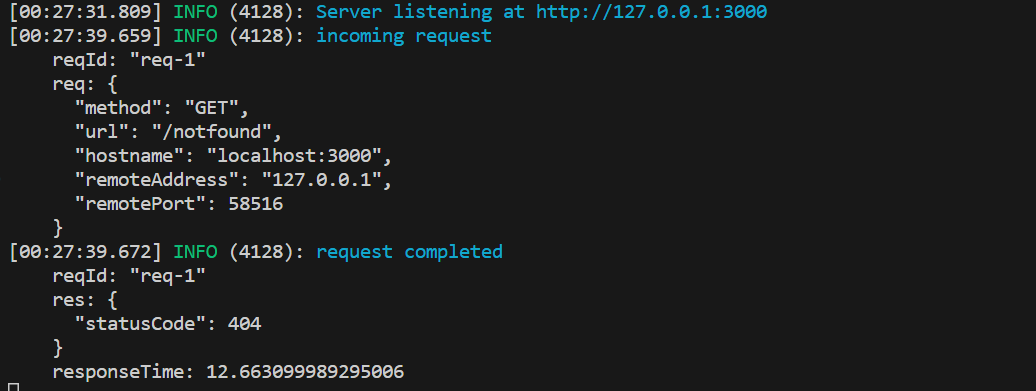
Handle Not Found
The Not Found handler is automatically invoked when a route is not matched. It can also be manually set by invoking the ‘reply.callNotFound()’. Below is a demo of how to set the Not Found handler:
app.get('/notfound', async (request, reply) => {
    reply.callNotFound()
  })
app.setNotFoundHandler(async (request, reply) => {
    reply.code(404)
    return "I'm sorry, I couldn't find what you were looking for."
  })
Thus, if the server is started and a request is sent to the notfound route, it returns the response shown below:
Plugins
You can refactor the routes declared in a route folder and register them as plugins in the app.js file.
For instance, we can create a new folder called route and a file called route.js, and paste the error route there as shown below. Then we can also add the first line to enable autocompletion on the app.
/** @type {import('fastify').FastifyPluginAsync<> }  */
import createError from '@fastify/error'

const KaboomError = createError('KaboomError', 'Something went Wrong', 501)

export default function error (app, opts) {
 app.get('/error', async (request, reply) => {
    throw new KaboomError()
  });
}
In the server file, the error route can be registered as a plugin as shown below:
import error from './routes/error.js';


….//some code here
....
app.register(error);
Wrapping Up
In this article, we have seen an overview of Fastify’s core features, particularly its built-in infrastructure for logging and how it handles environment variables.
We also discussed the best practices Fastify provides for and supports, such as graceful shutdown processes. Notably, you have learned how to handle errors properly whenever you are building applications with Fastify.
Supercharging Fastify Development with Platformatic
Developed by the co-creator of Fastify, Platformatic is a backend development platform designed to extend the capabilities of the Fastify web framework. Together, Platformatic and Fastify offer:
Developer-centric design
Real-time metrics
A vast plugin ecosystem
Built-in validation and serialization
Built-in logging